
Império Novo - An Axis Portugal AAR
- Thread starter Rensslaer
- Start date

-
We have updated our Community Code of Conduct. Please read through the new rules for the forum that are an integral part of Paradox Interactive’s User Agreement.
You are using an out of date browser. It may not display this or other websites correctly.
You should upgrade or use an alternative browser.
You should upgrade or use an alternative browser.
Send them to the Far East to finish off the Dutch.
Finally the British ai send real ships to sink your transports. Egypt does look like a redline. You could do with the Italians doing something to help. Perhaps, the Italians will, now that you've taken out the British in east and south africa.
Finally the British ai send real ships to sink your transports. Egypt does look like a redline. You could do with the Italians doing something to help. Perhaps, the Italians will, now that you've taken out the British in east and south africa.
I say send them to clear out the Dutch, with the Royal navy "finally" getting their heads out of their ehm.. behinds  things might get difficult around africa (whats left of it).
And with the threat of Australia you need to clear things up quickly around their islands.
things might get difficult around africa (whats left of it).And with the threat of Australia you need to clear things up quickly around their islands.
Put it in Indonesia, and finish the dutch before the Japs arrive. And get Philly once they're in the war?
Puppeting Australia and New Zealand would be nice too.
Puppeting Australia and New Zealand would be nice too.
Take over Arkansas so I can proudly say "My homeland was ruled by the mighty Portugese"!
As always, Portugal has need of more convoy transports – we’re not losing them anywhere near as quickly as we’re sinking the British merchant marine, but we can also afford the losses nowhere near as easily. I wonder how well we’re doing, compared to the German U-Boats.
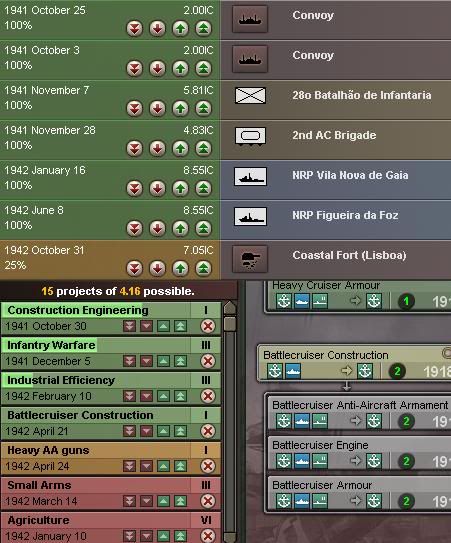
We’re building more armored cars. They’ve proved effective as fast scouts in Africa, and we need more heavily armored troops as we begin to connect with more powerful enemy units. As of now, the armored cars are our “light tanks”, not to mention the only troops that use Fuel. Two more heavy cruisers are in the docks, and we’re slowly building a Fort at Lisbon (I think this is level 2) to give us an edge against possible invasion.
The Construction Engineering tech will allow us to build Infrastructure once we achieve it. I don’t remember exactly where I’d wanted to build it, but I obviously felt there was a need. Supply is less a problem for me than speed of transport, considering how few units I have, relative to the empire I command.
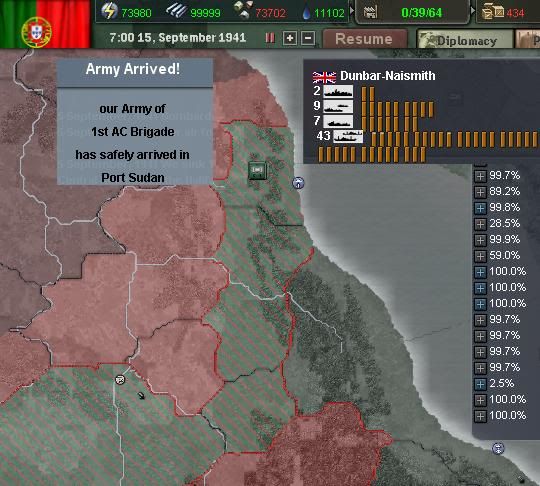
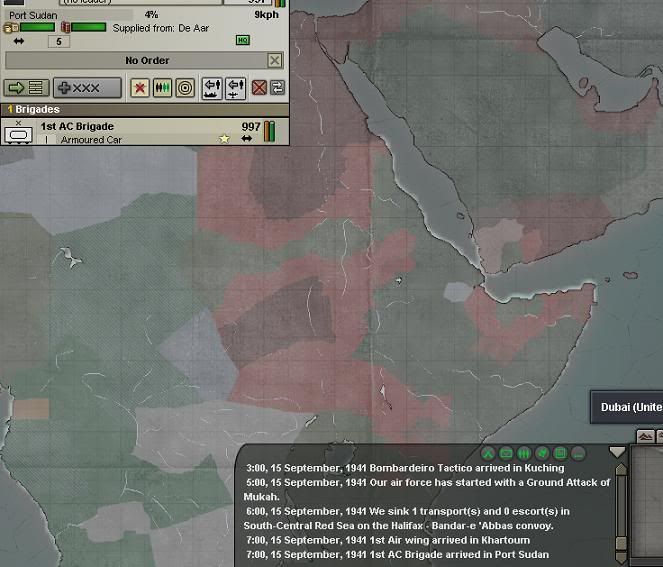
Those armored cars in Sudan, by the way, have reached Port Sudan, where they flushed a covey of British cruisers, destroyers and 2 battleships. Plus, look at all those transports with nothing to transport! Wow.
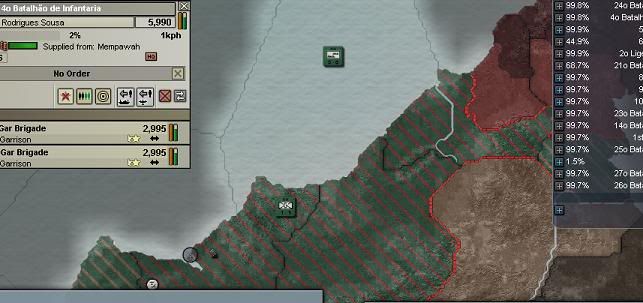
The screenshot below shows you our progress through Africa. The Belgian Congo (aka Zaire today) was split between us and Germany (who controls the rest now) when Belgium surrendered to them. Just one province of Free French territory to the south, plus French Chad up north remains unconquered. I suppose maybe that’s not Free French at all, but rather Vichy, which is why I didn’t conquer it on the way through that area.
You can see our “armored car bridge” across the waist of Africa to the Red Sea. That’s a barrier to any supply to British units remaining in central Africa, which as far as I can tell is just one or two divisions now. The Brits (Bifes – thanks Poloport!) have no coastal provinces remaining except for a tiny stretch of Kenyan coastline which I don’t think even has a port, and those few remaining provinces of British Somaliland which are blocked from communicating with the rest of Africa by Italian Ethiopia..
The main thing you can’t see in the above screenshot is that I now am in a race with the Italians! Gen. Rossi has struck out across the desert plains of Egypt, and has reached Matruh. They’re half-way to Cairo and Alexandria already, and I have a long way to go!
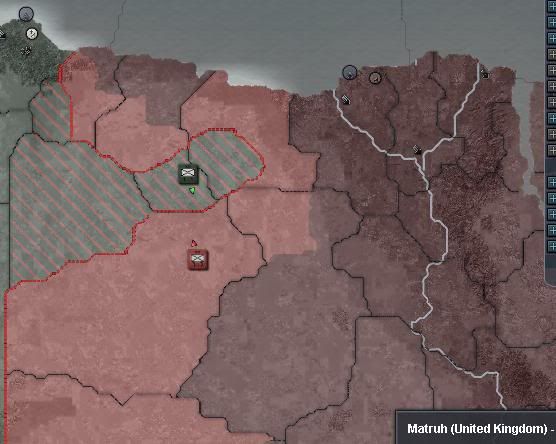
I WANT that territory, darn it! And the Italians didn’t make a move until they realized the British were paper tigers. The only reason they’re moving now is because I exposed them for the weaklings they are. And I absolutely do not want timid Italy controlling such a key port and strategic location. Grr…. Rush! Rush!
We’d be making more northerly progress if it weren’t for this pesky remaining division of British infantry in Kenya. In late September, I finally defeat them, and we all head north to mop up the remaining provinces between us and Egypt.

We continue to sink incredible amounts of shipping in the Red Sea. Like shooting fish in a barrel, Chita and her compatriots are flying round-the-clock missions, and racking up quite a score. There aren’t many other ways to get anything from India to the British Isles. The Red Sea is still shorter than the Cape of Good Hope route, and most of their convoys still go through there. Notice, though, that not only does the South African navy still have ships, but they’re still hanging out where I don’t want them. My transports shelter in Durban while they pass by.
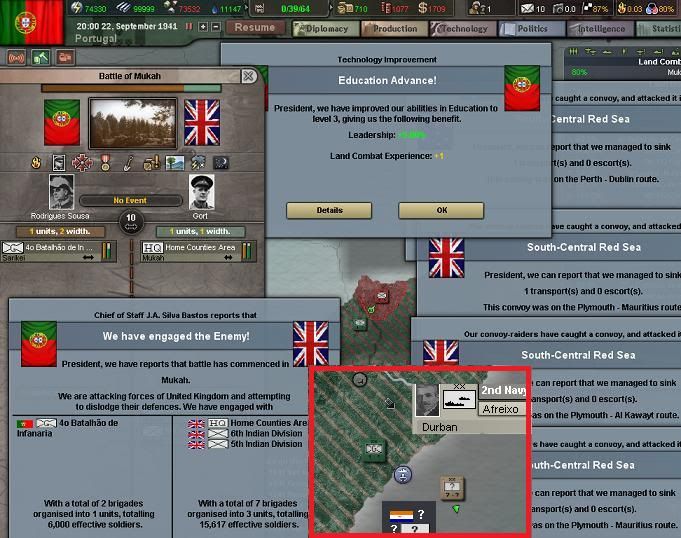
Back in Borneo, site of one of our most desperate early struggles, we are finally finishing off the last British defenders there, who have been starved out, more or less, for more than a year. Notice that there are two divisions and an HQ brigade stuck in that tiny pocket, but since they were recently defeated, the infantry divisions are in no shape to fight – they’ve taken shelter in the rear areas behind the HQ.
As you can expect, that final battle lasted about a week’s time. The last British defenders in Borneo offer their surrender on the 2nd of October, 1941. Just in time for me to turn my attention to the remaining Dutch territory in the East Indies, and the new threat of Australia.
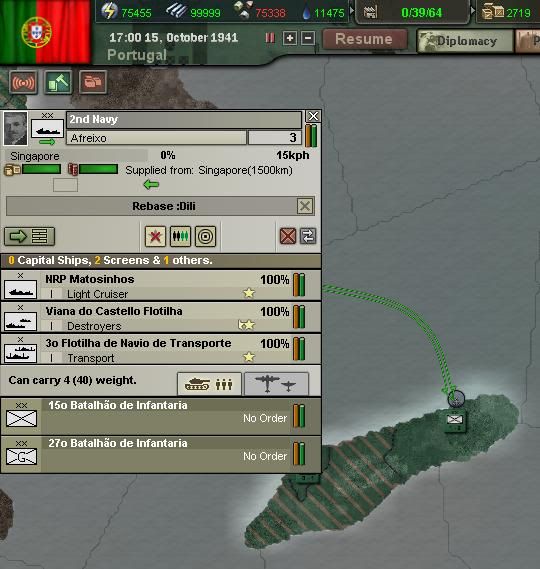
Those newly trained troops from Portugal? They’ve finally arrived in Dili, in Timor. There’s lots of Dutch territory still to take over, plus I’d love to be able to make progress against the islands in Australia’s possession without denuding my ports of defenders.
This also places two cruisers and a destroyer flotilla in the region – the majority of my naval force.
Taking a chance, I’ve been using my garrisons on both the northern and southern coasts of New Guinea to advance, but then they’re running back to their home port to protect it. I don’t know how much audacity the Australians might have – perhaps more than the British!
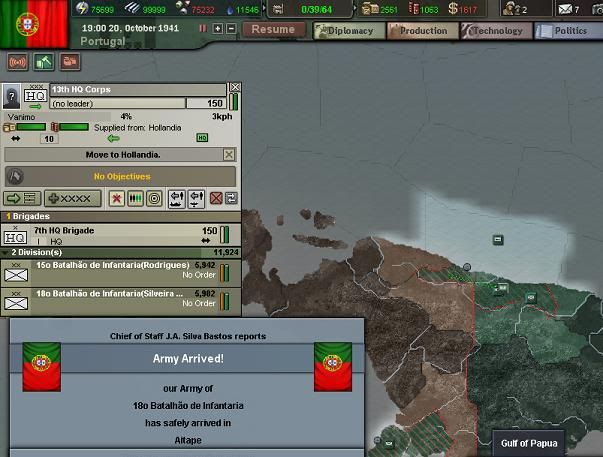
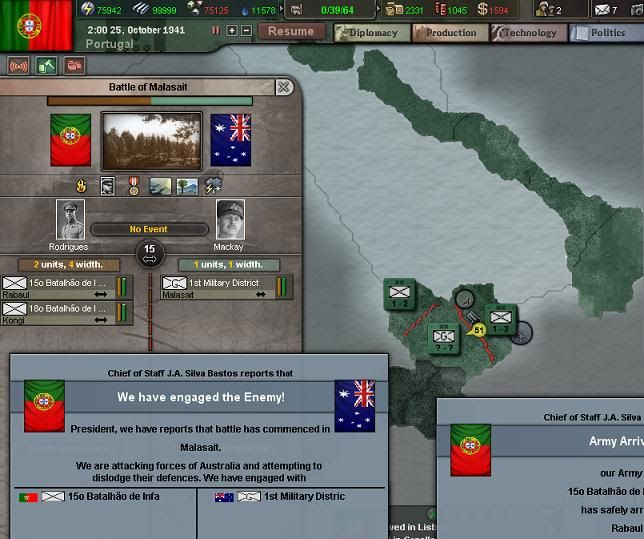
At the end of October, I land the 18th Infantry at Kongi, along the coast of New Britain. The Australians, probably thinking we were short on forces in the region, gambled that I couldn’t follow up by invading Rabaul, and so they moved across the island to attack my beachhead. Unfortunately for them, they didn’t count on the newly recruited 15th Infantry (actually, I think the 15th has been around a while – I probably let the newly recruited garrison stay home in place of one of the infantry divisions I’d had sitting around Lisbon for a while), which lands at Rabaul and immediately engages this garrison.
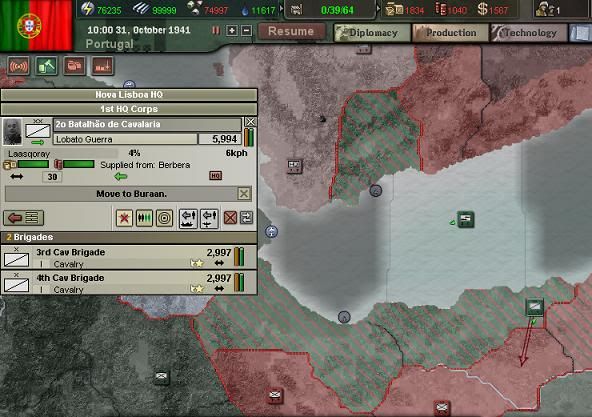
Moving back to the Red Sea region for a moment, now that the British have been forced out of Port Sudan, we take a gamble of our own. We bring another division and another transport from Durban and begin trying to do the leapfrog thing along the Somaliland and Adenese coasts again. This is doubly risky, I discover, considering there are two British divisions hanging out here.
I consider what other forces I might bring in to make this a successful strategy. Is it worth giving up on Egypt to get this territory? Hardly, I figure. But I do have more than enough units in Africa, so I go in search of one with nothing to do.
We’re building more armored cars. They’ve proved effective as fast scouts in Africa, and we need more heavily armored troops as we begin to connect with more powerful enemy units. As of now, the armored cars are our “light tanks”, not to mention the only troops that use Fuel. Two more heavy cruisers are in the docks, and we’re slowly building a Fort at Lisbon (I think this is level 2) to give us an edge against possible invasion.
The Construction Engineering tech will allow us to build Infrastructure once we achieve it. I don’t remember exactly where I’d wanted to build it, but I obviously felt there was a need. Supply is less a problem for me than speed of transport, considering how few units I have, relative to the empire I command.
Those armored cars in Sudan, by the way, have reached Port Sudan, where they flushed a covey of British cruisers, destroyers and 2 battleships. Plus, look at all those transports with nothing to transport! Wow.
The screenshot below shows you our progress through Africa. The Belgian Congo (aka Zaire today) was split between us and Germany (who controls the rest now) when Belgium surrendered to them. Just one province of Free French territory to the south, plus French Chad up north remains unconquered. I suppose maybe that’s not Free French at all, but rather Vichy, which is why I didn’t conquer it on the way through that area.
You can see our “armored car bridge” across the waist of Africa to the Red Sea. That’s a barrier to any supply to British units remaining in central Africa, which as far as I can tell is just one or two divisions now. The Brits (Bifes – thanks Poloport!) have no coastal provinces remaining except for a tiny stretch of Kenyan coastline which I don’t think even has a port, and those few remaining provinces of British Somaliland which are blocked from communicating with the rest of Africa by Italian Ethiopia..
The main thing you can’t see in the above screenshot is that I now am in a race with the Italians! Gen. Rossi has struck out across the desert plains of Egypt, and has reached Matruh. They’re half-way to Cairo and Alexandria already, and I have a long way to go!
I WANT that territory, darn it! And the Italians didn’t make a move until they realized the British were paper tigers. The only reason they’re moving now is because I exposed them for the weaklings they are. And I absolutely do not want timid Italy controlling such a key port and strategic location. Grr…. Rush! Rush!
We’d be making more northerly progress if it weren’t for this pesky remaining division of British infantry in Kenya. In late September, I finally defeat them, and we all head north to mop up the remaining provinces between us and Egypt.
We continue to sink incredible amounts of shipping in the Red Sea. Like shooting fish in a barrel, Chita and her compatriots are flying round-the-clock missions, and racking up quite a score. There aren’t many other ways to get anything from India to the British Isles. The Red Sea is still shorter than the Cape of Good Hope route, and most of their convoys still go through there. Notice, though, that not only does the South African navy still have ships, but they’re still hanging out where I don’t want them. My transports shelter in Durban while they pass by.
Back in Borneo, site of one of our most desperate early struggles, we are finally finishing off the last British defenders there, who have been starved out, more or less, for more than a year. Notice that there are two divisions and an HQ brigade stuck in that tiny pocket, but since they were recently defeated, the infantry divisions are in no shape to fight – they’ve taken shelter in the rear areas behind the HQ.
As you can expect, that final battle lasted about a week’s time. The last British defenders in Borneo offer their surrender on the 2nd of October, 1941. Just in time for me to turn my attention to the remaining Dutch territory in the East Indies, and the new threat of Australia.
Those newly trained troops from Portugal? They’ve finally arrived in Dili, in Timor. There’s lots of Dutch territory still to take over, plus I’d love to be able to make progress against the islands in Australia’s possession without denuding my ports of defenders.
This also places two cruisers and a destroyer flotilla in the region – the majority of my naval force.
Taking a chance, I’ve been using my garrisons on both the northern and southern coasts of New Guinea to advance, but then they’re running back to their home port to protect it. I don’t know how much audacity the Australians might have – perhaps more than the British!
At the end of October, I land the 18th Infantry at Kongi, along the coast of New Britain. The Australians, probably thinking we were short on forces in the region, gambled that I couldn’t follow up by invading Rabaul, and so they moved across the island to attack my beachhead. Unfortunately for them, they didn’t count on the newly recruited 15th Infantry (actually, I think the 15th has been around a while – I probably let the newly recruited garrison stay home in place of one of the infantry divisions I’d had sitting around Lisbon for a while), which lands at Rabaul and immediately engages this garrison.
Moving back to the Red Sea region for a moment, now that the British have been forced out of Port Sudan, we take a gamble of our own. We bring another division and another transport from Durban and begin trying to do the leapfrog thing along the Somaliland and Adenese coasts again. This is doubly risky, I discover, considering there are two British divisions hanging out here.
I consider what other forces I might bring in to make this a successful strategy. Is it worth giving up on Egypt to get this territory? Hardly, I figure. But I do have more than enough units in Africa, so I go in search of one with nothing to do.
The most important thing about Egypt is probably Suez, if you can send a few divisions using those transports you have, there to stake your claim it would help allot. On the other hand, I'm not sure exactly what Egypt has in terms of resources, so it might also be good to take over a few other provinces...
Egypt itself doesn't have much. Alexandria is the key supply base, though, for British forces in the Med and Middle East.
43 transports and a fleet that could have sunk the Portuguese transports for fun. Must have been short on fuel.
Of course the Italians are moving now. British forces will respond to them. They'll leave Alexandria unguarded. It'll be a bit risky, you've pulled off equally audacious (harebrained) moves previously.
While I watched your transports move up into the Red Sea I could help but wonder if there were any assets in the Mediterranean which could accomplish the Egyptian invasion? I know it's far too late to help in the game, but it's what I was thinkin'.....
While I watched your transports move up into the Red Sea I could help but wonder if there were any assets in the Mediterranean which could accomplish the Egyptian invasion? I know it's far too late to help in the game, but it's what I was thinkin'.....
I'm pretty sure he can't get past Gibraltar, so I think it's impossible for him to get into the Med (apart from the fact that there's bound to be a British naval presence that would make it rather foolhardy).
You're a bit behind the times: it's known as the Congo, again (or the 'Democratic Republic of the Congo', to be precise).Rensslaer said:Belgian Congo (aka Zaire today)
Unless that British division can hold up the Italians long enough (always a possibility, of course), I think you can wave goodbye to Alexandria and the Suez Canal. At least you still have plenty of opportunity in the Pacific. I see those new heavy cruisers you're building: do you ever (in the course of the game) put your shiny new cruisers in harm's way, or are they more like a fleet-in-being?
I'm pretty sure he can't get past Gibraltar, so I think it's impossible for him to get into the Med (apart from the fact that there's bound to be a British naval presence that would make it rather foolhardy).
Thanks. I forgot that Spain was not an ally and there was no getting past the Pillars of Hercules! I wasn't as concerned about the British in the Med as the Italians were active and likely causing them some trouble.
I'm really going to try to get an update up this weekend.
By the way, my recent updates have motivated me to go back to this game, which I haven't played in probably a year or two! I've just pulled it up and am looking at my options.
Might be a bit of culture shock to go back to a v1.2 game. But I'm convinced now it can still be fun. Lots of adventure to go!
Rensslaer
By the way, my recent updates have motivated me to go back to this game, which I haven't played in probably a year or two!
I've just pulled it up and am looking at my options.Might be a bit of culture shock to go back to a v1.2 game. But I'm convinced now it can still be fun. Lots of adventure to go!
Rensslaer