• We have updated our Community Code of Conduct. Please read through the new rules for the forum that are an integral part of Paradox Interactive’s User Agreement.
I am not so much out of position as in case of failure I can evacuate through the East. It would not be a good position for the 1757 campaigningopening, but my force will still be full strength and I could strike either Koeniggratz... or further South

Ach, its great when you capture a courier with your enemy's orders ... as we will see this useful piece of information led to the setting of a very bloody trap
 
Last edited:
16 October - 1 December 1756: the Devil sets the weather

By mid-October the two armies briefly settled into a stalemate with the Prussians building field fortifications at Loboswitz and the Austrians deployed on the direct road to Prag at Budin


(overall map showing the main operations in October and November)


(Main Prussian OOB, 17 October 1756)


(Austrian OOB, 17 October 1756)

In addition to the obvious threat posed by the main Prussian army at Lobositz, a poweful Prussian force was now operating on the east bank of the Elbe. Although forced onto the defense, and hoping for a change of weather to bring the campaign season to a halt, Browne could not afford to be completely passive. Accordingly he decided to try to disrupt Gessler's supply lines using his cavalry.

The first cavalry raid was led by von Futak and saw the first clash between the two armies of the war. This small skirmish was soon to be drawfed by the horrors yet to come, however, it offered some relief to the beleagured Austrians. Von Futak encountered a small Prussian detachment under von Schmettau at Tetchen. Surprised, the Austrian advance guard fell into an ambush but the Prussians broke off once they realised they were facing 2500 Hussars. Inconsequential though the battle was, the first victory was Austria's, and the Prussians suffered more losses as they fled the field.


However, what became known as the 'devil's autumn' continued to be marked by clear skies and firm ground. As Austrian units slowly filtered into Wien and Daun led an emergency relief force north, the threat to Browne's army grew.


By early November, realising that Browne was effectively trapped at Prag, the Prussians gambled on renewing the siege at Koeniggratz. At the same time, the main Elbe army probed for a way to bypass Browne's main force, as the skies remained clear. To Browne and his commanders it seemed as if God had shifted allegiance to Prussia, that, or Frederick was in league with the Devil.

The gloom though was quickly lifted with the news of another victory for the Austrian cavalry over their Prussian opponents. Near the small village of Leitmeritz, Lobokowitz's mixed force of Dragoons and Hussars routed a Prussian force 4 times their size.


However, any joy was short lived, by 14 November the main Prussian army had turned Browne's defense lines by crossing at Laun and was arraigned to the south of Prag. Perhaps due to difficulty of crossing the unbridged river, their two main columns had become separated but the threat was clear.


(The situation at Prag, 30 November 1756, note that Keith has fallen behind the main Elbe army, an error that was to have important consequences)


(Prussian forces at Prag)

Fresh forces were arriving in Wien, but would not be available until the next campaign season, somehow Browne had to secure Prag and save his own army.


(Austrian forces arriving in the Wien region)

Left with no real choice, Browne abandoned his positions at Budun, ordered Kollowrat to take up a defense position to the south of the city and ordered the rest of the army to march to Prag at all speed.


(Browne's famous order of the day, trapped, the Austrians had no choice but to fight)[1]

For once, his famously bad temper worked in his favour, the urgency of the situation was clear to all, esepecially as Daun with the only possible reinforcements was at least 20 days march away


It seemed as if Marie Theresa's long prepared war would end in defeat after less than 3 months of campaigning.

[1] - I spent ages over this seemingly simple choice, options explored including heading north into Saxony, putting Kollowrat into the city and moving Browne west (there is good supply there), or putting up a weak fight in the hope that Narwhal was only probing (hah).
 
At least Daun is a good commander! Nice to see such manouvering and using the buildable forts for establishing control on enemy land(never even thought of it myself:confused:).
 
Great updates!

Seems the Saxony capitulation event hasn't changed much. Sometimes I think the best move would be to put the entire force outside Pirna in turn 1 in order to get at least one battle out of this bunch of cowards. However, I have never done this because it comes with the risk that Prussia captures Saxon artillery and supplies. The same is true if Prussia assaults Pirna rather than wait for the Saxon capitulation.

Your strategy seems a bit over-active at the moment. I believe sometimes, it's better to do nothing in AGE games. In my humble opinion, there is only one position Austria shouldn't lose in 1756: Prag! You tried to play a forward defense designed to keep Prussia away from the city. The problem is that this implies that you have to split your army (some have to stay behind at Prag). Not only does this increase your numerical disadavantage, it also exposes you to the risk of flanking moves - exactly what Narwhal tried. Prussia's fast moving troops and excellent generals only exacerbate the danger (high strategic ratings allow for high success probabilities in forced marches, moreover several also have the fast mover trait). Trying to attack this early in the game isn't smart either, I am glad you abandonned this idea quickly. :)

From my experience, the safest strategy for Austria is to concentrate everything at Prag (except for some hussars to threaten supply lines). Then put the whole army on all out defense and prey that the Prussians waste some units on rearguard duty or on a siege at Koenigsgraetz. If Prussia attacks Prag from the South or East (no river to cross) and uses its entire army, even the whole Austrian army may not be enough to repulse them.

This seemingly cowardly strategy has an additional benefit: it draws the Prussians far away from their supply depots. If they fail to take Prag, they are left in a highly vulnerable position and winter will take its toll. Once reinforcements arrive on the scene in late 1756/early 1757, you can then counter-attack and cut off their retreat into Saxony.

Good luck and I hope you can rush back to Prague before the Prussians descend upon it. :)
 
Narwhal didn't waste any time after the untimely surrender of the Saxons! With his characteristic aggression, he has Prag in a chokehold before you can say Bob's your uncle.

I fully trust that Bornego knows his stuff, so I won't even try to analyze the situation. I'll just echo his sentiments and hope you can get back to Prague in time (no offensive to Narwhal, but it would be a rather quick and boring AAR if it ends in a crushing victory after three months of play).
 
but it would be a rather quick and boring AAR if it ends in a crushing victory after three months of play).

Not necessarily. Austria can recover from the loss of Prague as long as they manage to save major parts of Browne's army. If you lose the city to an attack from the south it's highly likely that Browne's army retreats north of the city. If that happens, saving it gets extremely difficult but not entirely impossible.

But let's not look too far ahead; for now Austria still has Prague. Let's hope loki can get his troops back in time. Time is what 1756 is about for the Austrians. It's one big play for time. Avoid a major defeat, try to hold Prague and make Prussia bleed as much as possible without taking major risks - you don't have to the Prussians will attack of their own accord.
 
Confession time, the next turn is as happened, in the following turn I did something monumentally stupid (stances, march to guns and being a bit optimistic) which led to a huge defeat, we played about 6 turns on and I'd put myself in a position of no recovery, so, as the idea is to generate an AAR as much as have fun, we've retraced our steps, so what is reported after this turn is rather different to the original. I'm very grateful to Narwhal for this as it put him on the road to a total victory ... and this on the road to being a relatively short AAR.

At least Daun is a good commander! Nice to see such manouvering and using the buildable forts for establishing control on enemy land(never even thought of it myself:confused:).

Daun, unfortunately doesn't make it to the battlefield, but even Kollowrat does well (it helps when you have no choice in the matter)

Great updates!

Seems the Saxony capitulation event hasn't changed much. Sometimes I think the best move would be to put the entire force outside Pirna in turn 1 in order to get at least one battle out of this bunch of cowards. However, I have never done this because it comes with the risk that Prussia captures Saxon artillery and supplies. The same is true if Prussia assaults Pirna rather than wait for the Saxon capitulation.

Your strategy seems a bit over-active at the moment. I believe sometimes, it's better to do nothing in AGE games. In my humble opinion, there is only one position Austria shouldn't lose in 1756: Prag! You tried to play a forward defense designed to keep Prussia away from the city. The problem is that this implies that you have to split your army (some have to stay behind at Prag). Not only does this increase your numerical disadavantage, it also exposes you to the risk of flanking moves - exactly what Narwhal tried. Prussia's fast moving troops and excellent generals only exacerbate the danger (high strategic ratings allow for high success probabilities in forced marches, moreover several also have the fast mover trait). Trying to attack this early in the game isn't smart either, I am glad you abandonned this idea quickly. :)

From my experience, the safest strategy for Austria is to concentrate everything at Prag (except for some hussars to threaten supply lines). Then put the whole army on all out defense and prey that the Prussians waste some units on rearguard duty or on a siege at Koenigsgraetz. If Prussia attacks Prag from the South or East (no river to cross) and uses its entire army, even the whole Austrian army may not be enough to repulse them.

This seemingly cowardly strategy has an additional benefit: it draws the Prussians far away from their supply depots. If they fail to take Prag, they are left in a highly vulnerable position and winter will take its toll. Once reinforcements arrive on the scene in late 1756/early 1757, you can then counter-attack and cut off their retreat into Saxony.

Good luck and I hope you can rush back to Prague before the Prussians descend upon it. :)

Aye, I'm now convinced that the best strategy is to stay at Prag and defend, perhaps to use the cavalry to try and disrupt if you can. If you are going to do forward defense, do it at Lobositz as you can't be flanked (but with no terrain bonus you are going to lose the battle).

I don't think you can now save the Saxons, they will collapse in turns 2-4 if the Prussians invest Prina properly, even worse, its not to turn 3 could you do anything with them in any case (I'm not sure the immense NM loss offsets a few dead prussians though)

Narwhal didn't waste any time after the untimely surrender of the Saxons! With his characteristic aggression, he has Prag in a chokehold before you can say Bob's your uncle.

I fully trust that Bornego knows his stuff, so I won't even try to analyze the situation. I'll just echo his sentiments and hope you can get back to Prague in time (no offensive to Narwhal, but it would be a rather quick and boring AAR if it ends in a crushing victory after three months of play).

Bornego is right, I can lose Prag but not the army, but the problem here is a retreat north is a real disaster as its very hard to regain position and the beaten part of the army and the new stuff at Wien can't join up

Not necessarily. Austria can recover from the loss of Prague as long as they manage to save major parts of Browne's army. If you lose the city to an attack from the south it's highly likely that Browne's army retreats north of the city. If that happens, saving it gets extremely difficult but not entirely impossible.

But let's not look too far ahead; for now Austria still has Prague. Let's hope loki can get his troops back in time. Time is what 1756 is about for the Austrians. It's one big play for time. Avoid a major defeat, try to hold Prague and make Prussia bleed as much as possible without taking major risks - you don't have to the Prussians will attack of their own accord.

The worst outcome is Austria is so weakened that Prussia can start just picking off France and Russia at their leisure in the mid-game
 
The First Battle of Prag, 19 November 1756


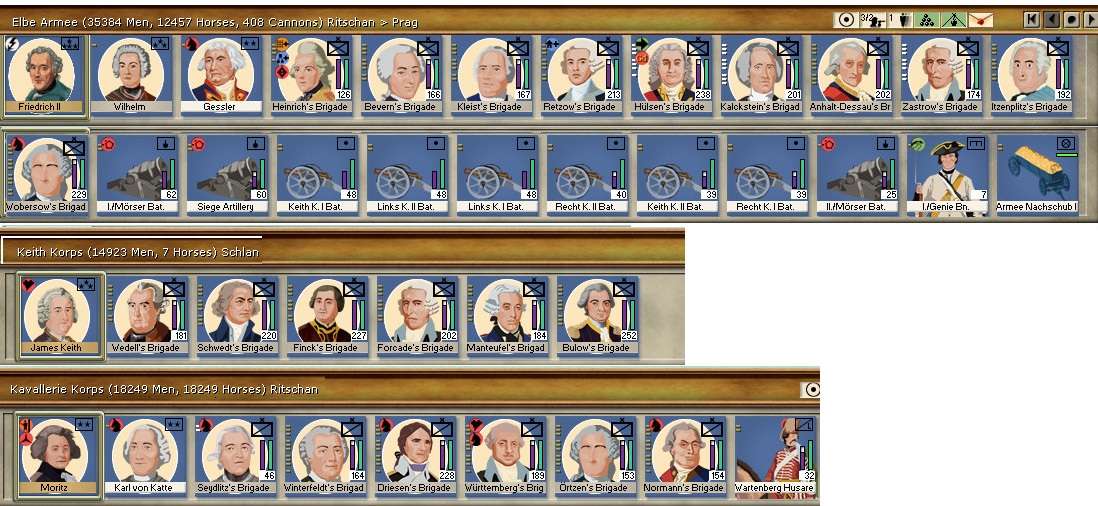
Prussian OOB (Narwhal supplied this information)
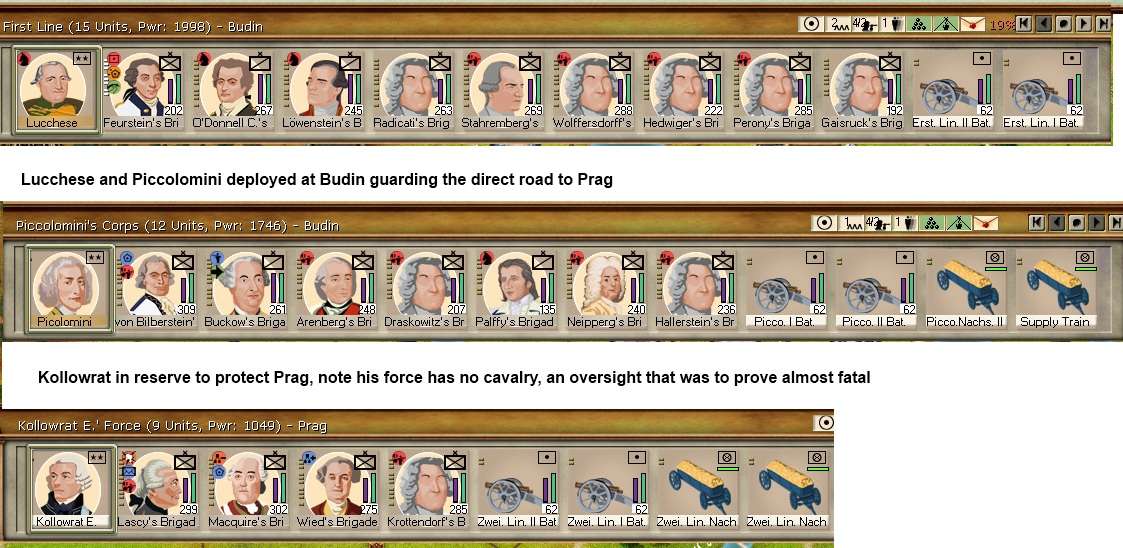
Austrian OOB

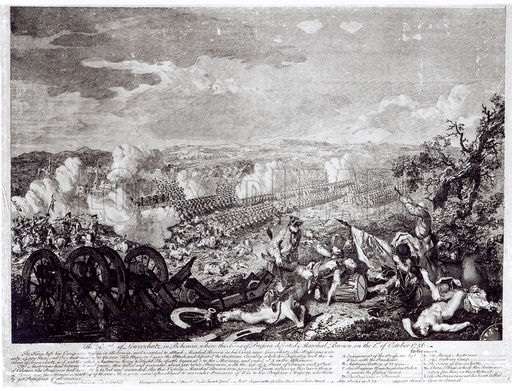
The clash at Prag on 19 November 1756 was the first major action of the war involving some 110,000 men and almost 700 cannon. By the end of the day 32,000 had fallen on the field of battle.

When news reached Browne that Frederick had not only bypassed his position at Borun but that his main army was to the south of Prag it appeared that all was lost. All that stood between 70,000 Prussians and Prag was Kollowrat's relatively weak corps. Browne, Lucchese and Piccolomini had little choice but to race to join him. However, the Prussians had a similar problem in that Keith's column had lagged behind, and it was not till the early hours of 19 November that the Prussian army assembled and moved forward under the cover of darkness.


Just after 9am on the short winter's day, Frederick himself, leading the main Elbe army with 35,000 men, fell on Kollowrat's 4 brigades (10,000 men) backed by a huge advantage in artillery. However, Kollowrat had had some time to prepare his positions, with his units dug in and making use of the various stone farmhouses of this prosperous region of Bohemia. With the first rains of winter falling, the Prussian advance was disrupted by mud and the prepared defenses.


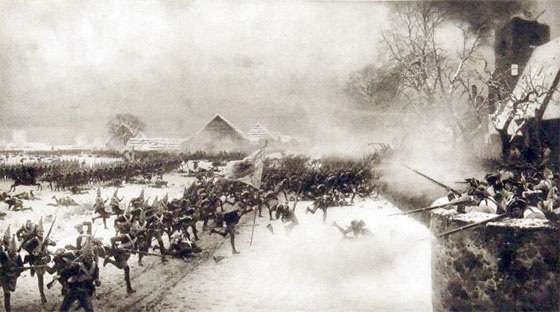
(Prussian infantry attacking a fortified farm house)

Equally he was aware that the cavalry advance guards of Piccolomini and Lucchese were almost in position.

His deployment had put Wied and Krottendorf's brigade in the front with Lascy covering the left flank and Macquire left in reserve. Both his lead brigades suffered 25% casualties in the opening salvos and fell back in disorder, however, their staunch resistance led to Itzenplitz's brigade losing its momentum, allowing Kollowrat to throw in his reserves. More dangerously he opted to shorten his lines in an attempt to stall the Prussian attack that threatened to drive straight through his lines.

By 10am, he had held, but only just and 25% of his corps were dead or dieing as the Prussians regrouped. Even worse, the Prussian cavalry was steadily moving to flank his position and Keith's corps was extending the main Prussian battle line.


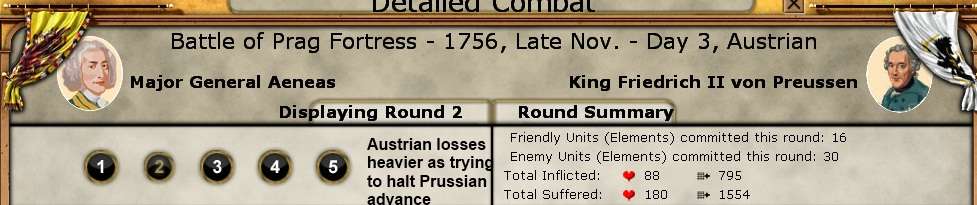
(detailed report on the opening round of combat)

However, Browne had anticipated this outcome and had ordered both Piccolomini and Lucchese to combine their heavy cavalry as they moved up. 4 Brigades of Cuirassiers and Dragoons (O'Donnel and Lowenstein from Lucchese's left flank and Buckow and Paiffy from Piccolomini) struck the advancing Prussians. The result was carnage, but it also bought critcal time. Almost 40% of the Austrian cavalry failed to return but the outcome was that the Prussian assualt lost momentum at a critical stage of the battle.


By 11am, the Austrian line had been driven in, but two fresh corps had had chance to deploy into line of battle.

The rest of the battle was a brutal clash between the two armies. Steadily the Austrians gave ground and by 12am some of Kollowrat's opening brigades were down to less than 400 men. It helped the Austrians that the Prussians switched their main target from Piccolomini to Lucchese as the day wore on, allowing weakened and shattered battalions a chance to reform and regroup.


(Main phase of the battle)

By 2pm the Prussians launched a last all out attack across the line. However, the losses were becoming more even (1000 Austrians for 800 Prussians) as they too lost their combat discipline on the battlefield churned up by shells and littered with the dead and dieing. With the short winter day fading, and at the point of victory, they fell back. It was possible that either the fierce Austrian resistance at the end convinced them that Daun had arrived (when in reality he had returned to Iglau) or that they expected the Austrians to flee and wished to avoid further losses.

As the Prussians fell back, the first snows of winter started to fall, giving the battlefield, with its a dreadfull scenes of carnage, an almost peaceful air. The cruel reality was the dropping temperature worsened the agonies of the many who lay wounded, adding the possibility of freezing to death to their sufferings.

The next morning Browne, re-organised his battle lines pulling Kollowrat's shattered column back into the city as an emergency garrison.


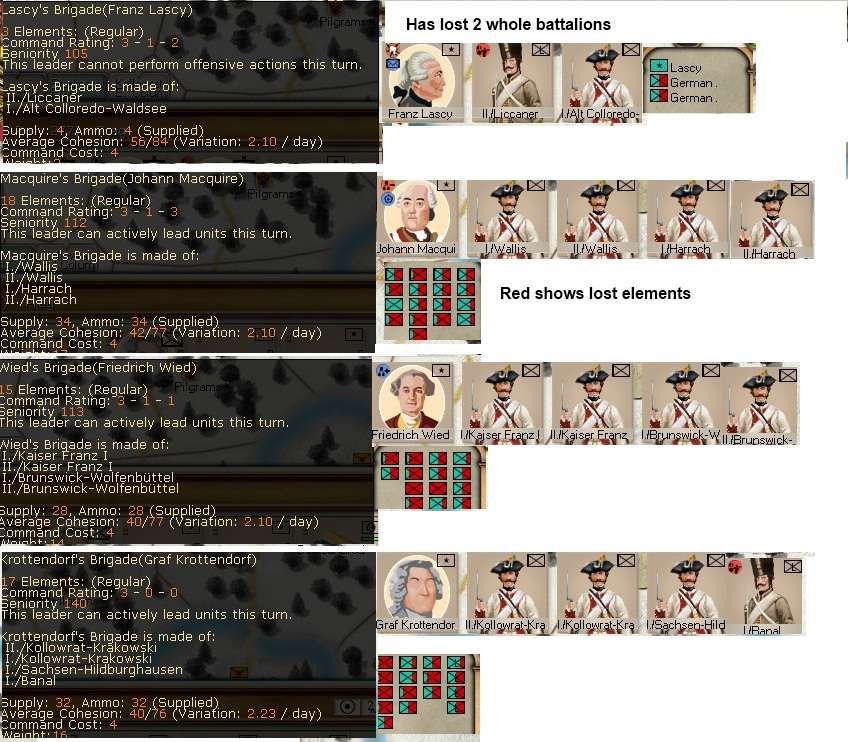
(Kollowrat's corp at the end of the battle, over 50% of the original force had fallen)

The other two took up positions on the original Austrian front line expecting a renewed Prussian attack. When this didn't come, men were detached to gather together the dead and to bring the wounded back to the makeshift field hospitals. After the horror of the 19th, it was somehow appropriate that Prussian, Saxon, Austrian, Hungarian and Croat were treated as one.


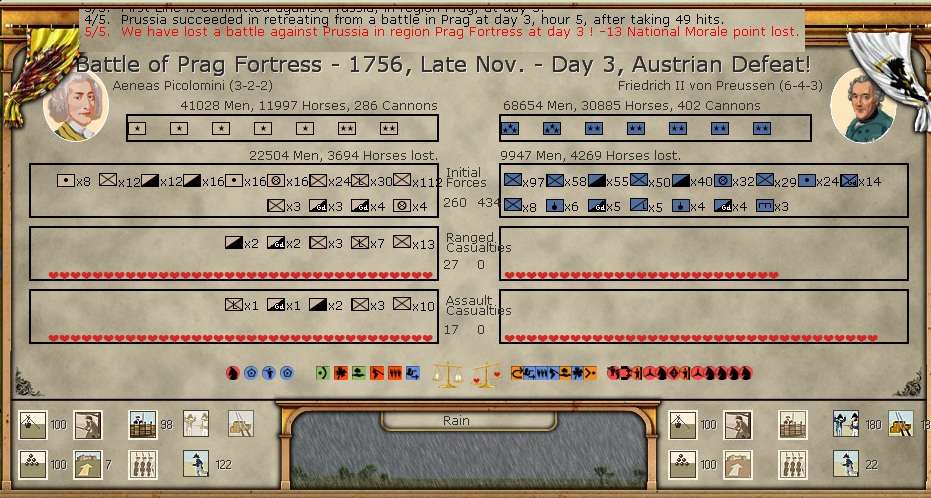
(the outcome of the battle)
 
Holy cow! After that carnage Narwhal surely attacked a second time. Still I would guess your chances in a second battle are better: you recover cohesion while Narwhal's unit lost some on their retreat and will lose more while marching into battle again. Moreover your troops get replacements while resting at Prague while Narwhal's won't. Most importantly, all your units are now in place. Combined these factors should be enough to tip the balance in your favour.

Unless it is already too late: I would recommend you put the badly mauled units in Browne's hq stack rather than inside the city. This way you still profit from their pw rating during battle and they are almost as safe as in the city since hq stacks engage last. You might also want to make sure that all stacks profit from Kolowrat's trenches. Simply pull a unit out of Kolowrat's stack and drop the unentrenched corps on top of it. It's a bit gamey, but also highly effective. You will need every advantage you can get.

Finally a small correction (something you probably know already): Red elements aren't lost. Red symbolizes hitpoints that have been lost. An entirely red element still has at least 1 hitpoint left. If the last hitpoint is lost, you won't see the element in the unit window any longer. This is when an element appears amongst the casualties in the battlereport.

But most importantly, congratulations! This was a superb update! Probably the best I have read in a long time.
 
That's... one... beautiful... update. The best I have seen for months.
It really looks like the sort of information one could read on Wikipedia. I do not know what to do

We should lower the number of big battles, or you will fall exhausted and / or fall short in historical pictures.

As a precision note on Loki100 disclaimer, in our "first" iteration, the "march to the sound of the guns" rule brought into what should have been a small combat involving Austrian reinforcements and the full Prussian army several Austrian corps guarding Prague, one after the other. Austrians are not the best in attack, and they were completely smoked (100+ elements destroyed). This was a combination of Loki100 forgetting the intricaties of "march to the sound of the gun rule", and bad luck . This made Prague completely undefendable, and the Austrians unable to retreat in their supply area in due time due to horrible winter (blizzard). With 60 000 dead Austrians, and the rest of the initial force exhausted by winter, we thought it would make a short game but a poor AAR, and decided to start back to just after this first battle.


I am now in want of Bornego advices : do you ever upgrade prussian artillery, or is it a waste of EP ?
 
One question for Narwhal - did, with your very interesting army setup, all artillery batteries take part in the battle form the start??
 
I am now in want of Bornego advices : do you ever upgrade prussian artillery, or is it a waste of EP ?

You overestimate my knowledge. I have wondered about this for a long toime myself. Your question finally got me to do some digging in the files:

The option gives the possibility of 5 elements of basic artillery upgrading into elite artillery. There is no probability mentioned in the event (therefore I believe it's actually a 100% chance). This only applies to Prussian artillery, its allies won't profit from the option.

Here is the difference between basic and upgraded artillery:

Basic artillery:

OffFire = 10
DefFire = 11
Initiative = 7
Range = 4
ROF = 2
Protection = 0
TQ = 7
Assault = 6​


Upgraded artillery:

OffFire = 11
DefFire = 11
Initiative = 8
Range = 5
ROF = 2
Protection = 0
TQ = 8
Assault = 7​


Is that worth it? Probably not the first option I would take, but Prussia tends to have more EP than it can spend very quickly. And then it quickly becomes a very good deal.


One question for Narwhal - did, with your very interesting army setup, all artillery batteries take part in the battle form the start??

I have wondered this as well. I usually do the opposite and concentrate artillery in the corps rather than the hq stack. If I am not mistaken, your artillery rarely gets to engage.
 
One question for Narwhal - did, with your very interesting army setup, all artillery batteries take part in the battle form the start??

Yes, my 9 units (30 elements) of artillery (one siege gun was captured unescorted when I did my flanking manoeuver South of Prague) participated in each round of battle :

Round 1 : Inflicted 39 hits out of 218
Round 2 : Inflicted 15 hits out of 180
Round 3 : Inflicted 15 hits out of 158
Round 4 : Inflicted 25 hits out of 193
Round 5 : Inflicted 21 hits out of 189

Overall, a nice addition, but not decisive.

The fact that they all participated is logical :

Weight of wheeled : 7
Support quota on clear terrain with mud : 150. Offensive master bonus : 20%, so it is 180 total base, and then you have to add the frontage bonus of Frederick (4*4*10=160) in clear terrain... I could bring a whooping 340 units of weight. I had 30 elements of guns : 210 only was needed (+16 for one supply element).

[Rule for frontage bonus : In open terrain only (clear/prairie/desert/wood), the Units Quotas are modified by leader (rank)*(offensive/defensive rating) depending whether in offensive or defensive posture:

Combat Units Quota: (+25 points)*(rank)*(off/def rating)

Support Units Quota: (+10 points)*(rank)*(off/def rating)]

Now, I don't know if when several columns are involved, each has its own frontage of if the frontage if shared. And what happens when units come from different direction.


The fact that they were all in the same stack was coincidental : I had put them in Frederick stack because he has a speed bonus, so his speed and Keith's would match more or less. Than, Keith fell behind so no way to hand back the guns. On the other hand, Moritz's cavalry force had joined up (it was made up of the screening force you saw in a battle earlier, and the Königsberg troops). I did not want the cavalry to participate too early (charge against high cohesion units => bad), so I ordered it to stay where it was (the region South of Prague) but in offensive posture so it could march to the sound of the guns. As the chance to "march to the sound of the gun" depends on the distance from battle in day, I decided to take the guns out. Hence the fact that all guns are with Freddie.
 
OffFire = 10
DefFire = 11
Initiative = 7
Range = 4
ROF = 2
Protection = 0
TQ = 7
Assault = 6​
Thank you for the research.

Looks like it is not worth it for me. The increase in range is not useful as there is no increase in ROF : it will still shoot only twice, and only once "more" before infantry (for regular guns, shooting at range 4 is always before infantry). The bonus in initiative is neglectable - since you are going to shoot before infantry does due to your range (shooting before other guns is useless - you rarely hit them anyway). It can be useful in difficult terrain / weather, when the range is limited, but in that case guns are not going to be the big damage dealers due to the small support frontage. And the meager 5% bonus in offense is meh. As for discipline...


I have wondered this as well. I usually do the opposite and concentrate artillery in the corps rather than the hq stack. If I am not mistaken, your artillery rarely gets to engage.
True, but as Frederick would be on his own at the beginning of the battle, he would engage first. I was a bit afraid he would disengage after Moritz did engage, so I used the "all-out assaul" order, and he did not.
 
My word, what a slaughter, and the lost elements will hurt long-term. Since even Bornego's best advice is to sit back and defend it looks like all we can do is hope for the rapid onset of winter.
 
Ouch that has to hurt. Come on Austrians.

To misquote the black knight in the Quest for the Holy Grail, its but a scratch, almost all my units recover their losses over winter, those 46 hits I inflicted as Narwhal broke off help even things up, & I spend the winter in nice warm Prag (well apart from 1 corps that does a lot of marching), Narwhal spends it besieging Koenigratz (ie he's not on a depot), so after being outmanouvered, the fight to the death orders really redeemed a dire situation for me

Holy cow! After that carnage Narwhal surely attacked a second time. Still I would guess your chances in a second battle are better: you recover cohesion while Narwhal's unit lost some on their retreat and will lose more while marching into battle again. Moreover your troops get replacements while resting at Prague while Narwhal's won't. Most importantly, all your units are now in place. Combined these factors should be enough to tip the balance in your favour.

Unless it is already too late: I would recommend you put the badly mauled units in Browne's hq stack rather than inside the city. This way you still profit from their pw rating during battle and they are almost as safe as in the city since hq stacks engage last. You might also want to make sure that all stacks profit from Kolowrat's trenches. Simply pull a unit out of Kolowrat's stack and drop the unentrenched corps on top of it. It's a bit gamey, but also highly effective. You will need every advantage you can get.

Finally a small correction (something you probably know already): Red elements aren't lost. Red symbolizes hitpoints that have been lost. An entirely red element still has at least 1 hitpoint left. If the last hitpoint is lost, you won't see the element in the unit window any longer. This is when an element appears amongst the casualties in the battlereport.

But most importantly, congratulations! This was a superb update! Probably the best I have read in a long time.

glad the update was well received. and yes, you're right, red is damage withing an element, not damaged elements per se.

as part of sorting out the game, we decided to let Narwhal have a free attack again (ie if it failed we cancelled the turn and he did what he originally planned to). I had a pretty routine victory, about 10,000 dead each, but my army was on the battlefield at the start, and 1:1 is rubbish for the Prussians. So I think that proves the advantage of sitting tight in Prag and waiting in 56.

That's... one... beautiful... update. The best I have seen for months.
It really looks like the sort of information one could read on Wikipedia. I do not know what to do

We should lower the number of big battles, or you will fall exhausted and / or fall short in historical pictures.

As a precision note on Loki100 disclaimer, in our "first" iteration, the "march to the sound of the guns" rule brought into what should have been a small combat involving Austrian reinforcements and the full Prussian army several Austrian corps guarding Prague, one after the other. Austrians are not the best in attack, and they were completely smoked (100+ elements destroyed). This was a combination of Loki100 forgetting the intricaties of "march to the sound of the gun rule", and bad luck . This made Prague completely undefendable, and the Austrians unable to retreat in their supply area in due time due to horrible winter (blizzard). With 60 000 dead Austrians, and the rest of the initial force exhausted by winter, we thought it would make a short game but a poor AAR, and decided to start back to just after this first battle.

ach, I've found a good source of images, after writing the GPW I've become quite adept at searches, shifting google to german helps as you trigger a number of German language sites (& I can just about work out what I need from my Dutch)

One question for Narwhal - did, with your very interesting army setup, all artillery batteries take part in the battle form the start??
Is that worth it? Probably not the first option I would take, but Prussia tends to have more EP than it can spend very quickly. And then it quickly becomes a very good deal.

I have wondered this as well. I usually do the opposite and concentrate artillery in the corps rather than the hq stack. If I am not mistaken, your artillery rarely gets to engage.
The fact that they were all in the same stack was coincidental : I had put them in Frederick stack because he has a speed bonus, so his speed and Keith's would match more or less. Than, Keith fell behind so no way to hand back the guns. On the other hand, Moritz's cavalry force had joined up (it was made up of the screening force you saw in a battle earlier, and the Königsberg troops). I did not want the cavalry to participate too early (charge against high cohesion units => bad), so I ordered it to stay where it was (the region South of Prague) but in offensive posture so it could march to the sound of the guns. As the chance to "march to the sound of the gun" depends on the distance from battle in day, I decided to take the guns out. Hence the fact that all guns are with Freddie.
True, but as Frederick would be on his own at the beginning of the battle, he would engage first. I was a bit afraid he would disengage after Moritz did engage, so I used the "all-out assaul" order, and he did not.

My word, what a slaughter, and the lost elements will hurt long-term. Since even Bornego's best advice is to sit back and defend it looks like all we can do is hope for the rapid onset of winter.

As above, oddly I was able to shake it off, we've just emerged from winter and the worst of in-element damage has healed, ok its drained off my replacements but I've been very disciplined at setting up and raising new depot bns (one key way to more replacement manpower). But it was a bloodbath, certainly the worst 1 day battle I've seen in RoP, I think as a product of being outclassed (& outnumbered), but making proper use of 'hold at all costs' meant my battalions stood there and just got battered. Its not usually a sensible stance, but having decided to fight, the worst thing was to both lose and be driven off, my remnants would have been dead meat.

Lots of Austrian dead, lots of Austrian lost elements, lots of Austrian prisoners taken... Truly, not a good day for the Habsburgs. But you still hold the city, right?

yep Prag was mine, the beer is safe, at least to 57, when I suspect the Prussians will have other ideas. Well I can take losing Prag in late 57 more easily than I can recover from losing it in late 56.
 
ach, I've found a good source of images, after writing the GPW I've become quite adept at searches, shifting google to german helps as you trigger a number of German language sites (& I can just about work out what I need from my Dutch)

It's an extremely helpful feature. :) I think I went through half a dozen different languages while I was researching for historical portraits of 7 Years War generals when I made additional leader graphics for RoP.


but making proper use of 'hold at all costs' meant my battalions stood there and just got battered. Its not usually a sensible stance, but having decided to fight, the worst thing was to both lose and be driven off, my remnants would have been dead meat.

I used to think the same. But actually it is probably the most powerful posture in the game. It ensures that your troops won't retreat simply because they are outnumbered. Therefore it is key to the defense of important positions. In RoP with its entrenchment limit of 2, it can be costly. But it is still worth it. As long as you don't use it when you expect to be outnumbered by more than 2:1 ... That could result in a lot less troops on the map. :D


yep Prag was mine, the beer is safe, at least to 57, when I suspect the Prussians will have other ideas. Well I can take losing Prag in late 57 more easily than I can recover from losing it in late 56.

The value of Prague is its huge supply capacity. It's the only place in Boehmia where the entire Prussian army can be fed. Losing it late in 1756 forces the Austrian army into a winter retreat that could easily end in its destruction. I once forgot to put my army on all-out defense at Prague, lost the battle and was pushed into retreating north. At that moment I thought I had lost the PBEM but then I split my army into several stacks (according to their speed). Browne's HQ and two battered brigades were sent designated as bait and marched north to draw the pursuing Prussian cavalry into the mountains while the other units flanked in wide circles around Prague on both sides. The HQ got slaughtered, some supply trains didn't make it either but the rest of the army escaped. Some units were in bad shape and cohesion was horrible after several turns of hard marches but they got their revenge soon enough.

Oh and before I forget: In my humble opinion you are wasting your best corps commander. Bilberstein seems currently to be a brigade commander under Piccolomini. Unless you have already done so, I would recommend that you put Bilberstein in charge of your biggest corps. With a defensive stat of 4, he is the only Austrian general available in 1756 who can give the Prussians some headaches.
 
Last edited:
The value of Prague is its huge supply capacity. It's the only place in Boehmia where the entire Prussian army can be fed. Losing it late in 1756 forces the Austrian army into a winter retreat that could easily end in its destruction. I once forgot to put my army on all-out defense at Prague, lost the battle and was pushed into retreating north. At that moment I thought I had lost the PBEM but then I split my army into several stacks (according to their speed). Browne's HQ and two battered brigades were sent designated as bait and marched north to draw the pursuing Prussian cavalry into the mountains while the other units flanked in wide circles around Prague on both sides. The HQ got slaughtered, some supply trains didn't make it either but the rest of the army escaped. Some units were in bad shape and cohesion was horrible after several turns of hard marches but they got their revenge soon enough.

Full disclaimer : I made the mistake of running East for various reasons in our "second" attempt. Arriving at Koeniggratz (and slowed down by the Austrian guns I forget to take out of the unit), I was blocked by a really terrible weather, and bKoeniggratz would - not - surrender. Even when it did it was too late, and my army had suffered > 1500 hits, thereby destroying the Prussian army. I took this decision because I underestimated the effect of the pass blocked, and also because in our first attempt (when I took Prague)I had moved East to intercept Von Daun (and not to "flee" there), Koeniggratz fell quickly and I had not a supply problem of the whole winter due to the passes NOT being blocked, so I was "OK, so fleeing East works. Fine". Huge mistake, and I neglected one of my rules : always have a retreat path.

Loki100 generously accepted to take back the game to before the mistake (which was like 6 turns before !).

So now, both Loki100 and I used our joker, and this will not happen again. Or should not. Anyway, we did not want a "quick win" for either side, and one of the two armies obliterated in 1756 is just that. Once the players can count of their back-up, it is different.

Incidentely, I understood just what Bornego meant by the supply stock of Prague. Before, I thought Prague was strategical due to its level 3 fortification and because it is on the other side of that mountain (and a river).