• We have updated our Community Code of Conduct. Please read through the new rules for the forum that are an integral part of Paradox Interactive’s User Agreement.

unmerged(305389)

Captain
5 Badges
Apr 22, 2011
335
0
  • Crusader Kings II
  • Hearts of Iron III: Their Finest Hour
  • Hearts of Iron III Collection
  • Victoria 2 A House Divided Beta
  • Mount & Blade: Warband
turn00a.jpg


Index:

1919:

Turn 1 - Siberians on the march: http://forum.paradoxplaza.com/forum/showthread.php?571687-Who-put-the-stranded-Admiral-in-charge-Siberian-White-Short-Campaign-PBEM&p=13117285&viewfull=1#post13117285
Turn 2 - Mistakes and maneuvers: http://forum.paradoxplaza.com/forum/showthread.php?571687-Who-put-the-stranded-Admiral-in-charge-Siberian-White-Short-Campaign-PBEM&p=13117328&viewfull=1#post13117328
Turn 3 - Trouble in the North: http://forum.paradoxplaza.com/forum/showthread.php?571687-Who-put-the-stranded-Admiral-in-charge-Siberian-White-Short-Campaign-PBEM&p=13120569&viewfull=1#post13120569
Turn 4 - A pincer movement: http://forum.paradoxplaza.com/forum/showthread.php?571687-Who-put-the-stranded-Admiral-in-charge-Siberian-White-Short-Campaign-PBEM&p=13120589&viewfull=1#post13120589
Turn 5 - Someone will be food for the fishes: http://forum.paradoxplaza.com/forum/showthread.php?571687-Who-put-the-stranded-Admiral-in-charge-Siberian-White-Short-Campaign-PBEM&p=13123895&viewfull=1#post13123895
Turn 5 results - The fishes are getting obese: http://forum.paradoxplaza.com/forum/showthread.php?571687-Who-put-the-stranded-Admiral-in-charge-Siberian-White-Short-Campaign-PBEM&p=13128343&viewfull=1#post13128343
Turn 6 - Retreats: http://forum.paradoxplaza.com/forum/showthread.php?571687-Who-put-the-stranded-Admiral-in-charge-Siberian-White-Short-Campaign-PBEM&p=13129110&viewfull=1#post13129110
Turn 6 results - The turn of the tide?: http://forum.paradoxplaza.com/forum/showthread.php?571687-Who-put-the-stranded-Admiral-in-charge-Siberian-White-Short-Campaign-PBEM&p=13132131&viewfull=1#post13132131
Turn 7 - A new plan for Kappel's escape: http://forum.paradoxplaza.com/forum/showthread.php?571687-Who-put-the-stranded-Admiral-in-charge-Siberian-White-Short-Campaign-PBEM&p=13132211&viewfull=1#post13132211
Turn 8 - The last days of Kappel's long march?: http://forum.paradoxplaza.com/forum/showthread.php?571687-Who-put-the-stranded-Admiral-in-charge-Siberian-White-Short-Campaign-PBEM&p=13136161&viewfull=1#post13136161
Turn 9 - All is quiet on the Siberian Front: http://forum.paradoxplaza.com/forum/showthread.php?571687-Who-put-the-stranded-Admiral-in-charge-Siberian-White-Short-Campaign-PBEM&p=13140024&viewfull=1#post13140024
Turn 10 - The Komuch heads home: http://forum.paradoxplaza.com/forum...paign-PBEM&p=13144088&viewfull=1#post13144088
Turn 11 - Samara is taken and Chapaev disappears: http://forum.paradoxplaza.com/forum...paign-PBEM&p=13154310&viewfull=1#post13154310
Interlude - Floating coffins and mass conscription: http://forum.paradoxplaza.com/forum/showthread.php?571687-Who-put-the-stranded-Admiral-in-charge-Siberian-White-Short-Campaign-PBEM&p=13157914&viewfull=1#post13157914
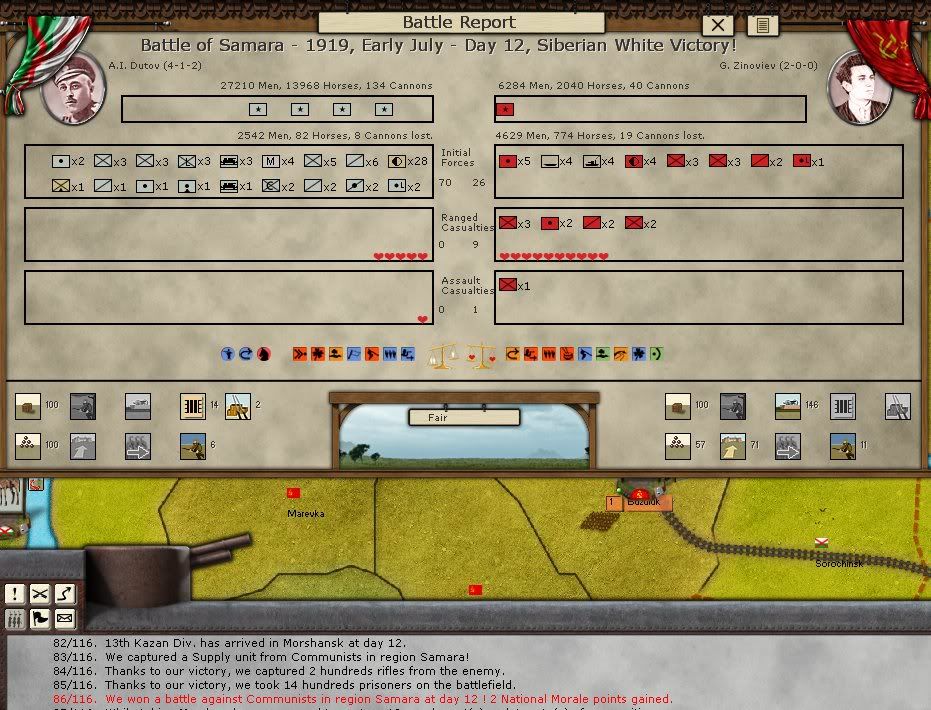
Turn 12 - Mud-wrestling: http://forum.paradoxplaza.com/forum/showthread.php?571687-Who-put-the-stranded-Admiral-in-charge-Siberian-White-Short-Campaign-PBEM&p=13161368&viewfull=1#post13161368
Turn 13 - How a fly stopped the elefant: http://forum.paradoxplaza.com/forum/showthread.php?571687-Who-put-the-stranded-Admiral-in-charge-Siberian-White-Short-Campaign-PBEM&p=13168599&viewfull=1#post13168599
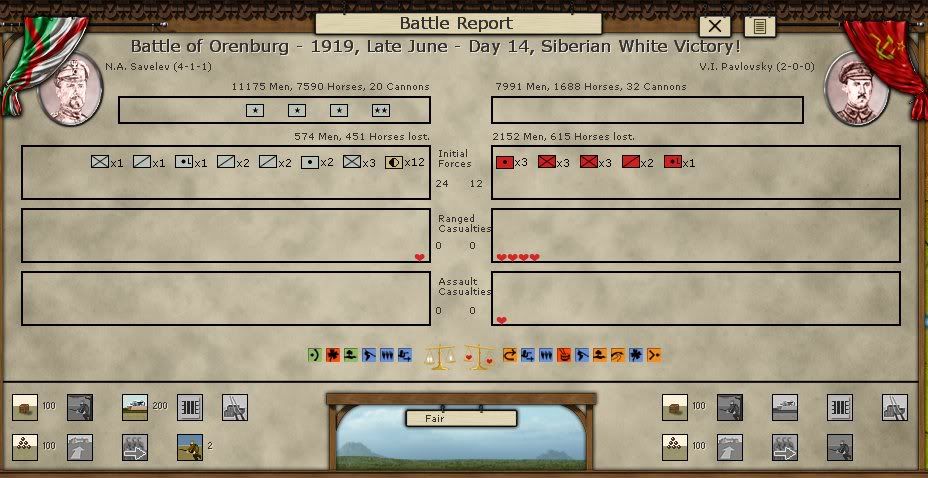
Turn 14 - Winter winds: http://forum.paradoxplaza.com/forum/showthread.php?571687-Who-put-the-stranded-Admiral-in-charge-Siberian-White-Short-Campaign-PBEM&p=13179476&viewfull=1#post13179476
Turn 15 - Breaking the Red spine: http://forum.paradoxplaza.com/forum/showthread.php?571687-Who-put-the-stranded-Admiral-in-charge-Siberian-White-Short-Campaign-PBEM&p=13183223&viewfull=1#post13183223
Turn 15 results - Bloody snow: http://forum.paradoxplaza.com/forum/showthread.php?571687-Who-put-the-stranded-Admiral-in-charge-Siberian-White-Short-Campaign-PBEM&p=13190335&viewfull=1#post13190335
Turn 16 - The cripple and the lame: http://forum.paradoxplaza.com/forum/showthread.php?571687-Who-put-the-stranded-Admiral-in-charge-Siberian-White-Short-Campaign-PBEM&p=13190422&viewfull=1#post13190422

1920:

Turn 17 - The Great Retreat: http://forum.paradoxplaza.com/forum/showthread.php?571687-Who-put-the-stranded-Admiral-in-charge-Siberian-White-Short-Campaign-PBEM&p=13195669&viewfull=1#post13195669
Turn 18 - Let them eat caviar: http://forum.paradoxplaza.com/forum/showthread.php?571687-Who-put-the-stranded-Admiral-in-charge-Siberian-White-Short-Campaign-PBEM&p=13203574&viewfull=1#post13203574
Turn 19 - Sisyphus was a lucky bastard: http://forum.paradoxplaza.com/forum/showthread.php?571687-Who-put-the-stranded-Admiral-in-charge-Siberian-White-Short-Campaign-PBEM&p=13227904&viewfull=1#post13227904
Turn 20 - An army of slackers: http://forum.paradoxplaza.com/forum/showthread.php?571687-Who-put-the-stranded-Admiral-in-charge-Siberian-White-Short-Campaign-PBEM&p=13232406&viewfull=1#post13232406
Turn 21 - The endgame begins: http://forum.paradoxplaza.com/forum/showthread.php?571687-Who-put-the-stranded-Admiral-in-charge-Siberian-White-Short-Campaign-PBEM&p=13252646&viewfull=1#post13252646
Turn 22 - Meddling Poles and starving Reds: http://forum.paradoxplaza.com/forum/showthread.php?571687-Who-put-the-stranded-Admiral-in-charge-Siberian-White-Short-Campaign-PBEM&p=13278836&viewfull=1#post13278836
Turn 23 - Where is Kolchak's caviar? http://forum.paradoxplaza.com/forum/showthread.php?571687-Who-put-the-stranded-Admiral-in-charge-Siberian-White-Short-Campaign-PBEM&p=13286206&viewfull=1#post13286206
Turn 24 - The last days of a revolution: http://forum.paradoxplaza.com/forum/showthread.php?571687-Who-put-the-stranded-Admiral-in-charge-Siberian-White-Short-Campaign-PBEM&p=13292845&viewfull=1#post13292845
Turn 25 - A Communist miracle: http://forum.paradoxplaza.com/forum/showthread.php?571687-Who-put-the-stranded-Admiral-in-charge-Siberian-White-Short-Campaign-PBEM&p=13298075&viewfull=1#post13298075
Turn 26 - Kolchak for Tzar! http://forum.paradoxplaza.com/forum/showthread.php?571687-Who-put-the-stranded-Admiral-in-charge-Siberian-White-Short-Campaign-PBEM&p=13304854&viewfull=1#post13304854
Turn 26 results - Aftermath: http://forum.paradoxplaza.com/forum/showthread.php?571687-Who-put-the-stranded-Admiral-in-charge-Siberian-White-Short-Campaign-PBEM&p=13304886&viewfull=1#post13304886


Introduction:

What a silly idea: an admiral without a fleet is commanding a war waged in interior Russia. In history, Kolchak's reign ended in utter disaster. He himself was killed while trying to escape from Russia with its gold reserves. I can't do much worse, can I?

This AAR will be very matter of fact, please don't expect story-telling or role-playing. I will simply try to present my thoughts while plotting my moves. If you are unfamiliar with AGEOD games, I strongly recommend Narwhal's AARs, he does an outstanding job explaining these games: :)

Narhwal's and loki100's Wars in America AAR: http://forum.paradoxplaza.com/forum/showthread.php?545321-Wars-in-America-A-how-to-AAR
Narwhal's Rise of Prussia AAR: http://forum.paradoxplaza.com/forum/showthread.php?513080-Learning-from-Prussia-a-Rise-of-Prussia-AAR-against-a-real-player-for-beginners

I won't try to redo what Narwhal has done so well, but I am adding a few chapters that try to give some insight on game mechanics special to RUS:

RUS game mechanics -Index:

Chapter 1 - Replacements: http://forum.paradoxplaza.com/forum/showthread.php?571687-Who-put-the-stranded-Admiral-in-charge-Siberian-White-Short-Campaign-PBEM&p=13157914&viewfull=1#post13157914
Chapter 2 - Division composition: http://forum.paradoxplaza.com/forum/showthread.php?571687-Who-put-the-stranded-Admiral-in-charge-Siberian-White-Short-Campaign-PBEM&p=13161471&viewfull=1#post13161471
Chapter 3 - Special Operations and ressource options: http://forum.paradoxplaza.com/forum/showthread.php?571687-Who-put-the-stranded-Admiral-in-charge-Siberian-White-Short-Campaign-PBEM&p=13171648&viewfull=1#post13171648
Chapter 4 - Green rebellions: http://forum.paradoxplaza.com/forum/showthread.php?571687-Who-put-the-stranded-Admiral-in-charge-Siberian-White-Short-Campaign-PBEM&p=13186493&viewfull=1#post13186493
Chapter 5 - Polish intervention: http://forum.paradoxplaza.com/forum/showthread.php?571687-Who-put-the-stranded-Admiral-in-charge-Siberian-White-Short-Campaign-PBEM&p=13186493&viewfull=1#post13186493


The Short Campaign:

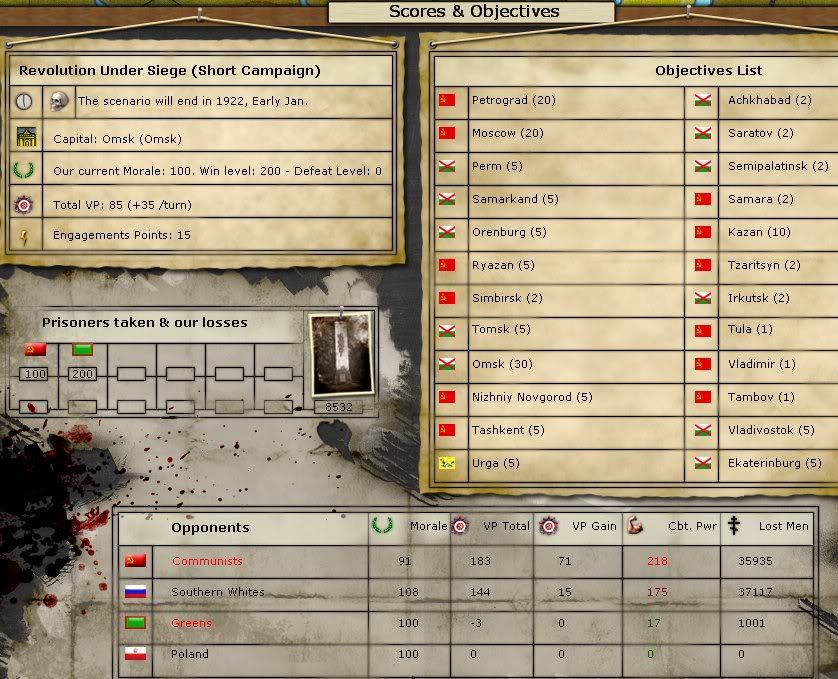
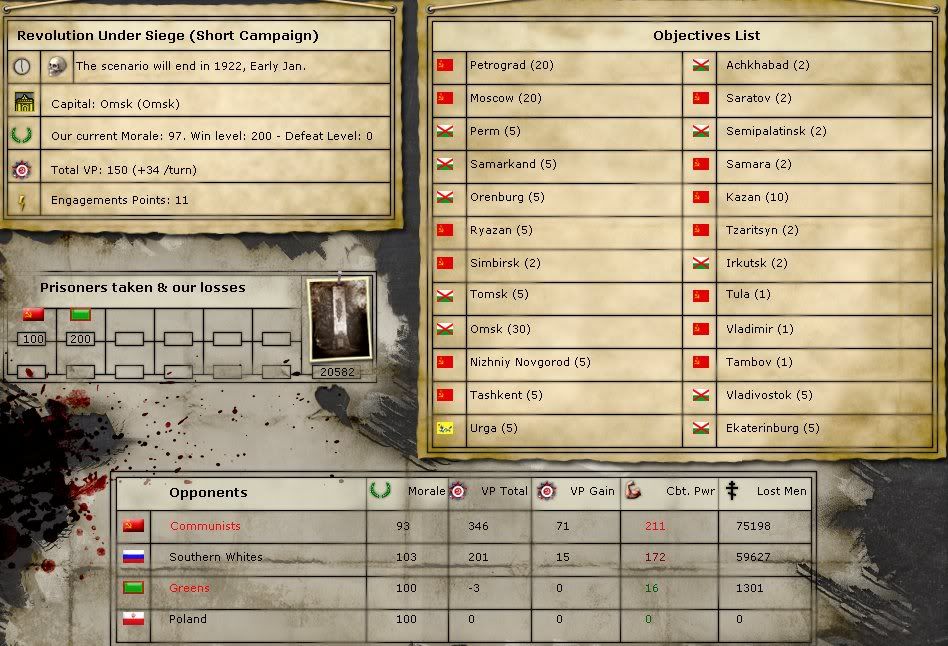
Unlike the Grand Campaign the "Short" Campaign is well balanced. While Grand Campaign PBEMs are almost certain to end with a White victory, the outcome of a Short Campaign PBEM is entirely open.
All sides start the game with strong armies. In the East the Red army and Kolchak's Whites are fairly even matched. The Southern Whites hold a small edge. But this initial advantage will quickly evaporate since the White powers can't recruit at the same speed as their Red opponent.

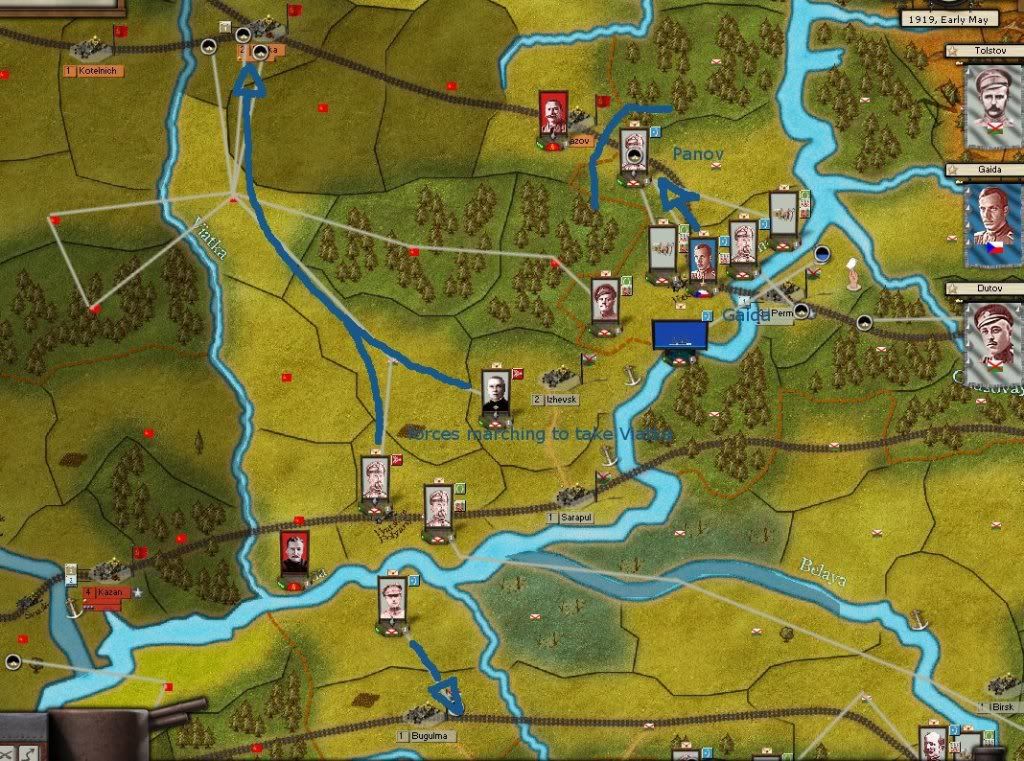
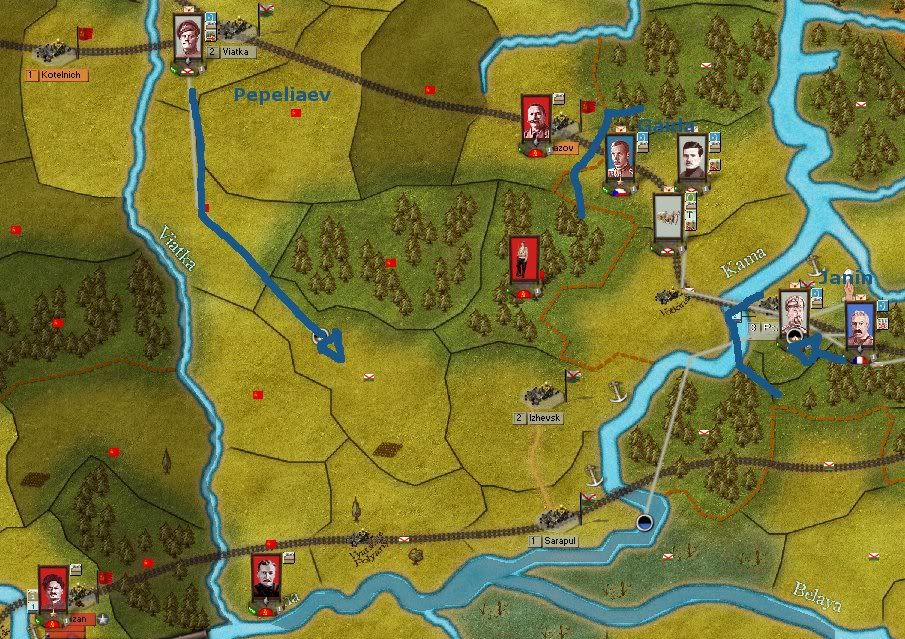
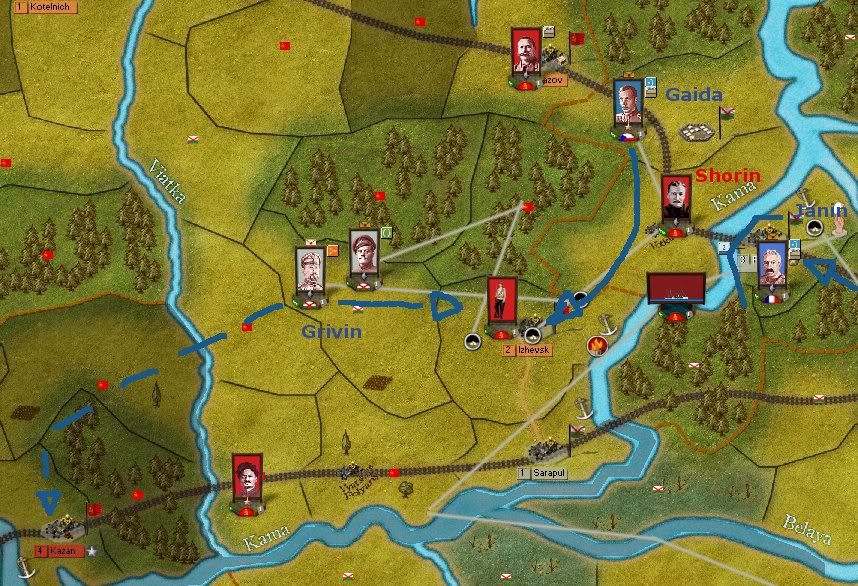
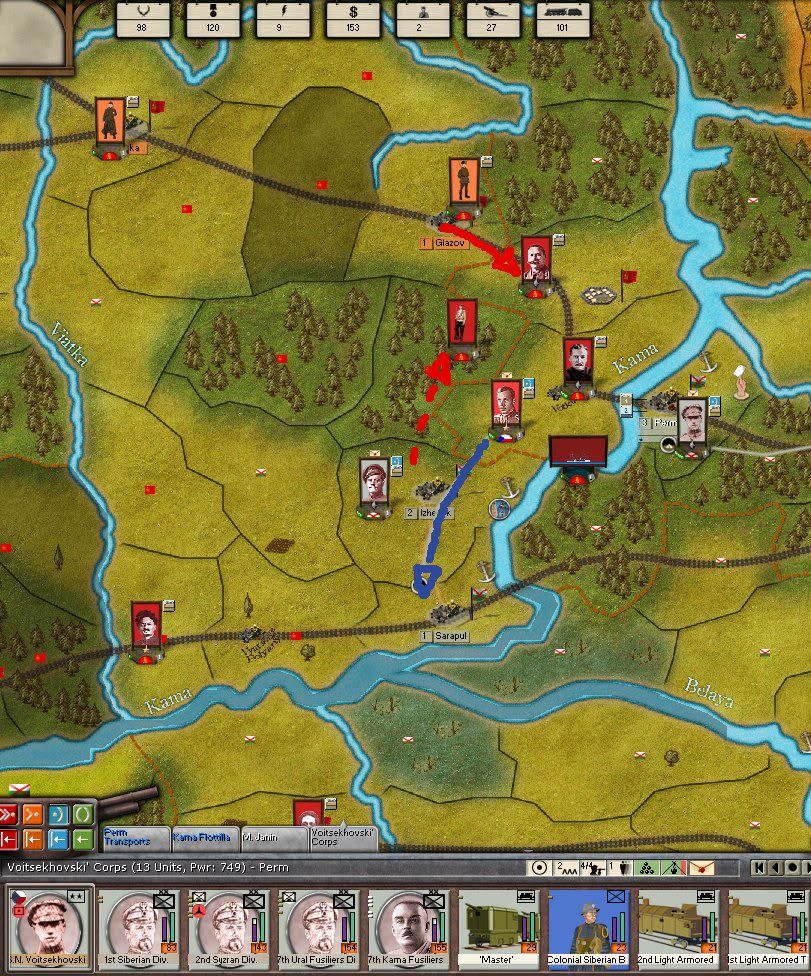
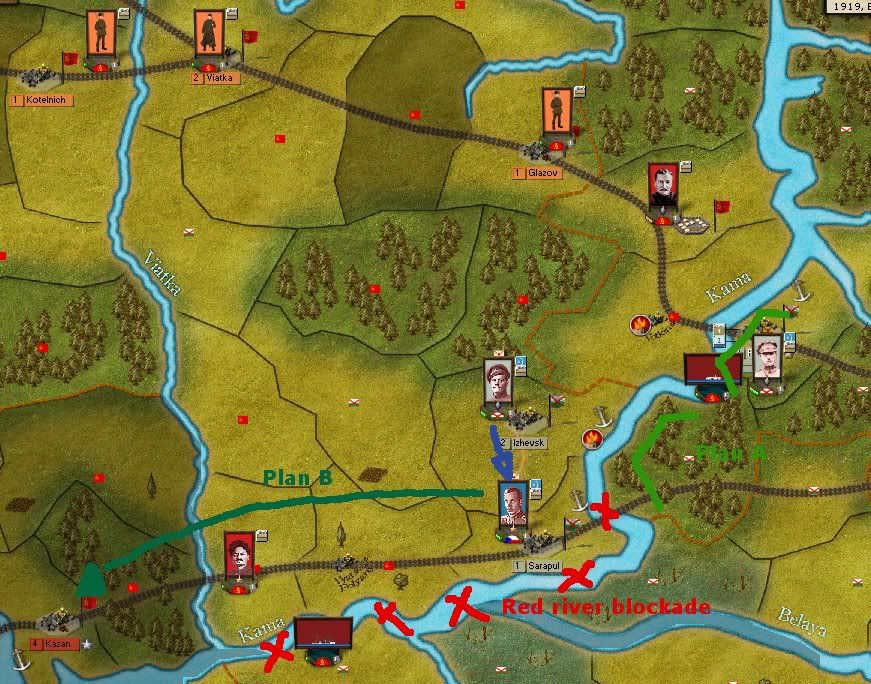
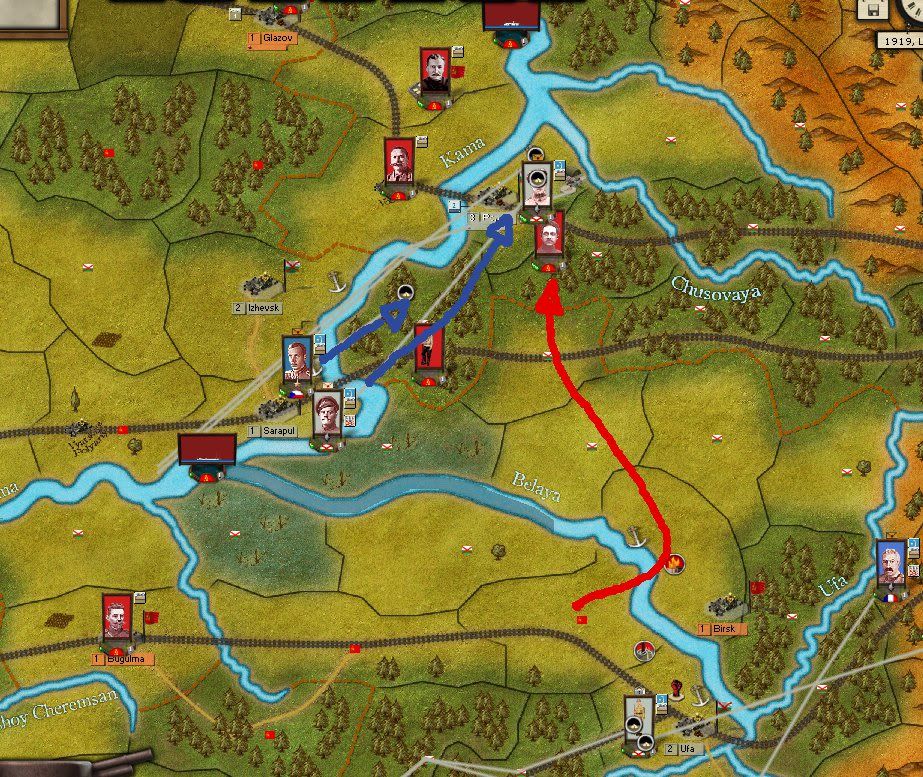
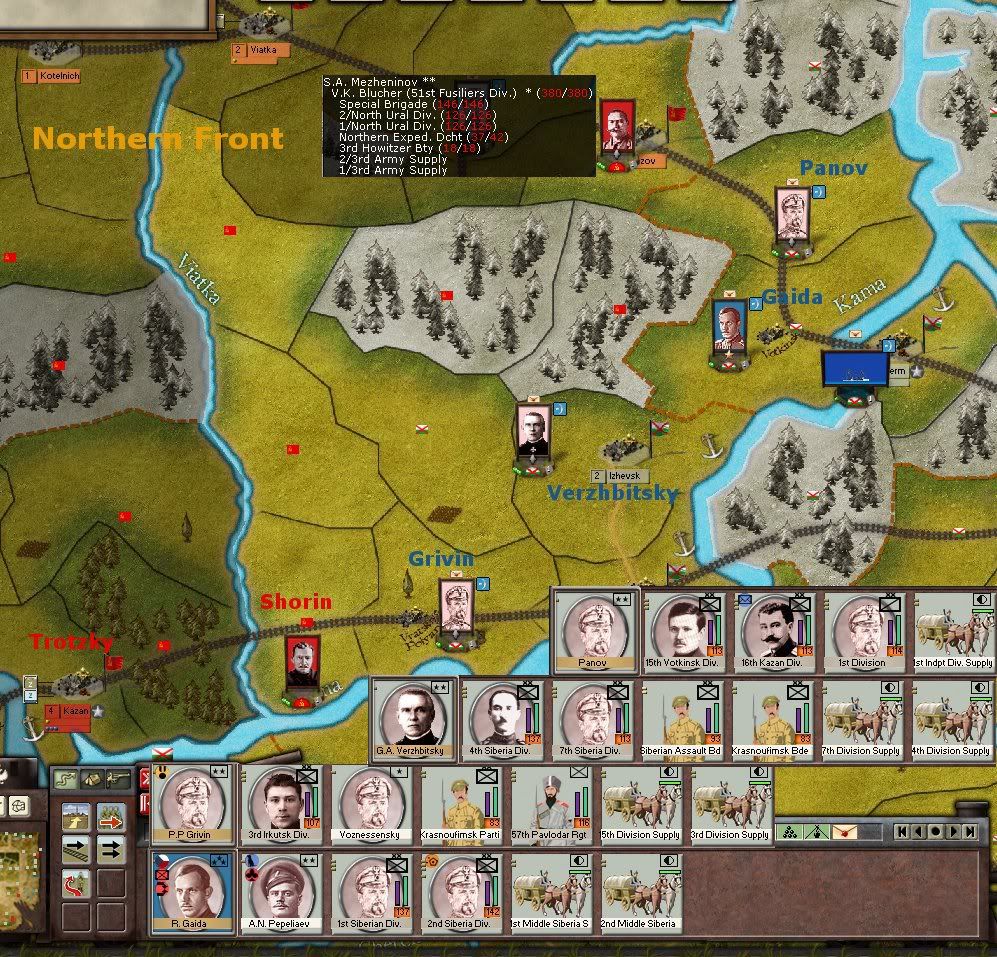
In the North, the initial battlefield is the area between Perm and Kazan. The Siberian White field four small corps against three slightly bigger Red stacks.

turn0a.jpg


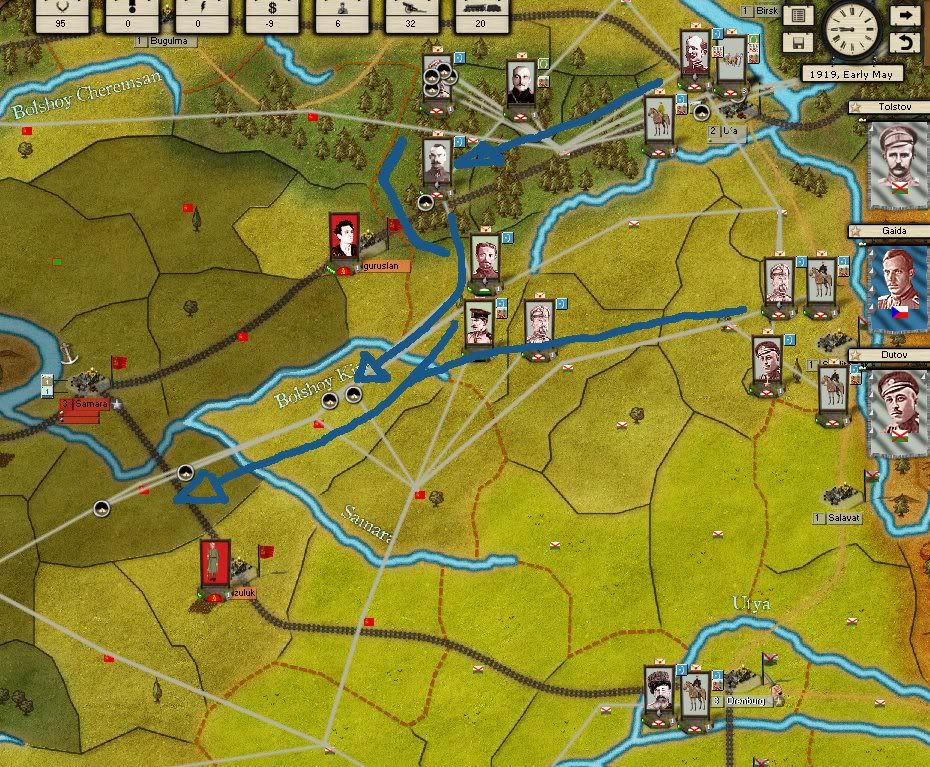
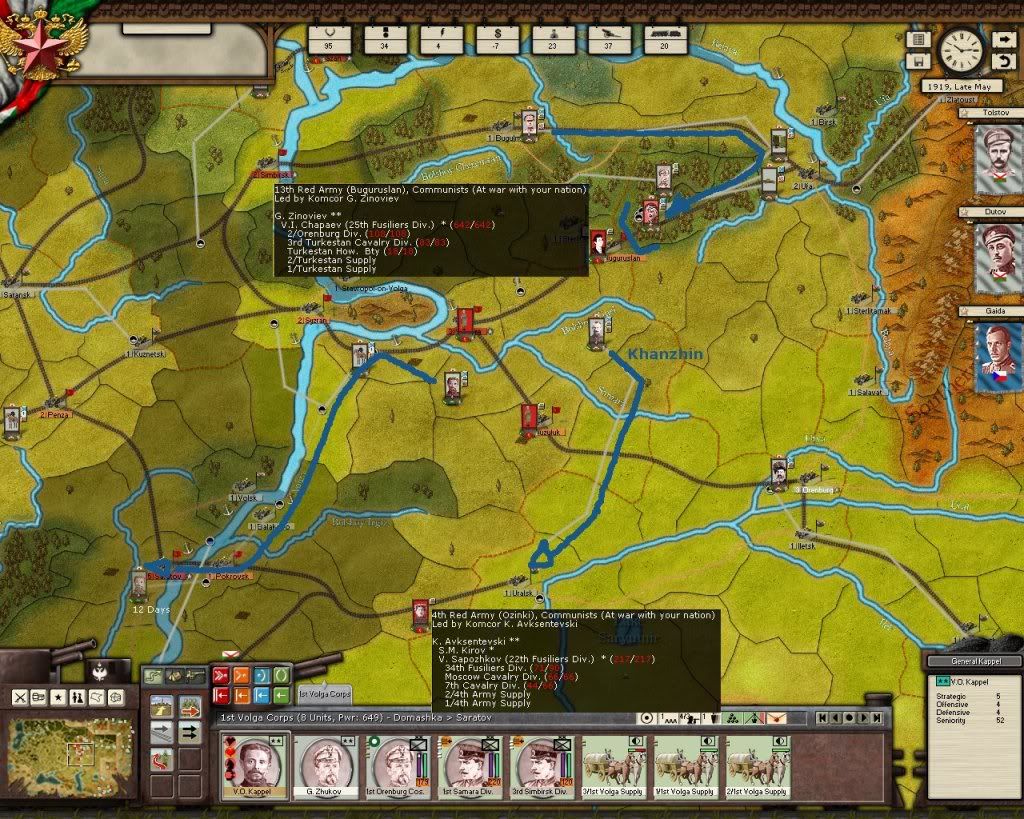
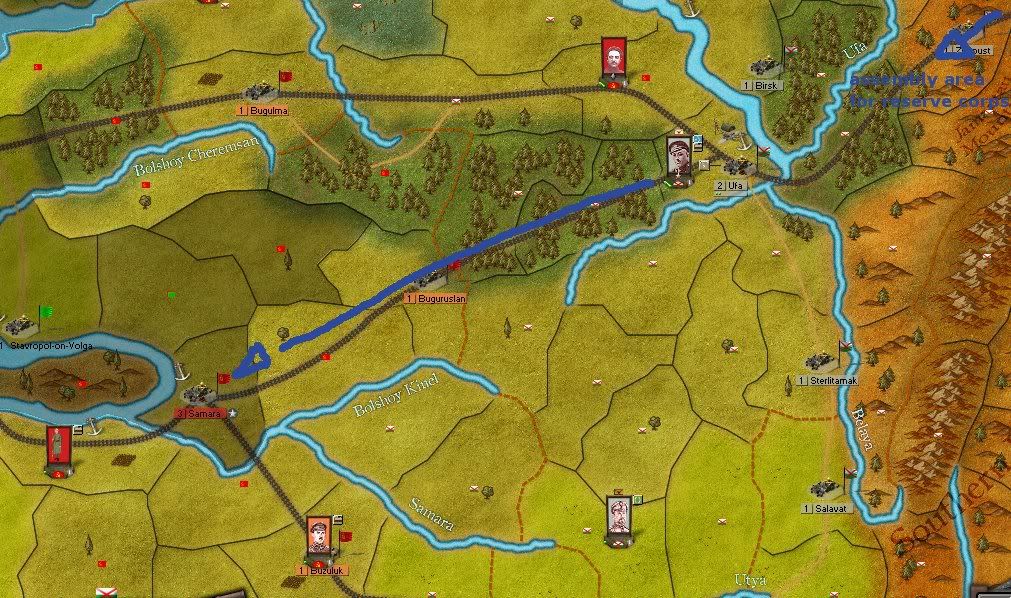
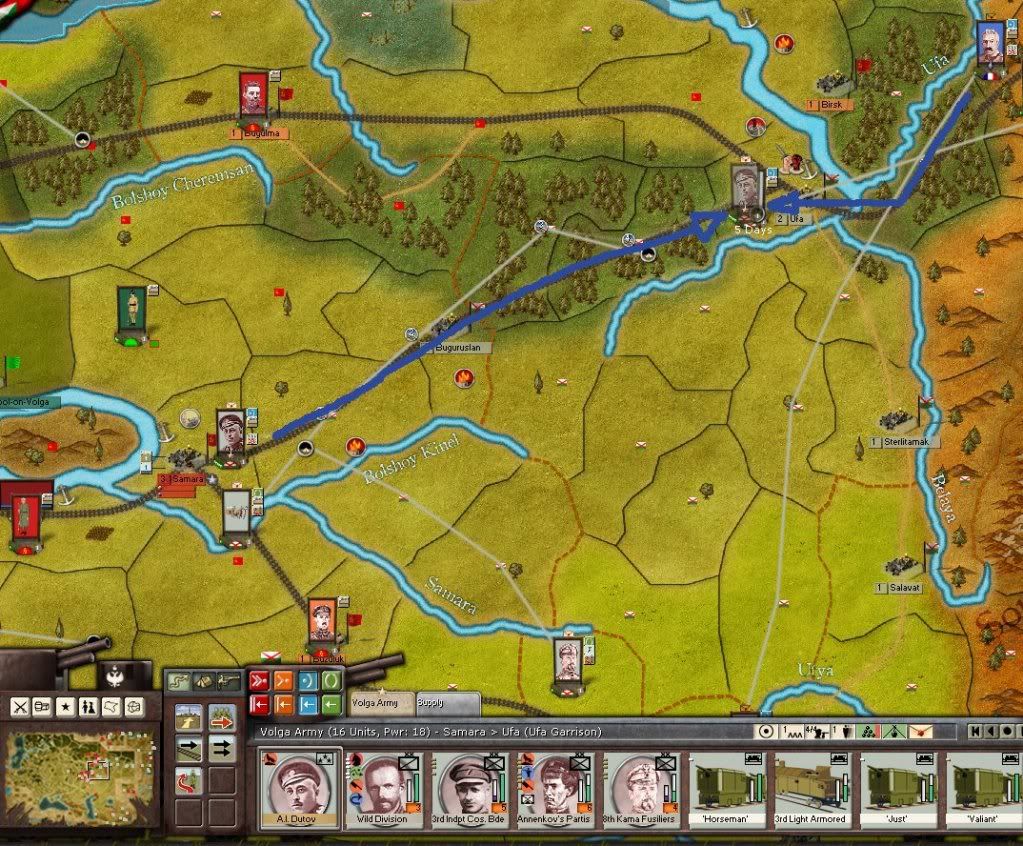
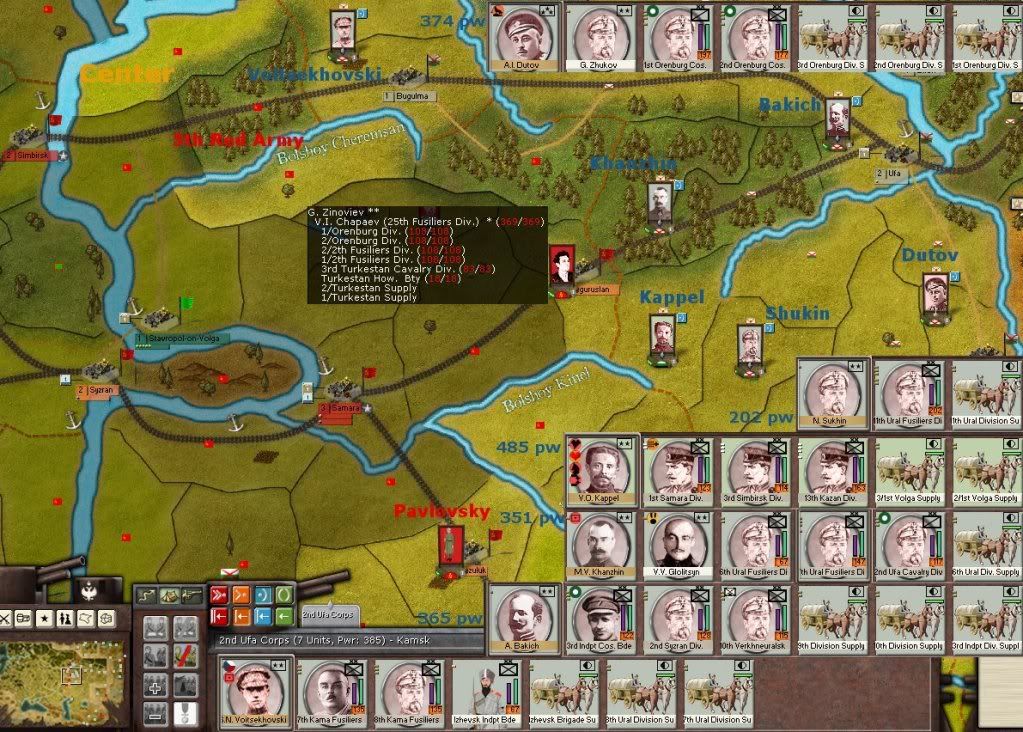
The center is the area between Ufa, Samara and Simbirsk. From the North it is divided by the Kama river. Again the Siberian White appear more numerous on a superficial glance: there are 6 Siberian White corps in this sector facing only 3 Red ones. However a Red division like Chapaev's often has the same fighting strength as an entire White corps. Overall both sides have about te same number of men, the Red forces are simply better concnetrated.

turn0b.jpg


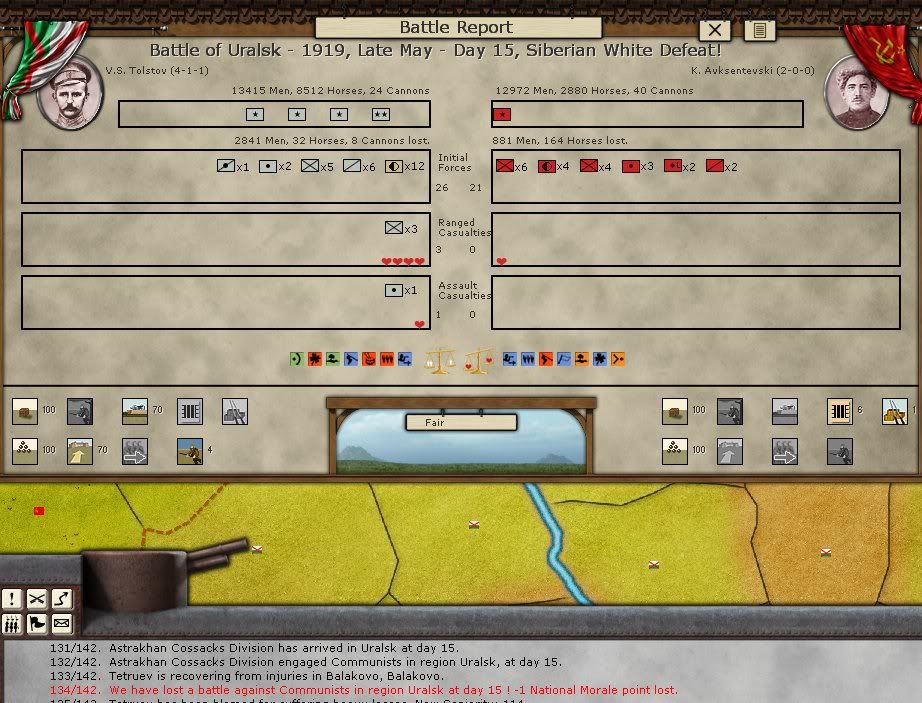
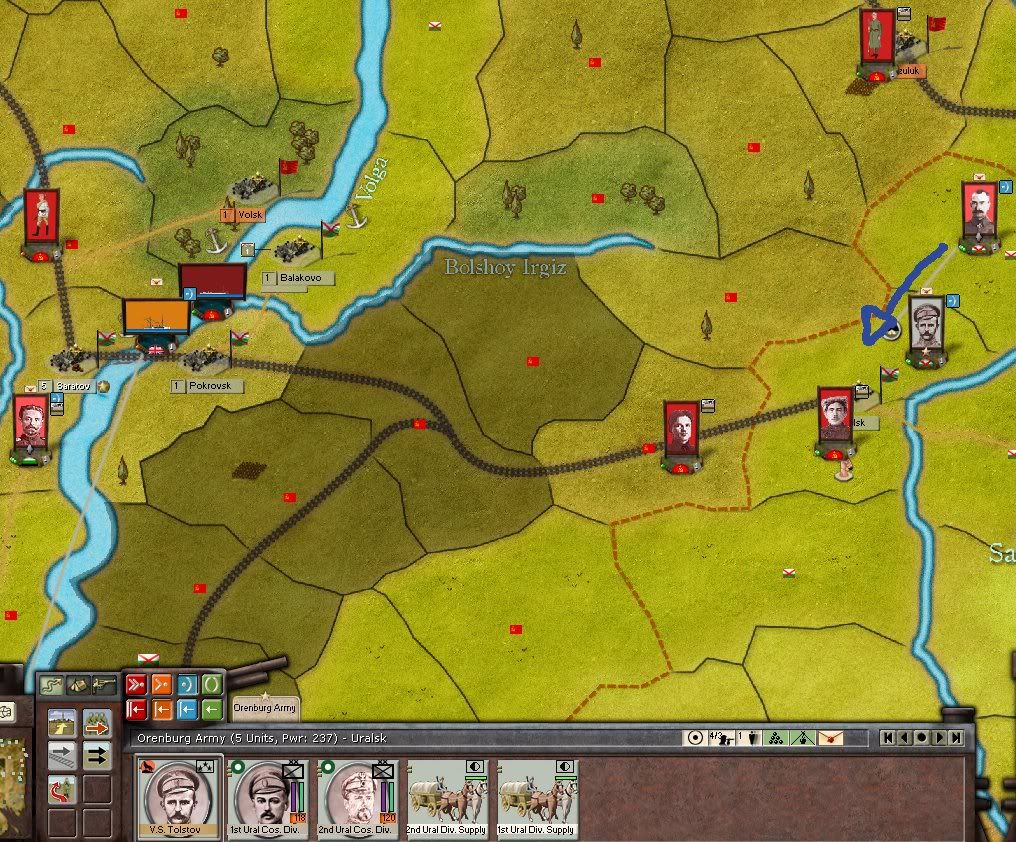
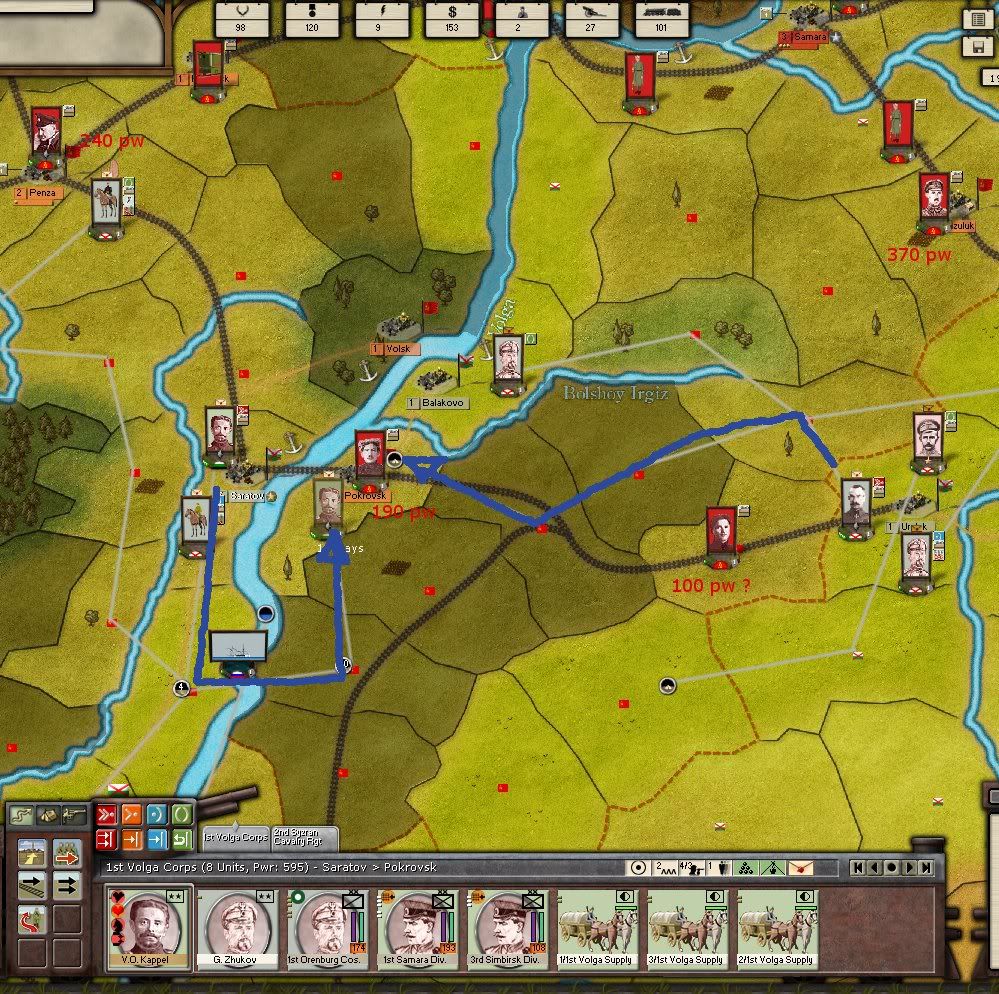
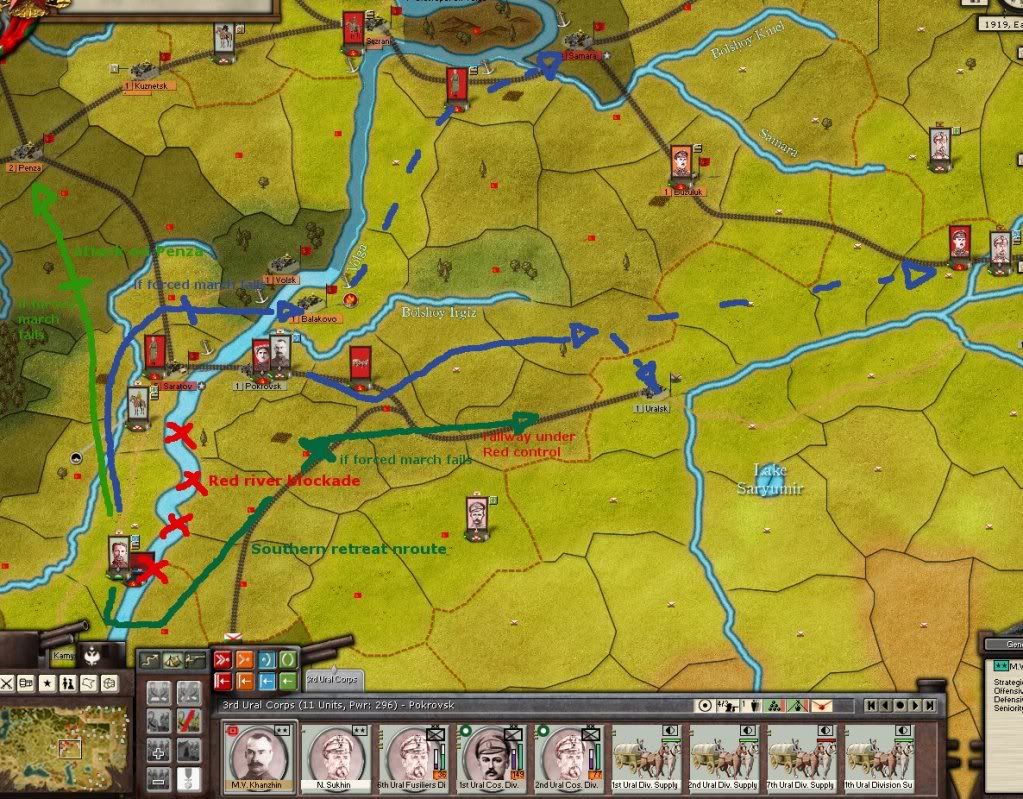
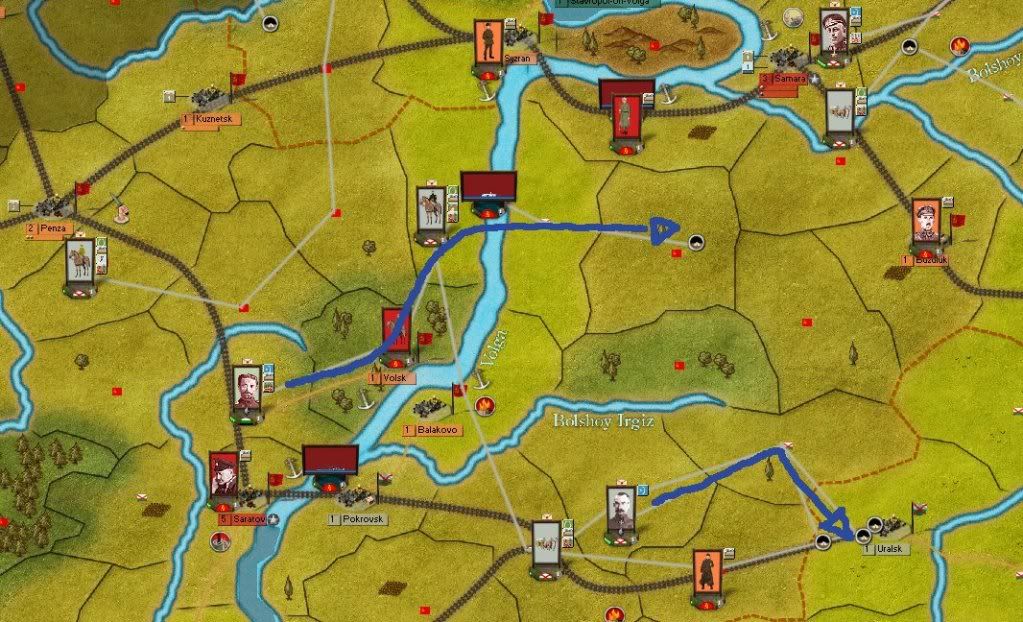
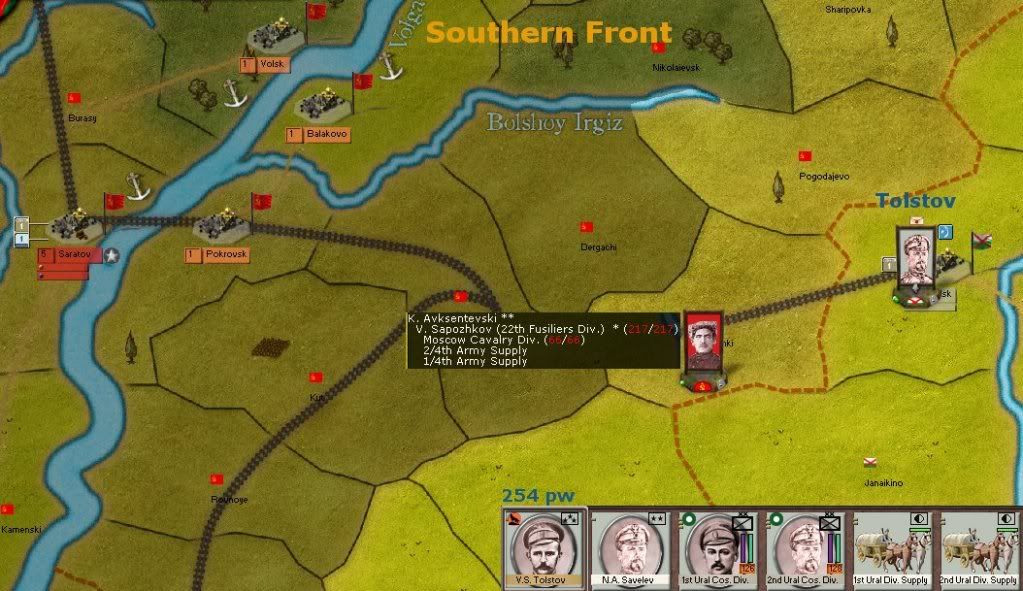
The Southern front starts relatively small: it's most important part is the railway line between Saratov and Uralsk. Each side has one corps in this area.

turn0c.jpg


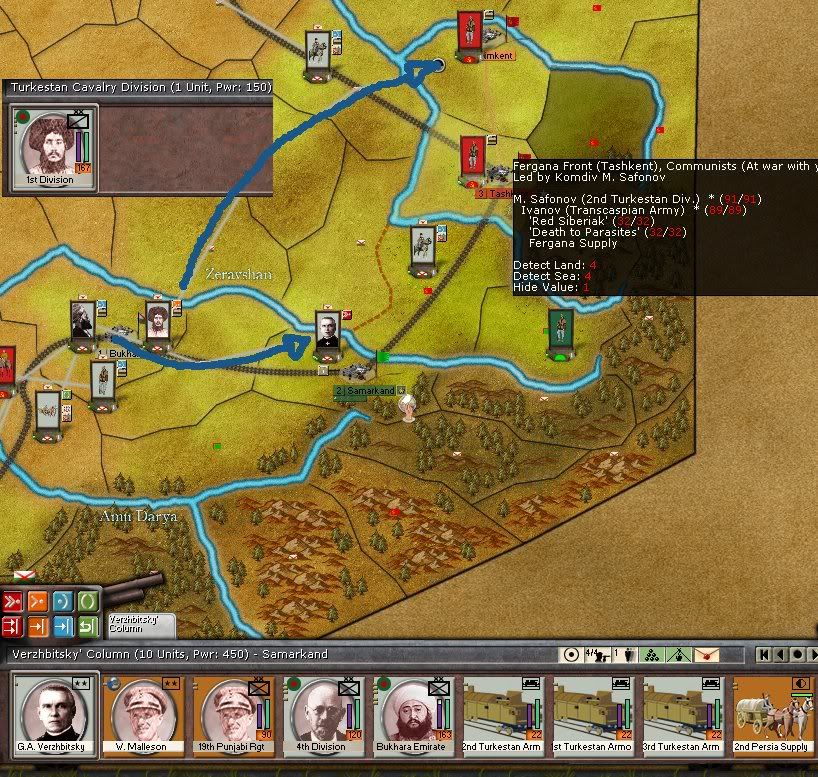
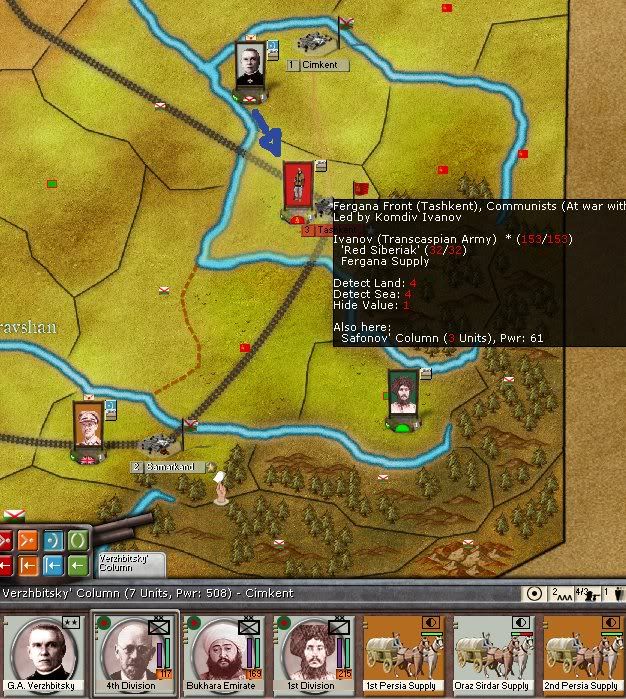
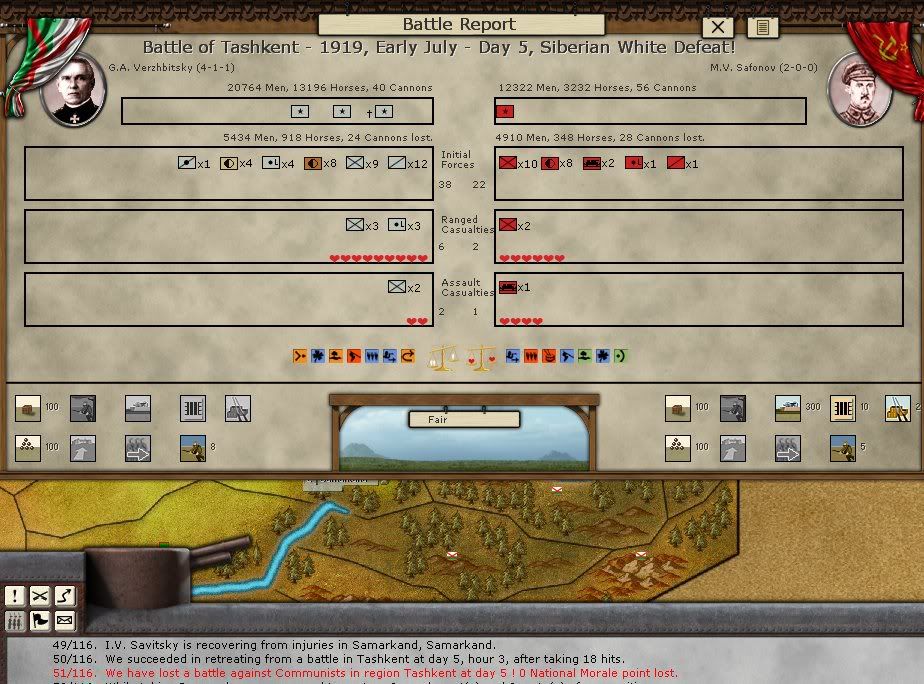
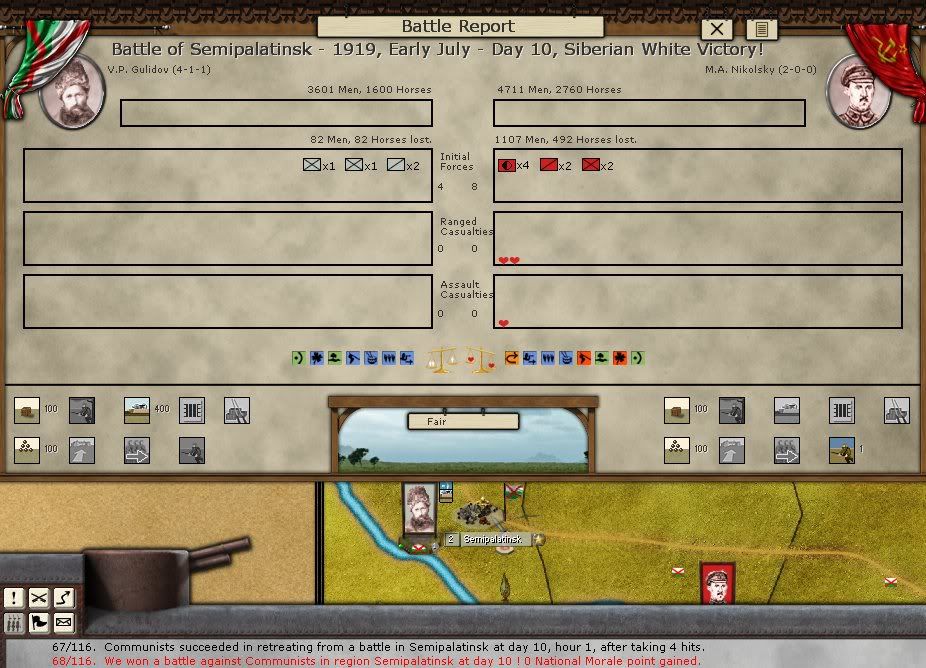
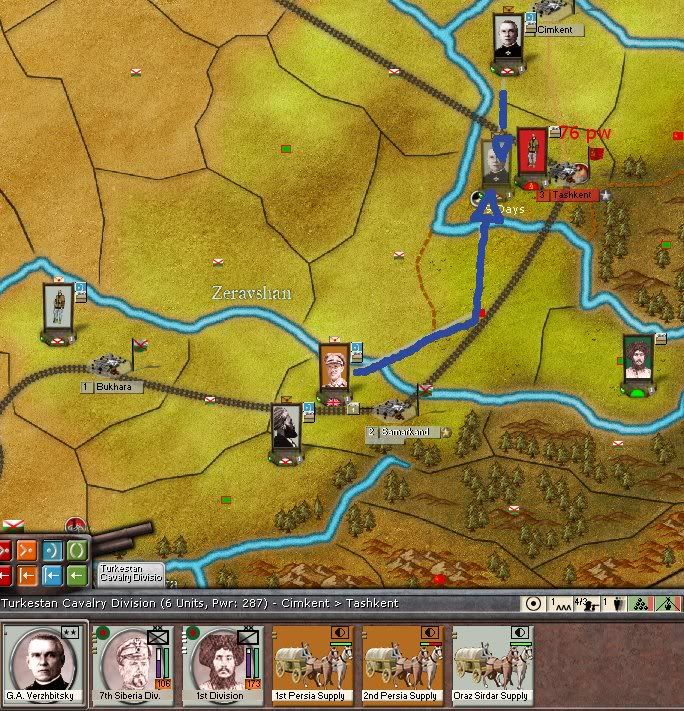
Central Asia and in particular the cities of Samarkand and Tashkent will constitute another battlefield. Here the Siberian forces outnumber the Red ones 2:1. As a third party Green peasant armies are bound to interfere in this sector.

This is the third PBEM I have been playing with this group of players. Our first one ended with a Red victory, while the second one saw the White forces victorious. We have switched sides after each game. This time I am in control of the Siberians. The Southern White player, Durk, is hosting.
These games have taught me a few things about my fellow players:
Durk is highly aggressive. He compared himself to J.B.Hood once. Ian can expect ceaseless attacks from him but the Southern Whites might pay a heafty price.
Ian is more defensive-minded and one of the most accomplished raiders I have ever seen. I fully expect to get flooded by Red cavalry. His only weakness may be that he tends to spread his forces out in an attempt to protect all strategic positions.

The Siberians are the weakest faction in this scenario. But I will work hard to change that. One of the things I love about RUS is that every faction has its own advantages and disadvantages: The upside of the Siberians in this scenario is:

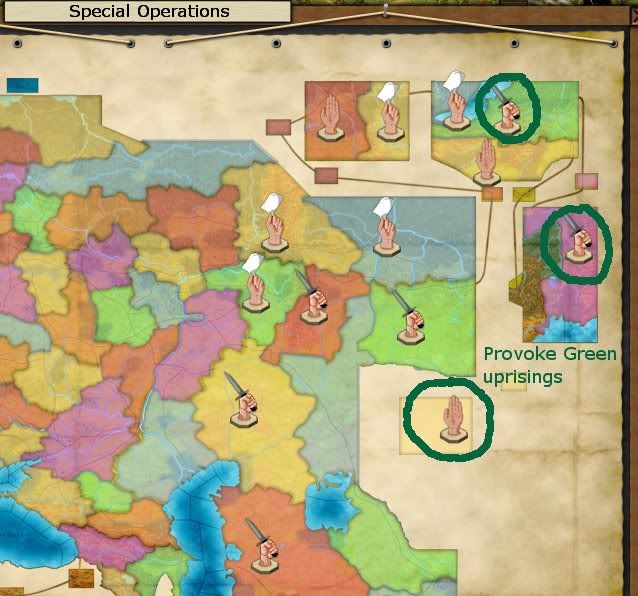
1. Unlike the Southern Whites, they control a lot of space allowing for the extensive use of special operations. In order to prevent a green flood I will have to mix requisition and conscription with reforms. There are some areas where I will deliberatly provoke Green uprisings, though. Why? Either these areas are far off and of no importance to me or I have locked troops there and am relying on my Green friends to unlock them.

turn1c.jpg


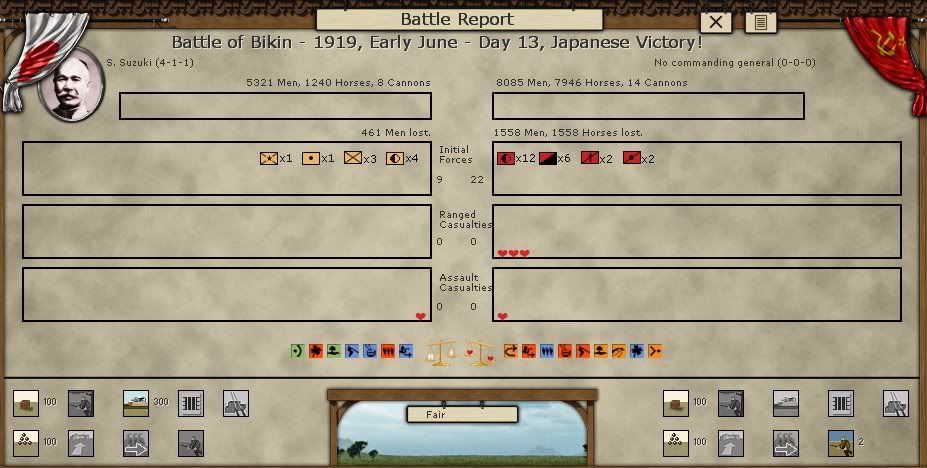
2. The Japanese: In the Far East, 700 pw worth of Japanese troops defend the Transsiberian Railway. What a waste of fighting power. Hopefully the Greens or Ian will unlock them for me.:p 
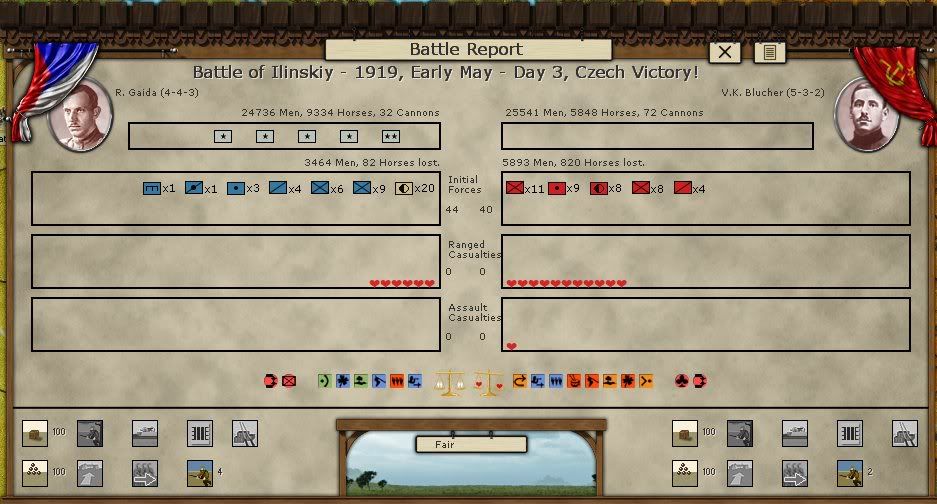
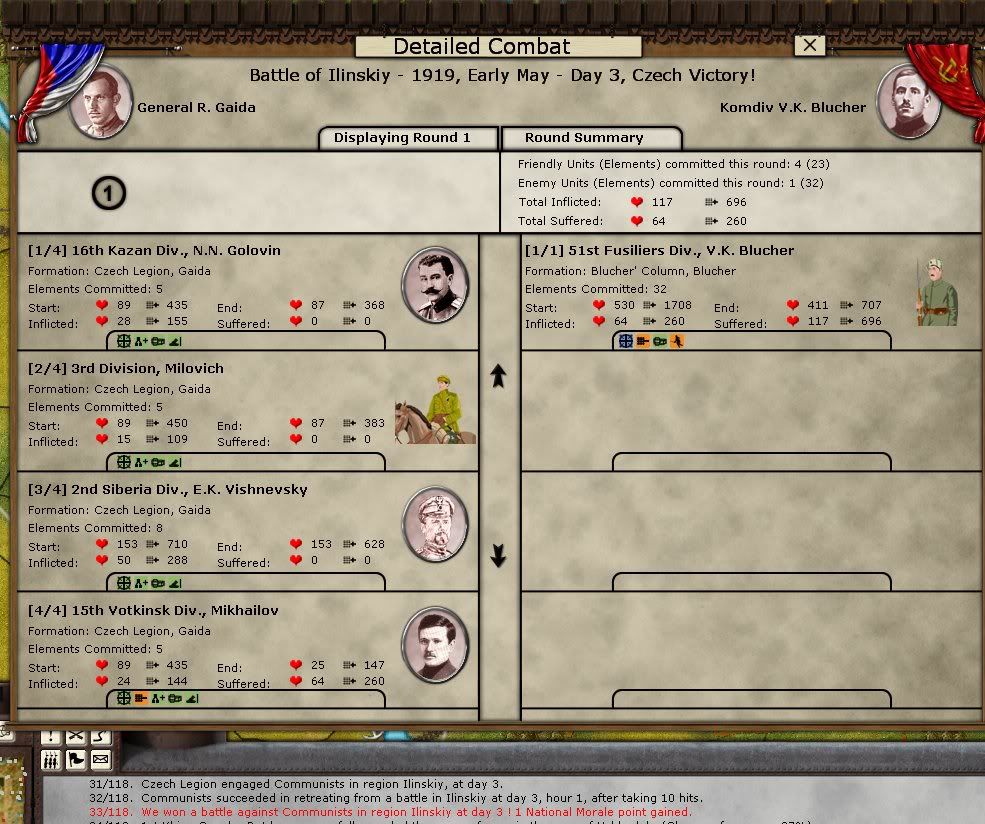
That is why I will provoke Green uprisings in these areas. The Green AI is dumb beyond imagination, it has only one instinct: go to the next city and cluster there. Often, it attacks regardless of the odds to achieve this goal. In doing so the Greens will unlock my garrision forces.

3. Decent leaders in adequate numbers: except for Kappel there aren't any excellent generals but the average Siberian 4-1-1 leader can at least be expected to be active most of the time. Everyone who has ever had the joy of playing the Reds in RUS learns to appreciate this.

4. Secure hinterland: Siberia itself is protected by the Ural mountains. Should things go badly these mountains are easily defendable. Should the Red Army venture past the Ural its advance will become increasingly difficult: at first there are still two railway lines, but soon they will be limited to one track of railways without any flanking possibilities.

The downside:

1. Small divisions: While the Red divisions can be monsters with up to 600 or 700 pw, Siberian divisions are usually between 50 and 200 pw at full cohesion. In battles this is a serious disadvantage. I will reorganize my forces but until I have built some multi-element brigades (one of the improvements introduced in the patch 1.04), I will have to live with weak divisions.

2. Spread out forces: my army starts all over the map. Apparently Kolchak never listened when his teachers talked about concentrating forces. Luckily this can be changed.

3. Few EP (the currency necessary to buy options). I start with 3 EP per turn while the important options like mobilization or money printing can cost as much as 10 EP. This is only a problem early in a campaign, later on the Siberians usually have more than they needed because the number of options available to them is fairly limited.

4. And of course: not enough troops. This will only get worse as the Red Army will grow fast.


About me: I am very new to this forum (although a long time lurker). If my beloved AGEOD hadn't been bought by Paradox, I probably wouldn't have registered at all. But recently I have come to appreciate this forum. It is full of live and like the old AGEOD forum welcoming and rather civilized. A good community to become a part of. :)
On the AGEOD forum I am known as OneArmedMexican. Bornego is an anagram of Obregon ... a Mexican general and president who lost an arm (makes it easier for me to remember the user name ;)). RUS is a gem of a game (unfortunately somewhat under-appreciated) which is why I wanted to write an AAR for a long time.

One final word of caution: I am not a native speaker; please have the kindness not to be too harsh when I make mistakes. :blush:
 
Last edited:
Turn 1 - Early May 1919: Siberians on the march

With the troops at my disposal frontal attacks are out of the question. I will have to rely on flanking moves and strike in my enemy's hinterland. If I can force him to spread his forces out, opportunities will present themselves.
Against the AI one can succeed with frontal attacks, against humans the trick is to outmaneuver the enemy. Isolate stacks, cut off their supply routes and try to starve them. The idea is to play passive-aggressive: I will will try to force or tempt my enemy into attack me.

Northern front: My initial target is Viatka. Two corps will attack it with a march around the Southern flank of Mezheninov's army. Supplies are scarce on the Siberian front and Mezheninov's men are relying on the depot at Viatka to collect supplies. Meanwhile Gaida will reinfroce Panov in order to bloster him against a possible attack.

turn1a.jpg


Center: While one corps will pin down Zinoviev, Kappel, Khanzhin and a few smaller stacks will outflank him in the South. The idea is to pose a direct threat to Samara and force a tactical retreat. I considered an assault on the city but was fairly certain that Ian would retreat Zinoviev back there. I did in our first game. A by-product of these moves is that I will end up with three corps of ~ 500 pw each instead of half a dozen weak ones.

turn1b.jpg


Southern front: Tolstov's army at Uralsk is woefully weak (250 pw). For now his men will defend. The small Cossack division at Gurjev will head North to reinforce him.

Central Asia: This is the only region where the Siberians have a clear numerical superiority. The first target is Samarkand, currently held by Green rebels.

Sidenote: Currently, this game is at turn 9. I started writing this AAR when we had reached turn 3. The first updates will come rather quickly. Later on things will slow down since I don't want to expose my current plans.
 
Last edited:
Turn 2 - Late May 1919: Mistakes and maneuvers

Battle of Ilinskiy: The first engagement of the war ended with a small Siberian victory, +1 NM. Blucher's attack was repulsed by Gaida's men at Ilinskiy. Still Siberian casualties were a bit high for my taste: 3.500 men.

turn2a.jpg


On closer inspection, it turns out that I had 4 small divisions pitted against Blucher's one big division. While three of mine escaped completly unscathed the fourth was horribly mauled and lost 3/4 of its men. It's a good example to show how small divisions fare badly in the AGE battle engine.

turn2b.jpg


Northern front: During my attack on Viatka the depot was destroyed which suits me fine since I didn't intend to stay there. My goal of crippling the Red supply line is achieved. Pepeliaev, one of my more capable commander has taken command over the now unified force (750 pw). He will head back through the mud with a forced march to a position where he can either threaten Kazan or reinforce Gaida. Gaida will stay where he is and build a depot to assure his supply. Soon this will be proven to be a bad mistake, that almost cost me an entire corps ... :sad:
Janin is reinforcing Perm with a French batallion and some armoured trains.

turn2c.jpg


Center and South: I should have gone after Samara in turn 1. Ian left it weakly defended. He hates to give ground and obviously didn't think about a flanking move. Now it is too late. Zinoviev will almost certainly retreat there by train. If I chose to attack, it would just end in a futile bloodbath.
Meanwhile further south Ian is preparing a move against Uralsk. Smart as he is, he has realized how weak Tolstov's army is. Even more worrying, he has brought up Kirov with two divisions from Samara to reinforce Avksentevski (the Red naming conventions in this game are rather boastful: armies are named front, corps are armies, divisions are corps and divisions are brigades). I decide to see this as an opportunity rather than a threat. Kappel will head south along the Volga and strike at Saratov. The move is not without risk: if his forced march fails he will only get to Pokrovsk. The same will happen if his crossing gets intercepted by a red river fleet. Norris small fleet of British gunboats is sent north to prevent this.
Even if Kappel should only reach Pokrovsk, it would still be an accpetable outcome since it will position him between the 4th Red Army and their supply base. Meanwhile Khanzhin will take his corps (400 pw) on another forced march to reinforce Tolstov at Uralsk. I can't remember ever using this many forced marches in one turn. :)
Tolstov himself won't give a field battle but rather retreat inside the city. If Ian should issue assault orders, I am confident that the Red Army will pay an unhealthy price.
Proud of this nice plan, I made yet another mistake: the small division from Gurjev was also headed to Uralsk destined to arrive on day 15 ...

turn2d.jpg


Central Asia: Samarkand is defended by 40 pw worth of Green rebels. It will fall easily. Verzhibitsky has been transferred South (instant redeployment, we are playing with one per turn - very handy). This solves my lack of command points in Central Asia. Juna-id-Khan at the head of some reinforcement (90 pw) will join the Samarkand force. Oraz Sirdar leads his cavalry division across the steppe to take Cimkent. Currently there are two regiments of Red infantry and a supply train there. Hopefully they will wait for my cavalry. :)

turn2e.jpg
 
Turn 3 - Early June 1919: Trouble in the North

Not a good turn. Remember that small Cossack division heading towards Uralsk? Khazhin failed his forced march and didn't arrive in time that left Tetruev's cossacks facing Avksentevski's Red forces on their own. Meanwhile Tolstov was sitting idly inside Uralsk watching the cossacks getting butchered. The battle report is highly misleading since it includes Tolstov's men. Basically the AGE engine lists all units present in a region regardless of their involvement in the battle (e.g.: ships lying in a harbour are included in the report of land battles waged in the same region, troops garrisioning a city are listed for battles fought outside the city walls).

turn3a.jpg


Northern front: But the real trouble is brewing on my Northern front. Shorin has snuck up behind Gaida. I overlooked that danger and Ian took ruthlessly advantage of my mistake. To make matters worse, the Kama is blocked by a strong Red fleet.
How to react? - Two possible plans formed in my head. An aggressive one and a passive one.

turn3b.jpg


Plan Kazan: Grivin has taken over from the inactive Pepeliaev (whenever possible I try to have 2 corps commanders in my stacks to assure maximum mobility). He will flank Trotzky and attack Kazan. Meanwhile Gaida and Janin will defend at all cost, pinning down Shorin and Mezheninov.
The risk: Trotzky is in command of a stack of 5 armoured trains he can't reinforce Shorin due to the lack of a suitable railway line, therefore there is a chance of him heading back to Kazan. But most importantly this would leave Gaida in an awkward position.

Plan Kama: Shorin hasn't taken complete military control of Votkinsk. I still have 47%. This will allow me to rail Gaida's corps there without switching to offensive stance. My troops will simply slip out of the trap. They will rendevouz with Grivin at Izhevsk. Perhaps I can take out the light Red brigade there as a bonus.

Sometimes decisions are dictated by one's mood. In this case, mine was darkened by the slaughter of my cossacks at Uralsk. I went with the safe option and abandonned my freshly built depot. Unfortunately the destroy depot option still doesn't work, I will have to leave it to the Bolsheviks.

Center: As expected Zinoviev has retreated to protect Samara. Lacking any promising targets, I decide to further weaken this sector. Dutov's army will be split: he will retreat to Ufa with two dvisions and four armoured trains where a third division arriving from the East will join him. Voitsekhovski will lead the other three divisions north to Perm via railway. This move should strengthen my Northern sector enough to take back the initiative.

Southern front: Kappel the best among my fairly mediocre generals hasn't let me down and took Saratov. The Red garrision was positioned outside the city. It retreated but not before it was badly mauled. Strangly Ian has split the force outside Uralsk and only attacked with 3/4 of his forces. Had I known I would have left Tolstov outside the city. The cossack fiasco could have been avoided. But at least their sacrifice has weakened Avksentevski. His cohesion is low, he now only has ~ 100 pw. With 33% military control, Tolstov can leave the city without a fight. There he will be reinforced by Khanzhin. Together they are more than strong enough to deal with my Red foes. Kappel is staying at Saratov recuperating cohesion. Kirov and Avksentevski are without a supply source. Personally, I would retreat them North to Samara but perhaps Ian will try to retake Saratov.

turn3d.jpg


Central Asia: I am strating preparations for an attack on Tashkent. It will be tricky since I have to leave enough forces behind to defend Samarkand from the Red troops as welll as a strong Green peasant army lurking in the mountains.

News from the Southern Whites: Durk hasn't made much progress. The Red Army hasn't lost any ground. Voronesh seems to be under siege, though. Southern White NM is up to 108 but Durk isn't using any reforms and hasn't taken any options yet.

turn3e.jpg


What truely worries me is the casualty sheet. I have inflicted about as many casualties as I have taken. But the Southern White have already lost almost 37.000 men while they can't have inflicted more than 27.000 Red casulaties. Considering that their troops are of better quality and are led by some of the best generals in the game this doesn't bode well. With his limited income in EP and small territorial base, Durk will have trouble replacing these losses.
 
Turn 4 - Late June 1919: A pincer movement

Kolchak's armies saw little combat this turn. One of my scouting units got mauled by the Red. But my Japanese allies more than repaid the favour. General Suzuki's small division was attacked by Red cavalry in the far East but the brave Japanese infantry prevailed.

turn4a.jpg


Northern front: Operation Kama worked, at least almost. Gaida escaped the trap without a fight but got blocked in the next region. He will finish his move this turn. Soon, I will have to make a decision: either I retreat behind the Kama and transfer most troops elsewhere or I retake the offensive. Trotzky's stack and Kazan are the obvious targets. Retreating won't be easy though since Red ships are still controlling the river.

turn4b.jpg


Center: My troops have retreated back to Ufa. Ordzhonikidze has taken Bugulma with 5 infantry divisions. Together with Zinoviev's army at Samara he is outnumbering Dutov's troops 2:1.


Southern front: The Red forces are all over the place but nowhere really strong. It's time to punish this mistake. The question is where to strike? My initial idea is to attack Penza. Kappel should be able to take on Samoylo's small stack there. The problem is that Penza can be easily reinforced by railway. It is too obvious a weakness. Sounds paranoid? I don't care, paranoia makes one rethink plans. ;)
Instead I decide to harrass Avksentevski. Kappel will cross the Volga further south and then head back north. Meanwhile Khanzhin is ordered to outflank Kirov and attack from the East. Kirov is highly unlikely to stay where he is anyway. If he retreats north he might run into Khanzhin's corps. If he retreats to the East he will just fatten my prey.

turn4c.jpg


I am leaving Saratov and Uralsk open. As a consequence Uralsk will probably be lost. Saratov on the other hand will hopefully be a very different story. Note the single cavalry regiment I left there to preserve my trenches? I like the smell of a trap in the morning. The Red river fleet could spoil my plan, though ...
 
great stuff - nice to see another RUS AAR, seems as if you have opportunities in the south but are running the risk of running into a bit of a quagmire where you can take a town if you concentrate but its not clear if you can hold it?

Thanks loki. You did an outstanding job on your WiA AAR by the way. :)

Your warning is right on the point, too. I did indeed run into a deep quagmire in the South. One of my corps will end up isolated and struggling for turns to come.
 
Turn 4 results - Late June 1919: The war gets bloody

I can't say I am happy about this turn. Technically, I won all three battles. But my casualties have been too high for my taste and the Red fleets are becoming a major annoyance. They seem to be everywhere.


In the North, Shorin and Gaida collided after all. The Reds attacked, Gaida defended but due to him moving out of the province, Gaida didn't profit from entrenchment. In the third and final round reinforcements joined in on both sides from neighbouring regions. This isn't depicted in the short version of the battle screen, though. 7.400 White soldiers died, while 11.000 Communists lost their lives before Shorin retreated. Far too costly a battle for my taste, still +1 NM is nice.

turn5a.jpg


In the South, my pincer movement ended in a fiasco. I gambled away a good strategic situation for no gain. The trouble started when Kappel was blocked from crossing the Volga by a Red fleet. Norris' British gunboats that were supposed to secure the river crossing retreated without a fight before a Red fleet. This left Khanzhin facing Avksentevski alone. He won but at a high cost. 3.500 White casualties against less than 2.000 Red ones.

turn5b.jpg


To make matters worse, Chapaev snatched Saratov from me, leaving Kappel in an isolated position. My plan backfired badly. In my defense, I would have never expected Ian to launch an attack on Saratov with insufficient forces. My idea was to wage a defensive battle there next turn. Had I simply stayed put, I would have won.

At least, the third battle was a clear victory. I have been slowly reinforcing the tiny corps at Orenburg with a few regiments of left-over troops. Again Ian attacked with insufficient forces. This time he paid the price. 600 White casualties for 2.100 Red ones. A good outcome.

turn5c.jpg


There could have been a fourth battle: Ordzhonikizde advanced on Ufa but unfortunately he retreated without a fight. Considering that he had 5 infantry divisions and several supply wagons with him his evasion value most have been low. Ian got lucky.

The bloodiest turn on my front this far boils down to a total of 11.603 White casualties against 15.331 Red casualties.
 
Turn 5 - Early July 1919: Someone will be food for the fishes ...

Usually I don't take crazy risk. I rarely make attacks that could leave me without an escape route or jeopardize my whole frontline. Not this turn though ...


Northern front: Two possible strategies have been in my head for the last few turns.

Plan A: Retreat Gaida and Pepeliaev across the Kama and establish an almost impregnable defensive line on its Eastern side. This would allow me to significantly weaken my forces on the Northern front but future offensive actions would be out of the question, too.

Plan B: Hold Perm while Gaida and Pepeliaev attack Kazan, either by outflanking Trotzky or by smashing through his small stack. With a forced march this can be done in one turn.

turn5d.jpg


Currently Plan A is hard to achieve, the Southern half of the Kama is blocked by a Red river fleet. The Northern half isn't. Ian has only a single transport there which is insufficient for a blockade. I am not sure whether he is aware of this.
For now, I will simply join Gaida and Pepeliaev into one strong stack.


Center: Dutov's hour has come. Operation Railway Voyage will be launched. Dutov will take his entire army (900 pw) and attack Samara, leaving Ufa undefended except for one locked regiment.

turn5e.jpg


The plan rests upon three assumptions:
1. I believe it's unlikely that Ordzhonikidze will attack Ufa again next turn. His stack has already been proven too weak.
2. Samara's defenses are weakened. Chapaev took 750 pw away from there in order to attack Saratov. With Ordzhonikidze threatening Ufa, Ian has little reason to worry about Samara. In other words it is unlikely that he will reinforce it.
3. The undefended city of Uralsk is bound to tempt Ian. It is almost certain that he will send a stack there which further decreases the probability of reinforcements being sent to Samara.

The obvious risk of this plan is losing Ufa. It would cut me off from Siberia. Something, I can ill afford. If everything goes as planned, Dutov's march should give him control of the entire railway line between Samara and Ufa. The next turn, this will allow him to rail back to Ufa possibly leaving behind a garrision to hold Samara. By rail the journey takes only five days. He should be just in time to fend off an attack from Ordzhonikidze (who almost certainly has a command penalty slowing his stack down, perfectly organized and active it would take him 4 days to reach Ufa. A stack arriving on day five should be able to slip into the region before he takes complete military control, allowing me to wage a defensive battle). Moreover, I am assembling a small reserve corps at Zlatoust. Only two regions away from Ufa. Unless it is stopped by a river blockade (Ian hasn't sent a fleet to this sector yet), it will arrive in time to bear the brunt of the first attack. But I trust that Dutov would be able to join that battle since we are playing with a small battle delay.

If Operation Railway Voyage works, it should give me two nice victories. If it doesn't, Dutov's army will be in deep trouble. Something Kappel and Khanzhin are already familiar with ...


Southern front: When Kappel's crossing attempt was blocked by a Red river fleet he ended up in an awkward position just south of Saratov. Meanwhile the city was taken without a fight by Chapaev. At least Kappel is well supplied giving him at least 4 turns to reach a new supply base.
There are two targets I can take within a single turn provided a forced march succeeds (65%): Penza and Tambov. Tambov is too far away from my other armies; getting Kappel back would be a major adventure. The weakly defended city of Penza is a lot more tempting. If the forced march fails however, Kappel will end up with few alternatives.
This leaves me contemplating routes to get Kappel back across the Volga: basically there is a Southern and a Northern route available.

turn5f.jpg


While the Southern route would bring me back to safety even if the forced march fails. I decide against it for three reasons:
1. I consider the river crossing likely to get blocked. Norris and two British gunboats have retreated there. A tempting target for an attack especially if it means cutting off Kappel's obvious retreat route across the Volga at the same time.
2. Durk has promised to send a Southern White fleet to clear the Volga. It can't arrive fast enough to secure Kappel's crossing along the Southern route. In contrast, the Northern path has Kappel crossing at the very end of his movement giving my allies enough time to get there.
3. I am hoping to get Kappel to Samara and join Dutov's army there. If Dutov fails, I can still get to Uralsk or Orenburg.

Khanzhin's position is hardly better. Weakened from his costly "victory" the obvious move would be to get back to Uralsk. The problem is that the last region on the way is 100% under Red control denying me the use of the railway. This means that Khanzhin would have to march through two regions. The Red armies only lack military control in Uralsk itself. They could use the railway except for the last step of the journey. One march against two means the Red forces can beat me to Uralsk.
Therefore Khanzhin will venture further North opening possible paths to Orenburg, Samara or even Ufa. Even better he will still be close enough to Uralsk to turn there if Ian should leave it unoccupied next turn.


Central Asia: Currently this is my happy place. It's is the one front where I have an advantage in numbers. Verzhbitsky will attack straight-forward. My opponent should have level 4 entrenchment but I have 2:1 superiority and am attacking from the one side not protected by a river. It will be costly but I have a good chance to succeed (or at least do major damage).

turn5g.jpg


Recruitment: The first conscripts have been pressed into service for Kolchak's corrupt regime. 5 new infantry brigades, two cavalry brigades, a few militias, artillery and cavalry regiments are now under construction.


News from the Southern Whites: Durk hasn't made any important territorial gains. But he has inflicted significant casulaties on the Red army. For the first time in this game, our combined casualties aren't much higher than the Red ones anymore.

turn5h.jpg


Considering that I have inflicted about 5.000 more casualties than I suffered, Durk is still in the negative by close to 10.000 men. But the situation is improving.
 
Thank you for following my little AAR. :)

a frustrating couple of turns ... I do like the way the AGEOD system can undermine your plans simply by misjudging your opponent and then having to sit there and watch it all unravel

AGEOD games come with nasty surprises especially in multiplayer games. :D Next turn has more of them in store for my poor Siberians. But at least things haven't unravelled yet. My strategic position has worsened considerably, though.

Cool! I'm not quite caught up (have read up to turn 4), but it seems you're travelling a rocky road. Good luck.

Kappel hasn't hit rock-bottom yet.

New update tonight.
 
Turn 5 results - Early July 1919: The fishes are getting obese ...

This is what my friend Durk wrote when he sent me this turn: "Disaster on my front. I lost two major battles and my naval move."
On my front, it was pure butchery but my Siberians came out out ahead; at least in most cases.

The First battle of Tashkent: In Central Asia my attack at Tashkent failed. 5.500 White soldiers have lost their lives, among them Seid-Alim, the Khan of Bukhara; general Savitsky has been wounded. The Red army has lost almost 5.000 men, the commanding general Safonov is most likely wounded, too. In my army, Savitsky's division has been wiped out while my other two divisions took hardly any casualties. I wish the SEPRUS team would try to tweak their battle engine to avoid these strange results.

turn6a.jpg


In Kazakhstan, Gulidov and four regiments are guarding the city of Semipalatinsk against a slightly stonger Red force. This is the second time they have beaten off a Red attack.

turn6b.jpg


From the very start of this game, my intention has been to squeeze Kazakhstan's peasant dry. I will defend the capital city at all costs, while everything else will be left to the Red Army and the Green rebels that are bound to rise. Attacks like this and clashes with the Green will cost Ian ressources for no gain.


The First Battle of Samara: The Red army had three stacks inside the city. In round one, the garrision, three elements of infantry and an armoured train were annihilated at little cost. The next five rounds of combat were a slow grinding match with Red casualties slightly higher than mine. During this fighting four more Red infantry regiments and a commissar were destroyed. Unfortunately, general Bakich was amongst the casualties as well. This loss hurts; two star generals are valuable and rare.

turn6c.jpg


The next day, my brave Siberians attacked again. Another five rounds of combat later, Zinoviev's division had been destroyed. Their leader was most probably wounded.

turn6d.jpg


All that is left of the Red forces in Samara is Pavlovsky's badly mauled division. It has 12 pw left. All its infantry has been killed, its supply was captured, now it only consists of three artillery regiments. Unfortunately, Dutov didn't make a third and finally assault. I might have captured a few Red ships. Still this is a major if somewhat costly victory. + 6 NM pays for my latest round of reforms. 9.450 White soldiers have lost their lives, but they have taken 13.372 Bolsheviks with them.

Overall 20.106 Red and 15.366 Siberian White soldiers have fallen this turn. Far too much mayhem for my taste. I fear this may be Phyrric victories.
 
Last edited:
Very bloody battles. I don't know how much the manpower potential of the Reds is better than yours, but I can't imagine you can maintain this rate of attrition much longer...

Good question. Which is a complimentary way of saying that I am not sure of the answer.:eek:o

But I will try:
Each side is limited to 6 requisitions (gives money and war materials) and 6 conscriptions at any time. Luckily the Siberians control a big hinterland. If you use special operations agressively - which I do - the Siberians can run 5-7 requisition/special operations simultaniously. As you can see in my very first post, I actually started with 9 but that isn't sustainable. A Red player on the other hand should able to use all 12 possible ressource gathering operations constantly.

All sides can supplement special operations by using the print money and partial mobilization option once every six months (12 turns).

Overall I would wager Siberian recruitment potential is close to 60% of the Red one. The Southern White however have a distinctively smaller recruitment capacity, perhaps 25 % of the Red one since they are hard pressed to get more than 2 special operations running at once unless they significantly expand their territory (and spend a lot of NM on reforms).

Currently I get enough ressources to replace my losses and build quite a few new units. But so do the Reds. Luckily Ian doesn't seem to use the full contingent of 12 special operations. On the other hand, I won't change the balance of power in my favour with the current casualty rate. The real worry are the Southern White losses, though. On their front the balance is shifting in favour of the Bolsheviks.:(

pretty attritional but at least you seem to have some control over Central Asia for your losses

Not quite yet. But I will soon.
 
Turn 6 - Late July 1919: Retreats

Northern front: Trotzky has retreated back to Kazan. Apparently, Ian knows me far too well. He must have realized that I had been contemplating an attack there. Meanwhile Ordzhonikidze has marched north and threatens Voitsekjovski from the East. Ian is shamelssly copying a strategy I used to smash his Siberians in our first game.;) I guess, I should take it as a compliment. Fortunately he has made two mistakes:
1. He believes that a single river transport can block a river crossing. From my tests, only combat ships can achieve a river blockade, transports are insufficient. I made the same mistake in our first game.
2. Therefore my troops can use the railway to cross the Kama which will enable me to get reinforcements to Perm faster than he can attack.

turn6e.jpg


Even better, I have a small fleet of gunboats at Perm; it will make a sortie which should stop any crossing attempts by Mezheninov. If Ian's plan was a pincer attack on Perm, only the Eastern flank will reach the battlefield.
Of course Ordzhonikidze might attack Ekaterinburg rather than Perm. I can't prevent this. But I am confident that I will be able to mount a powerful counter-attack within two or three turns.

If all goes well, Ordzhonikidze's attempt to encircle the Siberian troops at Perm, will end with him being trapped. To this end, Gaida is ordered to take defensive position just South of Perm. This will block one possible route of retreat for Ordzhonikidze. Meanwhile Pepeliaev will reinforce Perm's defenders.


Center: Dutov's army is completely exhausted. I don't dare to leave it at Samara in the hope of finishing off the cities defenders. Besides, it is possible that my soldiers would fail even if they tried to take the city: a turn ago Dutov's army was 900 pw strong, now it is at 18 pw as opposed to the 12 pw of Samaras surviving defenders. Most importantly a counter-attack is highly likely at least if Ian realizes just how weakened Dutov's soldiers are. In particular the Soviet corps south of Samara would be strong enough to punish Dutov's tired men.
Instead the army will retreat by railway to Ufa and redevouz there with a fresh division under Janin.

turn6f.jpg


Southern front: Kappel's second crossing attempt got blocked as well. This is getting increasingly worrying. But again two possible crossing points remain open because Ian uses transports not gunboats and thus failed to achieve a river blockade. Unless this is a ruse and Ian plans to switch around his fleets?
My other fear is an attack by Samoylo and his powerful corps. I consider turning back south to disorient him but decide instead to attempt my next crossing further north. Hopefully I will finally get Kappel back to safety.

turn6g.jpg


Meanwhile Khanzhin is ordered back to Uralsk. Only a single Red militia has a chance to arrive there before him. Samoylo's army at Saratov (about 900 pw strong) would need more than one turn.


Central Asia: At Tashkent, I will immediatley attack again. I expect another costly battle but the Red army has only 76 pw left. Verzhbitsky's remaining 15.000 men will attack first, followed a day later by Malleson with 4.000 men (174 pw, an English division and three armoured trains). Hopefully, the Green rebel army to the South-East won't interfere. At Samarkand only Juna-id-Khan remains with a tiny division.

turn6h.jpg


Recruitment: I continue to build units at a high rate. Ian who controlled the Siberians in our previous two games never used as many special operations as I am currently. Hopefully the amount of new units I am producing will come as a nasty surprise to him. Including the units I have started in turn 5, I am currently building 10 infantry brigades, 4 cavalry brigades, 7 Siberian White militias, 8 pieces of artillery and one tachanka.

turn6i.jpg


The one officer face in the building queue is a division of unfinished troops filled to the very last element. This gamey trick enables me to double the amount of units I can build at Omsk. It seems the building capacity per region is determined in relation to the command points the new units would need.
At the very least this extensive program should preserve the balance of power on my front.
 
Last edited:
Noooo... I really wanted to see Samara fall... All that hard work for nought. Well, I guess you did beat up on the Commies pretty well, so that's good. I hope your trap at Perm works, a clear, crushing victory would be good at this point.
 
hadn't realised just what a strategic resource the river gunboats were till reading this AAR, again it adds to the cat and mouse element in MP AGEOD games. Pity you had to fall back at Samara but hopefully you can recover faster and take it later on?