
So Far From God (Mexico 1836-'76)
- Thread starter ComradeOm
- Start date

-
We have updated our Community Code of Conduct. Please read through the new rules for the forum that are an integral part of Paradox Interactive’s User Agreement.
You are using an out of date browser. It may not display this or other websites correctly.
You should upgrade or use an alternative browser.
You should upgrade or use an alternative browser.
Will Santa Anna manage hold on to power for more than two minutes in this TL with the Texans under control, or will that only add to his worries?
Apologies for the delay but here's the promised tutorial for making trailers. For those who haven't seen it, my latest effort (painfully simple compared to those created by thrashing mad and others) is here
Update and replies for the AAR proper will follow as usual over the weekend
Putting a video trailer together for an AAR is a surprisingly simple affair. Obviously complexity scales upwards with ambition but this quick tutorial will show you how to put together and upload a very basic slideshow with music. There are plenty of tutorials on the internet to show you how to use gameplay footage, fancy editing, animation, etc etc, to create a masterpiece worthy of the Oscars but a simpler form should be adequate to a) advertise your AAR, and b) teach you the basics
Of course no tutorial would be complete without an official disclaimer. I am relatively new to this myself so if anyone has any shortcuts or other nuggets of wisdom then please feel free to correct me or share alternate techniques. For this tutorial you will require the below:
1) Image editing software. MS Paint will do but I'd recommend GIMP or Inkscape
2) Digital editing software. There are professional kits available (such as Ulead VideoStudio) but everyone should already have Windows Movie Maker
3) Soundtrack
I used Inkscape, Windows Movie Maker, and Ennio Morricone's Theme from A Fistful of Dollars (MP3), for creating both my latest trailer and this tutorial. Below follows a step by step guide to creating a basic trailer. At each point I'll lay out the actions before using my recent trailer to demonstrate. So here we go:
1) Before you actually start messing about with software its essential that you sit down beforehand and plan your video out. All films are essentially a procession of scenes/images. Our basic trailer will be little more than a sequence of images with a musical background. So I'd advise you to quickly sketch out, with pen and paper, factors such as the basic outline of your montage and what soundtrack you will use. For So Far From God I had already decided on the basic colour scheme, text, and music long before I actually made the trailer
2) Once you've got a rough mental image of the trailer, its time to turn this into reality. The bulk of the work in this case will be done in a graphics programme as we draw up our sequence of images - the slides in the slideshow. I make a point to use Inkscape for this as its extremely easy to tweak and (most importantly) centre text on the screen. There's little advice that I can give about the actual content of your video except for the following pointers:
* The ideal resolution for uploading to youTube is 640*480. All your slides should be of this size
* Remember that youTube will shrink your resolution so be ready to compensate for this. Fonts should be large/clear and images relatively simple. I save my images as .png to preserve some of the detail but even then extremely intricate images may well look blurred or squashed
* Stick to your outline from step 1 and keep the number of slides manageable. youTube's limit of 10 min per video is unlikely to be a problem but you should be aware of self-imposed constraints such as soundtrack length. If nothing else a low number of slides will make compiling the video easier
* Remember that each image is part of a sequence. Your narrative should continue easily from slide to slide. Preview your slideshow by flicking through the images in Windows
For So Far From God I first created and saved the basic template (orange background with black borders) and used this for each slide. Using Inkscape and the Edition font (which I found online) I completed roughly thirteen slides with the font sizes typically above 100. Pictures are of course optional. Because I was working to a soundtrack (see Step 4) I'd have liked to have more slides but this number was just about enough. Using Inkscape's centre tool (Shift-Ctrl-A) it was extremely easy to position the text in the centre of the screen; this can be a major frustration in other programs. Each image was saved as 'Slide1', 'Slide2', etc in a new folder and in the .png format
3) So by now you should have a collection of images that when put together in a sequence form a coherent narrative. Now it is time to turn these images into a slideshow using film editing software. Ulead is a powerful tool for this but it is unfortunately not available for free (legally!) although there may be a trial version available for download. In contrast the great advantage of Windows Movie Maker is that is it is a default component of the Windows suite. The latter is a much more limited program but then we're not shooting the Battleship Potemkin here. For this tutorial I'll be using Windows Movie Maker but if you do have Ulead, or another professional programme, the principles are largely the same. Most of the tools I mention below are available from the Tasks toolbar on the left hand side of the screen
The first step in constructing this video is to import your images via the Tasks>Import>Pictures function. When you've done so then drag the images down and arrange them in correct sequence in the slideshow window. Movie Maker has two distinct modes that we'll be using – Storyboard and Timeline, both accessible from the View menu. We'll be making more use of the latter but Storyboard (the default view) is useful for applying effects and transitions. Effects (found Tasks>Edit>Effects) are... well, effects that can be applied to each slide that you have assembled. The most obvious one that I have used in So Far From God is the Film Age effect that applies the grainy texture and projector lines to each image but I also make heavy use of Fade In and Fade Out to briefly black the screen between each slide. In contrast to effects, Transitions (found Tasks>Edit>Transitions) are not applied to each slide but rather the space between them. These are essentially fancy ways of moving between slides - think of the 'horizontal wipe' so beloved by George Lucas in Star Wars. Given that I was already using Fade In/Out effects the only transition that I saw fit to employ was Dissolve for the opening and closing shots. Both effects and transitions can be used simply by dragging them to their respective boxes on the Storyboard view (see below) and there is a limit of six effects and one transition per slide
The Storyboard (top) and Timeline (lower) screens. Note the highlighted Effects and Transitions tabs on the former
With your slides in place and effects/transitions applied, you can preview your video by clicking on the play button (beneath the preview window) to the right of the screen. Nicely enough this preview window is largely the same size as the eventual youTube resolution. You might note however that each slide is playing for the same length of time - most likely the standard eight seconds - and that is not much good to us. Its inevitable that you'll want to shorten the duration of some slides while extending that of others. The easiest way to do this is by switching to the Timeline (Ctrl-T) view where the real editing takes place. Here you have the slides laid out in sequence along the top row with space for music (see Step 4) sitting below. Crucially the slides now have a duration attached to them (which can be seen by hovering over the box or right clicking to see its properties) and you can simply adjust the duration of a slide by clicking and dragging the right hand side of its box. Unfortunately Movie Maker, unlike Ulead, does not allow you to manually enter a slide duration so dragging the selection seems to be the only way to change this
4) The odds are that most of your editing will be in matching slides to the music that you've chosen. At the very least you'll want to be sure that your slideshow lasts as long as your soundtrack and you may (as in So Far From God) want a particular slide to coincide with a musical flourish. We add a music track to our video (most formats should be accepted) by importing in the same way as pictures and dragging the track down to the music tab of our Timeline view. When you now play the preview it should be accompanied by a soundtrack. Selecting the right music is obviously very important and you want something that lasts roughly the same length as your slideshow - its somewhat jarring to end the video in the middle of a note - but you can divide/cut a track using the Split tool (M). This is useful for clipping the last few seconds of music to match with your slides
Now that you have your music set you can revisit your slideshow to ensure that it matches. The duration of some slides can be shortened while others can be extended for dramatic effect. Toy around with these as you see fit but bear in mind that a short slide duration, especially when coupled with an obscure font or lengthy text, may make it difficult for your readers to keep up. It takes much previewing and work to ensure that your pacing is perfect but it is very important to get right. Timing a slide to begin at exactly the right moment is also difficult - it took quite a few tries before I got my title in So Far From God to match exactly (well, almost exactly) with the crescendo of trumpets - but worthwhile
5) When you've finished tinkering with the Timeline view and are largely happy with how your movie has come together, its time to turn it into a real video. Use Tasks>Publish To>This Computer to export the video into a folder of your choice. The default format, Windows Media Audio (.wma), is accepted by youTube so shouldn't need changing. It will take a few minutes to export but then you can view the fruits of your labour in Windows Media Player (or alternative) to confirm that you're happy with the finished product
6) Time to upload your masterpiece to youTube for all to admire. Uploading a video requires registering an account if you do not already have one. When this is done you merely click the Video Upload tab, fill in the required description/information, select your file, and hit Upload. This can take some time however (it may be half an hour or more depending on your connection and the size of your video) so just leave it running. The upload restrictions (10 min in length) should not be an issue for a trailer but it will take some time (a few minutes to a few hours) for the video to be processed after uploading. You can check its status under the My Videos tab but eventually it will come through and can be found on your account page. Congratulations, you now have a trailer on youTube
By this stage you should be able to put together a slideshow with music and upload it to youTube. From here you can go on to include features like video capture, voice commentary, etc as you learn more and grow in confidence. Hope this was of some help and, as always, feel free to come to me with any questions or requests for clarification
Update and replies for the AAR proper will follow as usual over the weekend
-----
Making Movies: A Trailer Tutorial
Making Movies: A Trailer Tutorial
Putting a video trailer together for an AAR is a surprisingly simple affair. Obviously complexity scales upwards with ambition but this quick tutorial will show you how to put together and upload a very basic slideshow with music. There are plenty of tutorials on the internet to show you how to use gameplay footage, fancy editing, animation, etc etc, to create a masterpiece worthy of the Oscars but a simpler form should be adequate to a) advertise your AAR, and b) teach you the basics
Of course no tutorial would be complete without an official disclaimer. I am relatively new to this myself so if anyone has any shortcuts or other nuggets of wisdom then please feel free to correct me or share alternate techniques. For this tutorial you will require the below:
1) Image editing software. MS Paint will do but I'd recommend GIMP or Inkscape
2) Digital editing software. There are professional kits available (such as Ulead VideoStudio) but everyone should already have Windows Movie Maker
3) Soundtrack
I used Inkscape, Windows Movie Maker, and Ennio Morricone's Theme from A Fistful of Dollars (MP3), for creating both my latest trailer and this tutorial. Below follows a step by step guide to creating a basic trailer. At each point I'll lay out the actions before using my recent trailer to demonstrate. So here we go:
1) Before you actually start messing about with software its essential that you sit down beforehand and plan your video out. All films are essentially a procession of scenes/images. Our basic trailer will be little more than a sequence of images with a musical background. So I'd advise you to quickly sketch out, with pen and paper, factors such as the basic outline of your montage and what soundtrack you will use. For So Far From God I had already decided on the basic colour scheme, text, and music long before I actually made the trailer
2) Once you've got a rough mental image of the trailer, its time to turn this into reality. The bulk of the work in this case will be done in a graphics programme as we draw up our sequence of images - the slides in the slideshow. I make a point to use Inkscape for this as its extremely easy to tweak and (most importantly) centre text on the screen. There's little advice that I can give about the actual content of your video except for the following pointers:
* The ideal resolution for uploading to youTube is 640*480. All your slides should be of this size
* Remember that youTube will shrink your resolution so be ready to compensate for this. Fonts should be large/clear and images relatively simple. I save my images as .png to preserve some of the detail but even then extremely intricate images may well look blurred or squashed
* Stick to your outline from step 1 and keep the number of slides manageable. youTube's limit of 10 min per video is unlikely to be a problem but you should be aware of self-imposed constraints such as soundtrack length. If nothing else a low number of slides will make compiling the video easier
* Remember that each image is part of a sequence. Your narrative should continue easily from slide to slide. Preview your slideshow by flicking through the images in Windows
For So Far From God I first created and saved the basic template (orange background with black borders) and used this for each slide. Using Inkscape and the Edition font (which I found online) I completed roughly thirteen slides with the font sizes typically above 100. Pictures are of course optional. Because I was working to a soundtrack (see Step 4) I'd have liked to have more slides but this number was just about enough. Using Inkscape's centre tool (Shift-Ctrl-A) it was extremely easy to position the text in the centre of the screen; this can be a major frustration in other programs. Each image was saved as 'Slide1', 'Slide2', etc in a new folder and in the .png format
3) So by now you should have a collection of images that when put together in a sequence form a coherent narrative. Now it is time to turn these images into a slideshow using film editing software. Ulead is a powerful tool for this but it is unfortunately not available for free (legally!) although there may be a trial version available for download. In contrast the great advantage of Windows Movie Maker is that is it is a default component of the Windows suite. The latter is a much more limited program but then we're not shooting the Battleship Potemkin here. For this tutorial I'll be using Windows Movie Maker but if you do have Ulead, or another professional programme, the principles are largely the same. Most of the tools I mention below are available from the Tasks toolbar on the left hand side of the screen
The first step in constructing this video is to import your images via the Tasks>Import>Pictures function. When you've done so then drag the images down and arrange them in correct sequence in the slideshow window. Movie Maker has two distinct modes that we'll be using – Storyboard and Timeline, both accessible from the View menu. We'll be making more use of the latter but Storyboard (the default view) is useful for applying effects and transitions. Effects (found Tasks>Edit>Effects) are... well, effects that can be applied to each slide that you have assembled. The most obvious one that I have used in So Far From God is the Film Age effect that applies the grainy texture and projector lines to each image but I also make heavy use of Fade In and Fade Out to briefly black the screen between each slide. In contrast to effects, Transitions (found Tasks>Edit>Transitions) are not applied to each slide but rather the space between them. These are essentially fancy ways of moving between slides - think of the 'horizontal wipe' so beloved by George Lucas in Star Wars. Given that I was already using Fade In/Out effects the only transition that I saw fit to employ was Dissolve for the opening and closing shots. Both effects and transitions can be used simply by dragging them to their respective boxes on the Storyboard view (see below) and there is a limit of six effects and one transition per slide
The Storyboard (top) and Timeline (lower) screens. Note the highlighted Effects and Transitions tabs on the former
With your slides in place and effects/transitions applied, you can preview your video by clicking on the play button (beneath the preview window) to the right of the screen. Nicely enough this preview window is largely the same size as the eventual youTube resolution. You might note however that each slide is playing for the same length of time - most likely the standard eight seconds - and that is not much good to us. Its inevitable that you'll want to shorten the duration of some slides while extending that of others. The easiest way to do this is by switching to the Timeline (Ctrl-T) view where the real editing takes place. Here you have the slides laid out in sequence along the top row with space for music (see Step 4) sitting below. Crucially the slides now have a duration attached to them (which can be seen by hovering over the box or right clicking to see its properties) and you can simply adjust the duration of a slide by clicking and dragging the right hand side of its box. Unfortunately Movie Maker, unlike Ulead, does not allow you to manually enter a slide duration so dragging the selection seems to be the only way to change this
4) The odds are that most of your editing will be in matching slides to the music that you've chosen. At the very least you'll want to be sure that your slideshow lasts as long as your soundtrack and you may (as in So Far From God) want a particular slide to coincide with a musical flourish. We add a music track to our video (most formats should be accepted) by importing in the same way as pictures and dragging the track down to the music tab of our Timeline view. When you now play the preview it should be accompanied by a soundtrack. Selecting the right music is obviously very important and you want something that lasts roughly the same length as your slideshow - its somewhat jarring to end the video in the middle of a note - but you can divide/cut a track using the Split tool (M). This is useful for clipping the last few seconds of music to match with your slides
Now that you have your music set you can revisit your slideshow to ensure that it matches. The duration of some slides can be shortened while others can be extended for dramatic effect. Toy around with these as you see fit but bear in mind that a short slide duration, especially when coupled with an obscure font or lengthy text, may make it difficult for your readers to keep up. It takes much previewing and work to ensure that your pacing is perfect but it is very important to get right. Timing a slide to begin at exactly the right moment is also difficult - it took quite a few tries before I got my title in So Far From God to match exactly (well, almost exactly) with the crescendo of trumpets - but worthwhile
5) When you've finished tinkering with the Timeline view and are largely happy with how your movie has come together, its time to turn it into a real video. Use Tasks>Publish To>This Computer to export the video into a folder of your choice. The default format, Windows Media Audio (.wma), is accepted by youTube so shouldn't need changing. It will take a few minutes to export but then you can view the fruits of your labour in Windows Media Player (or alternative) to confirm that you're happy with the finished product
6) Time to upload your masterpiece to youTube for all to admire. Uploading a video requires registering an account if you do not already have one. When this is done you merely click the Video Upload tab, fill in the required description/information, select your file, and hit Upload. This can take some time however (it may be half an hour or more depending on your connection and the size of your video) so just leave it running. The upload restrictions (10 min in length) should not be an issue for a trailer but it will take some time (a few minutes to a few hours) for the video to be processed after uploading. You can check its status under the My Videos tab but eventually it will come through and can be found on your account page. Congratulations, you now have a trailer on youTube
By this stage you should be able to put together a slideshow with music and upload it to youTube. From here you can go on to include features like video capture, voice commentary, etc as you learn more and grow in confidence. Hope this was of some help and, as always, feel free to come to me with any questions or requests for clarification
Ladislav said:where can we see this trailer?
The link is in the first post of the AAR
")
The war in Texas was always troublesome in that it is nice for patriotic purposes to annex large swaths of territory to our Glorious Motherland, and there are all sorts of heroic stories, but the whole thing was done for the wrong reasons. Mexico had a good case, but not the ability to do anything about it.
No update this weekend folks as although I have one written I'm just not happy with it. So I'll take a few days this week to take it apart and (hopefully) put it back together in a more pleasing shape. For now I'll go over the comments to save myself some work (not that these are a chore ) next week
stnylan: Oh don't you know it. A particularly stubborn people the Texans... and I'm talking from experience here
robou: Ah but Santa Anna wouldn't be the character he was if he went around learning from his (many) mistakes. The man has plenty of admirable characteristics but self-introspection was not one
Cinéad IV: Any Mexican game is inevitably defined by the 'Big Blue', as you put it, and you can be sure that numerous future updates will be devoted to this challenge. I'll not spoil the surprise by revealing my strategies now but its safe to say that the defeat of Texas did not go down well up north...
asd21593: Eh... a peaceful coexistence is not likely. If nothing else I'll want to stop their own expansion towards the Pacific
Capibara: True. I wonder what Santa Anna will find when he returns to Central Mexico. Well I know but you'll have to wait another week unfortunately
CCA: I usually avoid VIP (or similar mods such as AGCEEP for EUII) because I find that increased historical detail has advantages and disadvantages. Sometimes it can feel as though you're wearing a 'historical straitjacket' as the mod forces you down certain avenues of history. For N America games however it looks like VIP adds far more than it takes away in game freedom with the mod really filling up an otherwise blank continent. If I had to start the gameagain, and was planning an AAR from the beginning, I'd have used VIP. If nothing else it would mean that I wouldn't have to keep making everything up
Dr. Gonzo: In fairness now, the average duration of Santa Anna's presidencies tended to be two minutes because he often got a) bored with the job and b) homesick. The really damaging stints in office (for both him and the country) were those where he actually lasted more than a few months...
J. Passepartout: I think its largely accepted by historians now (if not the US public) that US expansionism in the 19th C, and in particular the manufactured war with Texas, was really a transparent landgrab with very little to admire about its motives. But then it wouldn't be the first time that the US practised a 'Do what we say, not what we do' policy
And cheers to all who found that tutorial useful - Capibara, English Patriot, robou, and Ladislav. I'm surprised that it turned out so wordy but don't hesitate to contact me with questions. And, for reference, the trailer itself can be found from the AAR table of contents, my sig, or the beginning of the tutorial post itself
) next week-----
stnylan: Oh don't you know it. A particularly stubborn people the Texans... and I'm talking from experience here
robou: Ah but Santa Anna wouldn't be the character he was if he went around learning from his (many) mistakes. The man has plenty of admirable characteristics but self-introspection was not one
Cinéad IV: Any Mexican game is inevitably defined by the 'Big Blue', as you put it, and you can be sure that numerous future updates will be devoted to this challenge. I'll not spoil the surprise by revealing my strategies now but its safe to say that the defeat of Texas did not go down well up north...
asd21593: Eh... a peaceful coexistence is not likely. If nothing else I'll want to stop their own expansion towards the Pacific
Capibara: True. I wonder what Santa Anna will find when he returns to Central Mexico. Well I know but you'll have to wait another week unfortunately
CCA: I usually avoid VIP (or similar mods such as AGCEEP for EUII) because I find that increased historical detail has advantages and disadvantages. Sometimes it can feel as though you're wearing a 'historical straitjacket' as the mod forces you down certain avenues of history. For N America games however it looks like VIP adds far more than it takes away in game freedom with the mod really filling up an otherwise blank continent. If I had to start the gameagain, and was planning an AAR from the beginning, I'd have used VIP. If nothing else it would mean that I wouldn't have to keep making everything up
Dr. Gonzo: In fairness now, the average duration of Santa Anna's presidencies tended to be two minutes because he often got a) bored with the job and b) homesick. The really damaging stints in office (for both him and the country) were those where he actually lasted more than a few months...
J. Passepartout: I think its largely accepted by historians now (if not the US public) that US expansionism in the 19th C, and in particular the manufactured war with Texas, was really a transparent landgrab with very little to admire about its motives. But then it wouldn't be the first time that the US practised a 'Do what we say, not what we do' policy
And cheers to all who found that tutorial useful - Capibara, English Patriot, robou, and Ladislav. I'm surprised that it turned out so wordy but don't hesitate to contact me with questions. And, for reference, the trailer itself can be found from the AAR table of contents, my sig, or the beginning of the tutorial post itself
Lecture Five: The Triangular Presidency (1837-'42)
"We hang the petty thieves and appoint the great ones to public office"
Aesop
A year in Texas had been well spent and Santa Anna could return south in late spring 1837 knowing that the northern frontier had been pacified, potential military rivals kept occupied, and his personal prestige further enhanced. Nonetheless the tumultuous dance of Mexican politics had not abated in his absence and in June 1837 Don Antonio arrived in Central Mexico to survey a nation that had changed depressingly little in his absence. In the first place, the revolts against the central government had not been limited to the Texan settlers and there were federalist uprisings throughout the country, with the independence movements along the Yucatan and California peninsulas (under the banners of Santiago Iman and Juan Bautista Alvarado respectively) being of particular note. Far more seriously for Santa Anna was the return of his old rival Anastasio Bustamante to the presidency. Having taken advantage of his usurper's absence in Texas, Bustamante overthrew José Justo Corro in September 1836 to install himself as president for the second time. With many of his loyal soldiers left to police the US border Santa Anna was caught in a dilemma - he possessed the resources to either march on Mexico City or to quash the provincial revolts but was unable to accomplish both. Having paused in Monterrey Don Antonio was considering his priorities when contact was made with former president Nicolás Bravo (whose last bid for the presidency had been foiled by the 'Tiger of Texas' himself a decade previously). The details of the meeting itself remain unknown* but the evident outcome was that when Bravo formally declared himself in opposition to the sitting President (the Plan de La Ciudadela) he enjoyed the enthusiastic support of Santa Anna. Within a matter of months (2 January 1838) supporters of this temporary alliance had driven Bustamante out of power and, excepting an aborted return in 1839, into an exile from which he would never return. Bravo became Mexico's fourteenth president in fourteen years and Santa Anna was granted licence and funding to suppress the various uprisings throughout the nation
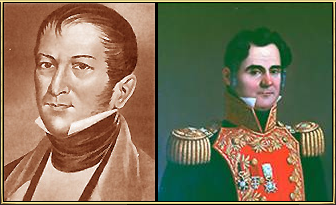
Nicolás Bravo (L) and Anastasio Bustamante (R): Two major rivals of Santa Anna during the 1830s
Why did Santa Anna support a rival instead of not seizing the presidency for himself? While typically held as a prime example of Don Antonio's cunning - moving against the revolts would serve to strengthen his own powerbase and neuter the President by retaining control of the army - a more pressing factor was probably the emergence of large bands of bandits/guerrillas along the Veracruz-Xalapa-Mexico City road. This was a threat to not just the national economy but to Santa Anna's own extensive estates around his hometown and by June 1837 he was again campaigning in his old stomping grounds of Veracruz. The next two years saw the Ejercito de Operaciones carry its anti-insurgent campaign throughout the rest of the country. This was Santa Anna in his element and, as in the Wars of Independence, he wielded a mixture of mercy and brutality as he slowly secured province after province. Prisoners and rebel sympathisers who actively opposed him were executed without hesitation but those who accepted the proffered amnesties were either allowed to go free or conscripted into his own ranks. Nonetheless this was not a repeat of the Wars of Independence. The revolts, with the exception of Texas, were generally minor and without real popular support. After two years of near ceaseless campaigning the country was relatively calm, by Mexican standards, and Santa Anna was able to once again retire in peace and concentrate on expanding his Veracruz estates. With the bungling Bravo government stumbling from crisis to crisis, and somehow succeeding in alienating all major factions of Congress, this was destined to be a short retirement. The humiliations in the arena of foreign policy (see below) sat particularly ill with a wealthy and newly-confident criollo political caste and, with Santa Anna openly signalling his eagerness to return to Mexico City, it was only a matter of time before discontent coalesced into conspiracy. To Bravo’s credit he recognised the writing on the wall and fled the capital on 17 January 1841 mere hours before the gears of revolt eased into action with the storming of the National Palace by soldiers loyal to General Mariano Paredes y Arrillaga (1797-1849), an old comrade of Santa Anna's. As Bravo made his way to exile in Columbia it was Don Antonio, the popular choice, who was offered the presidency by Congress
When Santa Anna was sworn into office on 3 February 1841 it was with a mandate of domestic reform - plus a sweeping number of extra-constitutional powers required to achieve this - but the attention of the new government was initially focused on the international arena and correcting the errors of the previous presidency. On, temporarily, settling the 'Texas Question' Mexico had finally looked to present itself on the global stage only to discover that the rest of the world was equally embroiled in conflict and turmoil. In Europe the fragile peace that accompanied the Congress of Vienna collapsed as the victors of the Napoleonic Wars fell into open war over the issue of Belgian independence. Ironically the only Power to emerge with any credit from this fiasco was France and Premier Thiers was able to capitalise by forcing Constantinople to back down during the Second Oriental Crisis and later sanctioning Papal expansion throughout the Italian peninsula. Mexican attempts to arrive at friendly relations with both London and Paris bore little fruit – such expensive efforts were quickly dropped on the return of Santa Anna to the presidency - and it is safe to say that the Americas were far from the minds of Europe's statesmen in the first half of the 19th C. This may well have been for the best given the sabre-rattling that followed, almost farcically, from the destruction of a French bakery in Mexico City during the Wars of Independence. Mexican refusals to pay more than half the outrageous compensation demanded encouraged a number of French politicians to talk openly of a punitive expedition to the Caribbean... an avenue of action that was only dismissed when Premier Thiers made it abundantly clear that he had no time for such petty distractions from European affairs
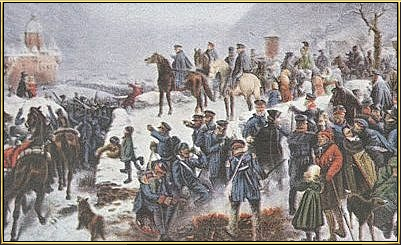
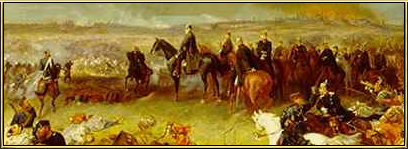
The Prussian Army enters Belgium during Winter '37. The Second Treaty of London ended the inconclusive war and secured the independence of a rump Belgian state
This inattention was increasingly returned by both Mexico City and Washington as the issue of Texas came to dominate the time of both governments, not as an internal Mexican issue but as a real flashpoint between the two nations. Unofficial US support for the Texan Revolution had not gone unnoticed and Mexican politicians had consistently blamed foreign bandits and adventurers for the revolt. The new US President, Martin Van Buren (1782-1862), was not a particularly confrontational figure but he faced intense pressure to act from Southern Democrats. Even the reality of Santa Anna's victory could not detract from the importance of the province, and general westward expansion, to the slave-owning lobby and the clamour for admitting Texas into the Union only grew following the crushing defeat of the Lone Star Republic. Events came to a head in 1840 when Sam Houston remerged in the US as head of a so-called Texan government-in-exile. Claiming to speak for the entire province, the rebel government formally requested that Texas be considered a US state and thus be liberated from the "occupying" Mexican soldiers. That this claim was completely without legal merit did not dissuade the Southern states and, in an early harbinger of what was to later come, the nation's politicians were heatedly polarised on the issue. After months of political manoeuvrings Van Buren reached a compromise settlement whereby he refused to admit Texas as a state or intervene militarily but, accepting the legitimacy of the government-in-exile, he conceded that it could possibly be considered a territory under foreign jurisdiction. Despite the very vague terminology it was obvious that Mexican sovereignty was being impugned on and Mexico City was only persuaded to turn a blind eye to these proceedings by liberal bribes to President Bravo (who required significant sums of cash in attempting to ward off Santa Anna’s challenge). The Mexican public were justifiably outraged when Bravo refused to condemn the words of Washington, although he stopped short of actually selling the land, and this fiasco significantly strengthened Santa Anna's hand when he did move against the President in late 1840
Santa Anna was unable to roll back time but on reassuming power once again he did present an official protest to the United States and made securing the Texan border a high priority. Such tensions also dovetailed nicely with the government's own militarist tendencies; the most obvious of which being the creation of a national army reserve. Minister of War José Tornel (1796-1853)** was given the funds to not only buy the loyalty of the military, which was by no means a monolithic entity, but to create a permanent reserve of armed soldiers loyal to the President. Such a move flew in the face of conventional 19th C logic, which saw a small professional army as security against the wider population, but Santa Anna knew well the difficulties in governing a vast country such as Mexico with a wholly professional force. Its also possible that the presidential ego was big enough to believe that his soldiers would never mutiny. The plans for this national reserve had first been discussed prior to the Texan Revolution but following 1840 they were greatly accelerated with the number of rurales approaching forty thousand by 1842. In theory this national militia would help address the crippling problem of rural banditry but in practice it was, consciously or not, the first attempt to institutionalise Santa Anna's rule. Luckily, for the President at least, it was also a sound move in light of increasing tensions with the larger neighbour to the north. When Mexico did go to war in 1842 it was with an army that was, on paper at least, one of the more formidable in the Western Hemisphere
-----
* An English translation of Santa Anna's memoirs is available as 'Crawford, A.F., (1967), The Eagle: The Autobiography of Santa Anna' but is of limited historical value. Nonetheless this colourful, if extremely unreliable, collection of anecdotes does shed some light as to the motivations of the caudillo during his long and frequently controversial career
** José María de Tornel (1796-1853) was a long-time associate of Santa Anna and the foremost of the santanistas. A brilliant propagandist and capable administrator, he was six times Minister of War and occupied a variety of other portfolios over the years. His political career was be tightly intertwined with that of his famous friend but he was no puppet - many historians have attributed Santa Anna's shift from federalism to centralism, amongst other policy changes, to the influence of Tornel and his ministerial policies. See, 'Fowler, W., (2000), Tornel and Santa Anna: The Writer and the Caudillo'
He is competent enough to see war with the USA coming. This bodes well for the Mexican's as long as the Americans aren't too cunning.
A tough test for Santa Anna and Mexico, let's hope they can deal well with the Americans
Lecture Six: Texas and Beyond (1842-'43)
"The Assyrian came down like the wolf on the fold,
And his cohorts were gleaming in purple and gold;
And the sheen of their spears was like stars on the sea,
When the blue wave rolls nightly on deep Galilee"
Lord Byron
On his assumption of the presidency in February 1841 there was broad consensus amongst the Mexican political elite that there were three looming issues that required Santa Anna's immediate attention. These were constitutional reform, economic recovery, and settlement of the Texas question. It was failure to resolve any of these that had stripped Nicolás Bravo (and Anastasio Bustamante before him) of support and then motivated the political establishment to grant Santa Anna extra-constitutional powers on his return to Mexico City. Mexican politicians were aware that radical change was needed if the country was to end over two decades of strife but there was, unsurprisingly, little agreement as to the best path of reform. For a man with no taste for such infighting Santa Anna was able to play the political game remarkably well but his patience for the petty feuding and constant committees was, as always, short. On 17 June 1841, mere weeks after assuming power, he retired once again to Veracruz. Recalled to the capital a few months later to deal with a constitutional crisis, the President again sought to quickly escape the poisonousness environment of Mexico City and "the easy and much coveted life of the palace". In this the unrest in Texas provided the perfect excuse to once again abandon his duties and take to the field of battle. It is clear that the province was close to Santa Anna's heart – he had served there as a young cadet during the Wars of Independence and his more recent victories there were clearly something that he took great personal pride in - and it is almost certain that he would have moved to dismiss or discredit US claims the province anyway. However the sudden re-emergence of the Texan national movement in 1842 provided both the perfect platform on which to act and a dangerous escalation of tensions with the United States of America
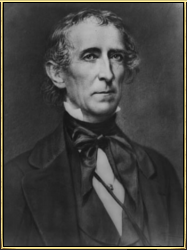
John Tyler (1790-1862): Tenth President of the United States
On 11 May 1842 Sam Houston returned to Texas with a small privately funded army of five hundred men and declared his intention to 'liberate' the Lone Star Republic. This threat, made alarmingly real by success in driving the surprised Mexican garrison from Austin, was given added weight by the open support, moral and financial, lavished on Houston by prominent US Democrats who in addition persuaded the weak President Tyler to lend the expedition his personal approval. Few would have been surprised by Santa Anna's immediate reaction to this 'invasion' and within a month he was marching north at the head of a freshly raised army with intention of crushing the Texans and reaffirm his nation's territorial integrity. With both Mexican and US formations racing towards the border war loomed ever closer but was by no means an inevitability – the Northern Whigs were uniformly horrified at the behaviour of their countrymen and there was not a Mexican politician or general to be found who desired war with the US. Events however have a tendency to escalate... especially when they concern Santa Anna. On their arrival at Austin, on 9 July, the Mexican formations were greeted with a barrage of musket fire from the entrenched Texans and the new arrivals promptly responded in kind. A brief battle broke out but the defenders were hopelessly outnumbered and in the absence of eager reinforcements - the National Army's presence along the border being enough to stifle the effects of Houston's rallying call - the small expedition was doomed. It took over three hours of vicious fighting but finally the Texan lines collapsed in the face of overwhelming numbers and firepower. Fleeing soldiers were cut down without mercy by Mexican cavalry and a mere 171 soldiers survived the battle to face a brief captivity. Perhaps he was intent on settling the Texan question permanently or perhaps it was merely in keeping with previous behaviour but Santa Anna's reaction to the vanquished was harsh. On 15 July those Texans who had joined the expedition, including Houston and other notables, were hanged for treason and all US soldiers of fortune who had participated were shot as bandits
Legally Santa Anna's actions were without fault, if somewhat severe, but the execution of US citizens by Mexican soldiers sparked a storm of moral outrage across the border. That these had been soldiers of fortune invading a neighbouring nation was quickly judged to be irrelevant in the United States press and pressure rapidly mounted for the Tyler administration to take strong action, both in avenging the executed citizens and 'liberating' Texas from the perfidious Mexicans. This was a cacophony to which President Tyler was all too ready to listen to and on 24 July 1842 he secured from Congress a mandate to wage war on Mexico for the "shedding of American blood upon American soil". For the first time a state of war now formally existed between Mexico and the United States. There is no evidence to suggest, as many have done since, that Santa Anna's actions were deliberately chosen to cause such a reaction in Washington and spark a war before the US militarisation programme was complete. Nonetheless with the bulk of the National Army concentrated along the border, and US regiments still scattered throughout the states, Mexico occupied an auspicious position with both local superiority of forces and larger reserves of soldiers to draw upon*. Santa Anna's response was typically vigorous, aggressive, and breathtakingly audacious. Eager to secure a place at the head of the fighting he launched his own offensive on 29 July, taking thirty thousand men, the bulk of the National Army, deep into United States territory. Undefended Shreveport fell to the advancing army on 13 August and the fresh arrival of 2nd Division of Regulars, under Brigadier General William J. Worth, was unable to prevent Santa Anna seizing Baton Rouge a month later on 20 September. The Ejercito de Operaciones then turned south for the pivotal Battle of New Orleans where over twenty thousand US soldiers had become trapped in this swampy city. Investment of the city commenced on 30 September but as Santa Anna's army prepared for a lengthy siege amongst the swamps of the Mississippi River Delta, fighting continued along a front that stretched from New Orleans to Vancouver. This was not what President Tyler had intended
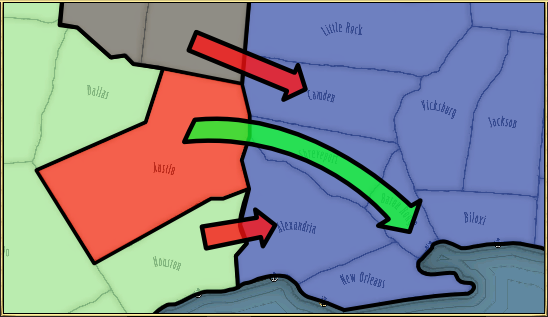
Santa Anna's First Louisiana Offensive (July - December 1842): Green indicates the advance of the Ejercito de Operaciones; Red is the movement of supporting Mexican armies
To the extreme west of the front the fighting was less structured and more sporadic as the various armies shrank into insignificance before the vast and sparsely settled plains of North America. Particularly in the lands that are today referred to as the Pacific Northwest these 'armies' were in reality little more than raiding parties employed to reinforce the respective claims of both governments to the frontier. This was accomplished by a mixture of intimidation and open violence as settlements and outposts, the most sizeable of which rarely numbered more than a hundred inhabitants, were terrorised into acknowledging the authority of Mexico City or Washington. For the soldiers themselves the lure was the loot, far more tangible than any allegiance, that could be extracted from prostate towns and villages. In this dirty campaign the Mexicans held a number of key advantages. As a nation that already ruled much of the lands of the Rockies it possessed numerous federal soldiers well trained in patrolling these desolate lands and it was possible to quickly reconstitute these bodies of lawmen into two mounted brigades. Secondly, the early decades of the 19th C had already seen many of the worst examples of United States crimes against the Indian population of N America** and, on explaining their purpose, passing Mexican bands could generally rely on the passive goodwill of the Indian settlements that dotted this landscape. A third, more indirect, advantage was the US disinterest, or inability to project force, in this northern front and only a single understrength infantry regiment (the much maligned Colonel Kearny's Army of the West) was despatched by the federal government to oppose Mexican mechanisms in the region. These three factors eventually converged in the Battle of Murray (13 August 1842) in which the Army of the West was destroyed after Mexican cavalry were informed of its position by Indian scouts. This gave free reign to Mexican commanders to terrorise or raze US settlements and the passing of the Webster-Ashburton Treaty (26 November 1842) - through which United Kingdom divested itself of its own assets in the region, increasingly viewed as liabilities by a Westminster unwilling to be drawn into a N American war - effectively opened the entire north-west to the avarice of Mexican raiders
Together with the skirmishing of the Pacific Northwest there were also major campaigns fought around Green River (General Arista scoring a major victory on 22 September) and both Vicksburg and Cheyenne. In these it was generally the Mexicans that emerged victorious as they followed Santa Anna's example and pressed forwards on the offensive. The sole US offensive, into San Antonio, was crushed and driven back towards New Orleans in mid August 1842 and, despite this being a conflict fought across an entire continent by many local forces on numerous disparate fronts, it was towards the Mississippi Delta that the attention of observers increasingly turned. The fighting elsewhere did not halt as Santa Anna courted both defeat and victory in the swamps of the New Orleans but it was on this battle that the outcome of the war, and the future of North America, would hinge
-----
* Figures as to the relative strength of both combatants are not conclusive but it is accepted that on the eve of the war the National Army of Mexico possessed eight skeleton infantry divisions with a further two cavalry brigades based in the Rockies. With the exception of Santa Anna's newly raised army, these were all understrength formations that required the mobilisation of state militias to reach full strength. A further four divisions would be entirely constructed from the Rural Guard (rurales). Thus Mexican offensives can be seen to take three waves - the original thrust by Santa Anna (July), the secondary supporting offensives by standing divisions (August-September), and the fielding of entirely new divisions (November onwards) - as its reserves were brought to the the field
In contrast the US Army could rely on a standing army that traditionally comprised four professional divisions. Preparation for war had produced a further two divisions by 1842 but the real strengths of the US remained its state militias and larger population. These were increasingly drawn upon for the war effect and by the end of the war the US had achieved numerical parity, at least, with its Mexican foe. See, 'Bluhm, R.K., (2005), US Army: The Complete history' for details on the rapid pace of this mobilisation and how it influenced later US strategic planning
** The forced removal of tens of thousands of Indians from their lands by the US government during the 1830s is of course one of the most infamous early examples of what is today called ethnic cleansing. The bitterness aroused by the Trail of Tears was a perverse boon to the Mexican National Army during the War of 1842, particularly given the role played by Winfield Scott in both conflicts. One of many works dealing with these tragic events is 'Ehle, J., (1988), Trail of Tears: The Rise and Fall of the Cherokee Nation'
Last edited: