

I've been lurking for a while in this AAR and enjoying it immensly. Keep up the good work.
Last Man and Shilling - Semper Fi HPP AustraliAAR
- Thread starter Saithis
- Start date
-
We have updated our Community Code of Conduct. Please read through the new rules for the forum that are an integral part of Paradox Interactive’s User Agreement.
You are using an out of date browser. It may not display this or other websites correctly.
You should upgrade or use an alternative browser.
You should upgrade or use an alternative browser.
Wonderful stuff. The ANZACs are showing their mettle on all fronts, just a shame the Brits are such a mess. Though it is fun to see a much less clear cut situation.
Are you already righting the Home Islands off? Surely Scotland, even Northern Ireland, could provide an strong redoubt for the Allies? I also doubt Churchill's place at this point. The Admirals might have cocked up but Winnie is in charge and would have accepted the move. Maybe Eden or Attlee need to be drafted to continue the resistance with a credible leader?
Are you already righting the Home Islands off? Surely Scotland, even Northern Ireland, could provide an strong redoubt for the Allies? I also doubt Churchill's place at this point. The Admirals might have cocked up but Winnie is in charge and would have accepted the move. Maybe Eden or Attlee need to be drafted to continue the resistance with a credible leader?
Soviet style, or else it won't work.They'll need to shoot a lot of Admirals...
Soviet style, or else it won't work.
You mean they would have to write tearful, public recanting confessions of incompetence and ideological impurity and sabotage, followed by the conclusion that having committed such crimes death is the only thing they deserve from the people of Britain?
That'd be...well. Interesting.
Britain doesn't need admirals right now, it needs men... give them a rifle and send them to the front! ")
Seriously, though, I don't think it's right to give up on the homeland just yet. Buying time is very valuable, because the Germans still have a lot of work to do in Britain and the Balkans.
Seriously, though, I don't think it's right to give up on the homeland just yet. Buying time is very valuable, because the Germans still have a lot of work to do in Britain and the Balkans.
They'll need to shoot a lot of Admirals...
Fortunately Britain has plenty to go around.
Another hit of my favourite AAR!
Jesus, things in Europe are very dire. Has there been many contingency plans formed? Fall back to Scotland? Fall back to Northern Ireland? Occupy Iceland and hope for the best? Is the UK able to be saved (more importantly without the utilisation of its' navy can it save itself?
I have two planned defensive positions after this. One involves retreating to Northern England, where I am planning to hunker down and see how long I can hold in the hills. The next involves a retreat to Glasgow and Northern Ireland in preparation for a general retreat from the Isles to Canada. I have a few escape contingency plans for what to do if this goes wrong in any particular stage of the retreat. I think at this point Iceland has fallen under US occupation due to events, so it should be fairly secure. I have...other plans for my own troops. UK cannot be saved in this position, it's better to wait until Germany is occupied in a large war with the US/USSR before eventually returning to try and retake the country then. If the UK had used its navy and air force better, this may never have happened.
I've been lurking for a while in this AAR and enjoying it immensly. Keep up the good work.
I'm glad to hear it, thank you. Enjoy your lurking!
Wonderful stuff. The ANZACs are showing their mettle on all fronts, just a shame the Brits are such a mess. Though it is fun to see a much less clear cut situation.
Are you already righting the Home Islands off? Surely Scotland, even Northern Ireland, could provide an strong redoubt for the Allies? I also doubt Churchill's place at this point. The Admirals might have cocked up but Winnie is in charge and would have accepted the move. Maybe Eden or Attlee need to be drafted to continue the resistance with a credible leader?
I've written the Home Islands off mentally due to lack of manpower on the ground to hold against Germany's number advantage. They also have control of the skies and more or less control of the seas thanks to Royal Navy incompetence. As for Winston...he definitely had a place in approving the movement of the Home Fleet, which is a topic I'll be getting back to later.
Soviet style, or else it won't work.
You mean they would have to write tearful, public recanting confessions of incompetence and ideological impurity and sabotage, followed by the conclusion that having committed such crimes death is the only thing they deserve from the people of Britain?
That'd be...well. Interesting.
That would be...interesting indeed. Somehow I can't see the British going for it, though.
Britain doesn't need admirals right now, it needs men... give them a rifle and send them to the front!
Seriously, though, I don't think it's right to give up on the homeland just yet. Buying time is very valuable, because the Germans still have a lot of work to do in Britain and the Balkans.
The homeland won't be given up until it's a choice between the Homeland or the 150,000 odd remaining Allied troops on Great Britain. I'll buy as much time as I can, force the Germans to work hard. Every day of spring they lose this year is another day the Soviets have to build up.
Whose homeland?
Well, AFAIK this Australia is being played as a loyal defender of the empire.
Pretty sure Britain was meant with the homeland, and the United Kingdom is considered rightly the homeland of the Empire, even if not necessarily the homeland of the modern Australian. Australia is a loyal defender of the British Empire and the rightful British government, of course, so we won't take the loss of the UK sitting down. This war ain't over until it's over.
Sad to see the UK AI floundering so badly even as the German one plays a blinder.
Not sure you'd ever be able to make charges stick against the admiralty. You can bet there'd be at least one memo (in triplicate) in which they warned of grave misgivings about moving the Home Fleet to Asia. It's a no-brainer insurance policy against just this sort of thing, and if everything had worked out it could just be quietly forgotten.
Not sure you'd ever be able to make charges stick against the admiralty. You can bet there'd be at least one memo (in triplicate) in which they warned of grave misgivings about moving the Home Fleet to Asia. It's a no-brainer insurance policy against just this sort of thing, and if everything had worked out it could just be quietly forgotten.
I had the same thing at one time, in 3.05, playing Germany. spend tons of IC and over 2 years building only carriers and light cruisers to invade the US, only to find the ENTIRE US Navy (I checked) at port in Japan, which they had defeated.
must have something to do with a lack of perceived threat or something?
must have something to do with a lack of perceived threat or something?
Hi Saithis,
This is great reading!
Are the Germans only active in Britain and Yugoslavia? Would it be possible to go on the defensive in Asia to bring some of those troops to Europe (and maybe 'pick up' some South African & Canadian units along the way)? Could you use these troops to land somewhere and draw some Germans from Britain, releasing the pressure a bit?
Looking forward to next update
I've come late to this AAR but have enjoyed reading it and like your presentation style. I'm also interested in the HPP mod and figured this might be a good way to get a glimpse into that. *subscribed*
Sad to see the UK AI floundering so badly even as the German one plays a blinder.
Not sure you'd ever be able to make charges stick against the admiralty. You can bet there'd be at least one memo (in triplicate) in which they warned of grave misgivings about moving the Home Fleet to Asia. It's a no-brainer insurance policy against just this sort of thing, and if everything had worked out it could just be quietly forgotten.
Sad perhaps, but it makes the AAR more insteresting. As for the charges? Not likely. I gave them some scapegoats and you can bet most of them including Winston kept their ass covered for this kind of thing.
I had the same thing at one time, in 3.05, playing Germany. spend tons of IC and over 2 years building only carriers and light cruisers to invade the US, only to find the ENTIRE US Navy (I checked) at port in Japan, which they had defeated.
must have something to do with a lack of perceived threat or something?
It certainly has something to do with mismanagement of resources vs. actual threat. The Royal Navy positioned about 70% of its resources in Asia and 25% in Mediterranean. All that was left in the Home Fleet (against Germany, the weakest navy they were at war with) were a few destroyers, subs and the Dutch fleet.
Hi Saithis,
This is great reading!
Are the Germans only active in Britain and Yugoslavia? Would it be possible to go on the defensive in Asia to bring some of those troops to Europe (and maybe 'pick up' some South African & Canadian units along the way)? Could you use these troops to land somewhere and draw some Germans from Britain, releasing the pressure a bit?
Looking forward to next update
Thank you! Germany is currently only active in Britain and Yugoslavia, although I believe they have a considerable buildup of forces in both France and Poland, presumably in preparation for a two-fronted war against the USA/USSR. I might be able to pull my troops out and onto enough transports, but because I'll have to dodge the IJN and RM on the way, it'll take up to 4 weeks to get the troops to Europe safely. That'll probably be too late to affect the outcome of this war. If I land troops on the continent I'll likely be forced to withdraw or lose them. Germany's army on the ground is way too much for 3 divisions of ANZACs to take. I estimate they have in the area of 700 brigades.
I've come late to this AAR but have enjoyed reading it and like your presentation style. I'm also interested in the HPP mod and figured this might be a good way to get a glimpse into that. *subscribed*
Welcome to the late show, then! I'm glad to hear you're enjoying it and I'll try to keep highlighting the more HPP unique stuff as it comes up.
Hi Saithis,
I was leaning more towards turning their flank somewhat by raiding Norway. If they've built up in France/Poland then they'll have to drag some troops from somewhere for amphib landing and the German troops in Britain would prob be closest and have necessary transports.
But yeah, looking forward to whatever you have planned
Hi Saithis,
I was leaning more towards turning their flank somewhat by raiding Norway. If they've built up in France/Poland then they'll have to drag some troops from somewhere for amphib landing and the German troops in Britain would prob be closest and have necessary transports.
But yeah, looking forward to whatever you have planned
Interesting, Norway is not yet occupied by Germany. For whatever reason they turned their gaze immediately to Britain and made no attempt to invade Norway. I suspect the Royal Navy held supremacy in the North Sea until the Fall of France and the entrance of Japan into the war, at which point Germany's Navy was given free reign to do whatever it wanted and it went straight for the bigger target.
-----
Sorry for the delays everyone, the usual muck. The good news is that this time the muck includes possible money-making opportunities, and also that I should have considerably more free time starting on the 5th. As in, enough free time that I might be able to update twice weekly again. Let's hope free time plays into my hands again, because this war is only just getting started!
Chapter 3.7 - The Adrian Line
As the war continued, there was little but bad news to brief Australia's generals on the morning of the 21st of February: Nottingham had finally fallen.
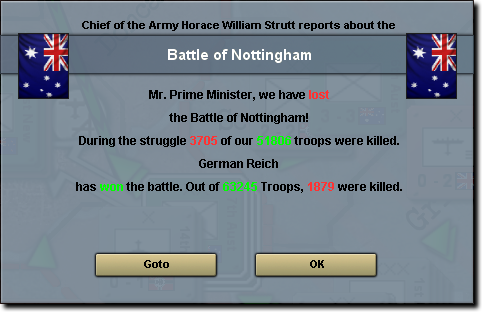
Heavy casualties had been sustained on the Allied side as they desperately tried to evacuate everyone from Yorkshire, while the Germans blitzed through relatively unopposed. Nonetheless, fuel shortages and German overconfidence played into British hands, and all regiments and brigades escaped Bingham-White's failed encirclement more or less intact. General Robertson's valiant leadership of the Australian 1st Cavalry Division led to recommendations by fellow staff officers and his direct superior, General Cann, for decoration and promotion. Bingham-White was extremely displeased due to the General's tendancy to defy orders, and the suggestion was shot down almost immediately. Nonetheless, thanks to his delaying action, the Australian Army was still intact and on the move.
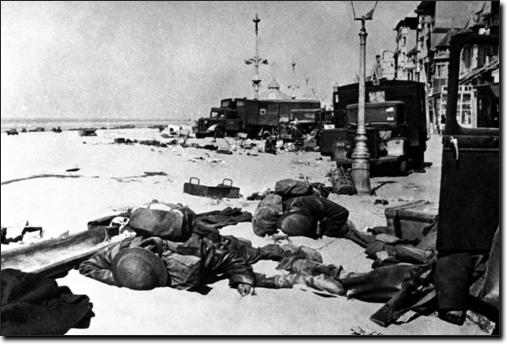
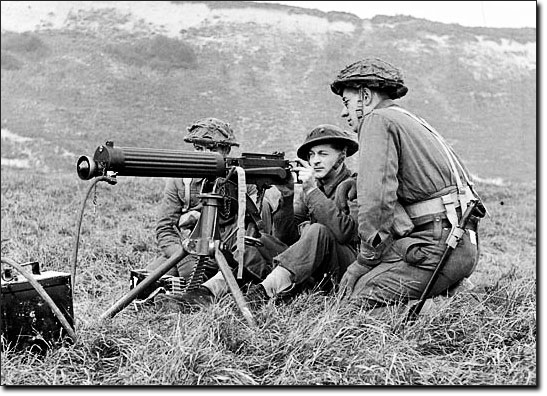
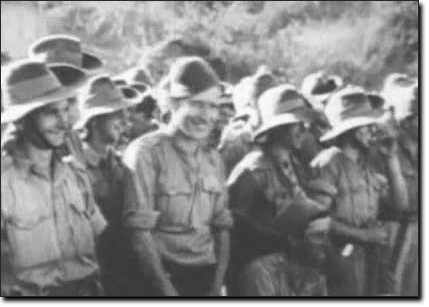
The Germans used propaganda photos such as this one to try and lower British morale while boosting the Germans' own.
Nottingham, however, was in a poor state. Demolished from repeated bombings and artillery shelling, nearly half of the city's buildings had been seriously damaged or destroyed and ANZAC casualties could be found everywhere. German propaganda used the images of devastation and defeat to hold up to the world both their ultimate victory over Britain and the futility of the survivors' struggle in the north. Hitler once again called for the Allied Army to surrender and even promised them safe passage home if they would end the war. The Allies refused to give in to his demands, and the war would continue, bloody as it was, across Northern Britain.
ANZAC forces begin to retreat through Yorkshire, offering only token resistance to buy time for other units. Sheffield remains a temporary bastion of resistance while the rear guard forces try to escape fast-moving German encirclements.
Five nations still held a visible and strong fighting presence in Britain, but only ANZAC retained cohesion and real fighting capacity. As survivors piled into Sheffield and the surrounding environs, news reached them that Doncaster to the east had fallen. There was no more time or hope for a British victory and the only option was full retreat.
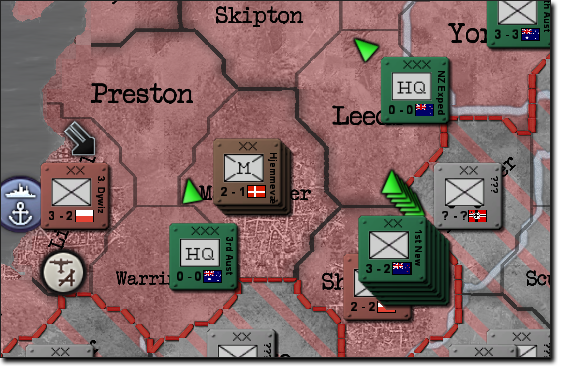
Using whatever train lines and as many trucks, cars, cycles and other fast-moving vehicles that could be spared, the ANZAC military began a fast-paced retreat up the Isles. The plan was to establish a defensive perimeter near the Scottish border dubbed the 'Adrian Line'. It was believed that if the Adrian Line could be held, however long, the outcome of the war would be positively turned in favour of the Allies, who desperately needed a victory here. Germany advanced as rapidly as supply lines and the orders of their Generals permitted, but only brief skirmishes and delaying actions would be had between the two sides.
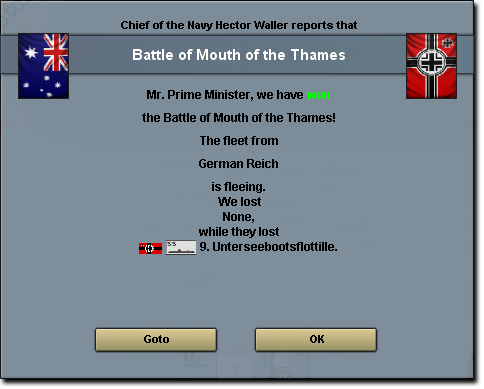
Germany's overconfidence on the seas, however, would eventually cost her. A squadron of fifteen U-boats had made harbour in London for repair and resupply, but were easily spotted by British resistance cells in the city's docklands. As soon as the U-boats left port, the RAN had been informed and was en route. HMAS Vanguard was hungry for revenge after the loss of transports to the German fleet off the Breton coast, and revenge was what they had. The submarines emerged from the River Thames still surfaced and vulnerable when the Australians arrived. Fast-moving dive bombers moved in with the sun at their back and the German flotilla commander did not know of the attack until the first torpedo had blown a hole in the side of his own boat. With no real depth yet to dive and no time to escape, the entire flotilla was sunk, fifteen boats in all. Only a small portion of the Kriegsmarine's mighty uboat armada, but still a significant victory and a reminder to Hitler that his navy was far from invincible and had ridden this far on luck and the Luftwaffe's air cover.
Yorkshire now has no chance of holding and the Polish at Liverpool volunteer to stay behind and protect the city, buying the British time to escape.
The Germans continued to pressure the Allied lines, and the Polish at Liverpool opted to stay behind and fight to the last. They hoped that by buying time for the ANZAC and British forces to establish Adrian, more lives could be saved and the Allies might someday win. The plan was bold but ultimately the Poles has no supply and would last only a few days, while in the east German forces continued to advance unabated. Australia needed something to slow down the Germans and fast.
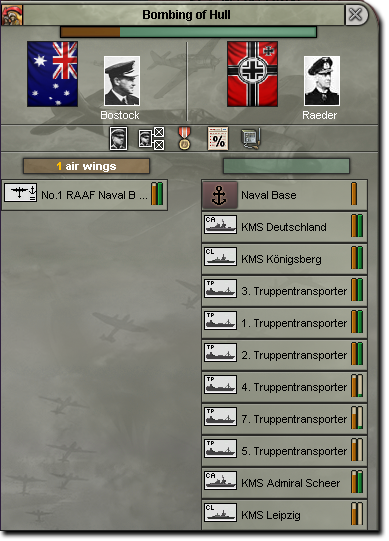
Bostock's feared raiders strike the port at Hull, disrupting German supply lines and sinking two transports.
Although the risks were deemed high, the bulk of Australia's naval and medium bomber fleets departed from RAF airbases in Belfast to strike at Hull, where the German fleet was still docked. They met with surprisingly little resistance and were able to bomb both port facilities and ships with relative freedom. A supply depot was destroyed and a number of ships were hit, including two sunk transport vessels and the KMS Leipzig, who suffered heavy damage and was lucky not to sink after a bomb nearly lit the ammunition stores aflame. The strike succeeded in its job and supplies were momentarily disrupted, seeing a slowing of the German forces - but only a slight one. The German Fleet was damaged, but still very intact. To most ranking officers on both sides, the strike felt like little more than the struggles of a cornered and already beaten animal.
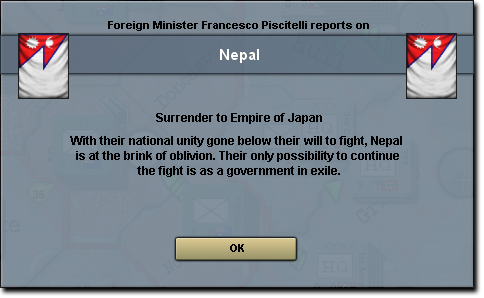
On the morning of the 7th of March, Kathmandu fell into Japanese hands. The Japanese had finally made some headway through the Himalayas and were starting to threaten Northern India, although their strikes were still heavily hampered by the poor infrastructure and inability to get supplies to the front lines in any meaningful quantities. The Nepalese government-in-exile established herself in Bombay, where the Indians offered them full support and a promise to retake Nepal at any cost.
Japan has failed to make decisive advances since the war's beginning, despite the capture of Nepal.
Day by day, the Indian Army grew stronger while Japan's force projection in the region stayed relatively similar. To the east, Yamashita had been able to restore supply lines to most of his front-line troops following the surrender of the Thai government, but everyone knew that unless Burma and Malaya could be taken, Japan would see no victory in the Far East. His plan had yet to unfold completely, and only time would tell if Japan could turn this war around into their favour.
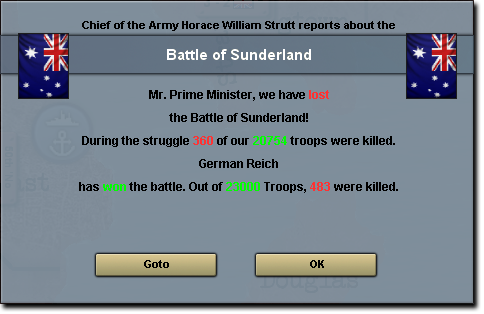
While ANZAC fighting retreats had been mostly bloodless so far, a minor battle was finally fought over Sunderland, where Australian, British and French forces united momentarily to struggle together for the town. Every surviving tank of the Allied Forces had been brought to Northumbria to the region in hopes of blunting the armoured advance of Germany's medium panzers, who were thrusting up the coastline. Although some argued the battle was foolish, the brave sacrifice of these tanks and several volunteer units cost Germany nearly three days and almost 500 men. As they finally marched into Sunderland, it had become too late to stop the Adrian Line from forming.
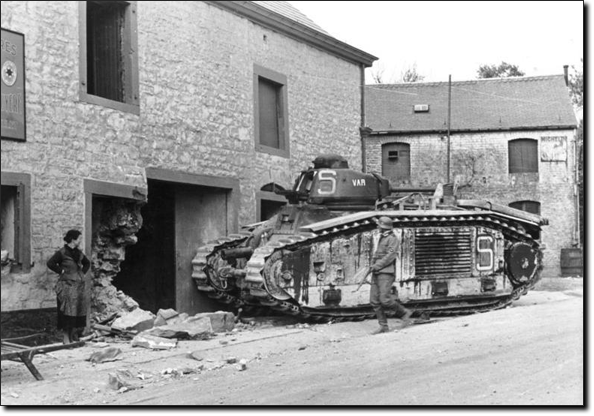
A German soldier stands near a captured Renault B1 Char, one of only 4 French tanks to escape the Battle of France alive.
Amongst the wreckage of Sunderland, the Germans soon realized that Britain would never fall easily, even against inevitable defeat. Guderian began planning a decisive strike, hoping to cut through Cumberland in the west and capture the bulk of the ANZAC army in the east. By now it had become evident that ANZACs were the backbone of British fighting strength and that their skill and tenacity in battle was unequalled by other soldiers in the region. Stationed on the east, where had had recently forced two Australian divisions Newcastle itself and made little headway against its defences, Generalmajor Erwin Rommel famously boasted that "...[if] we had but two of these Australian divisions, we would conquer the world with ease."
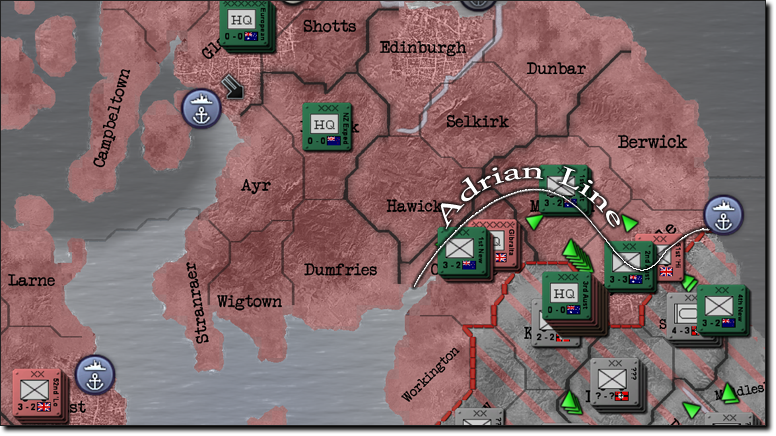
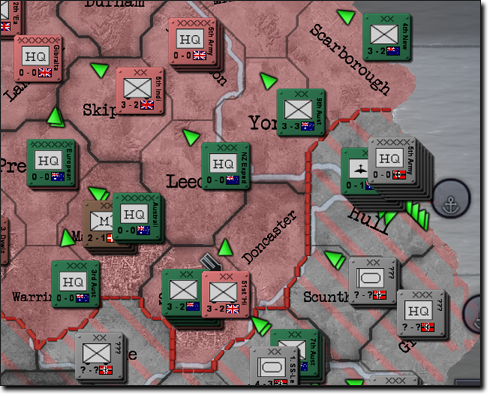
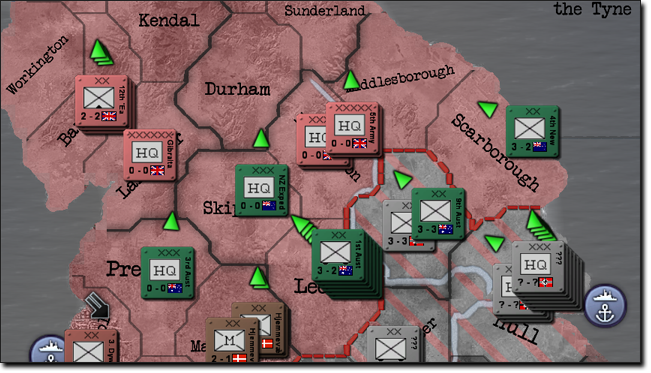
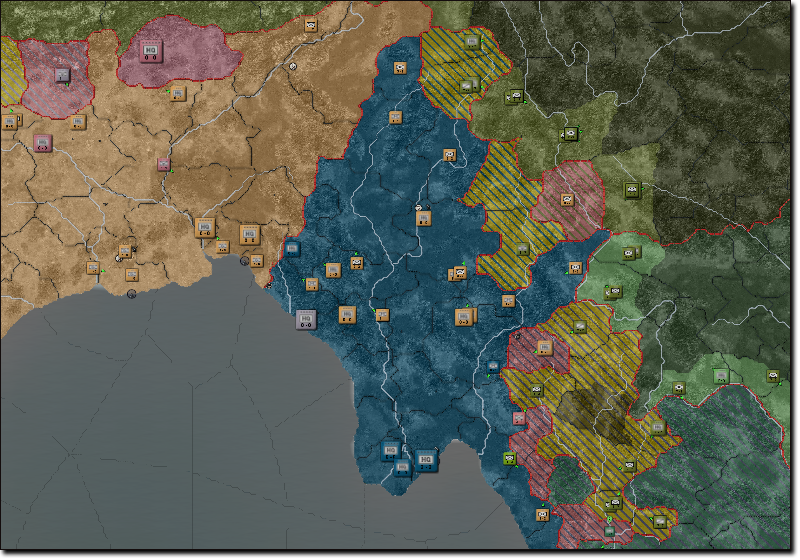
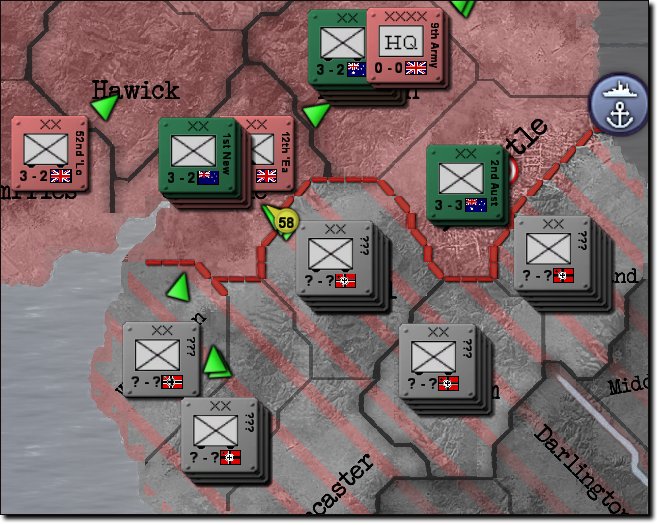
ANZAC forces form up in the Adrian Line with the support of British troops. Other divisions move to garrison key port cities.
The Adrian Line had formed and was digging in at pre-planned positions. The rough hilly landscape of the northwest combined with the thick urban terrain of Newcastle meant that Australian troops had an excellent position to try and hold out against the Germans. Surviving Allied units were given passage through the lines, but the Germans on their tail would gain no such mercy once they arrived.
The rough, mountainous terrain of Northern England made for good defensive positions, and the Australians and British had plenty of heavy artillery and machine guns in supporting positions.
Australian forces laid down overlapping fields of fire, using natural terrain features to force chokepoints and defend key positions while granting themselves the option to move freely both in their own lines and even to launch raids and strikes into and behind enemy lines. These men were experts of fighting in difficult terrain and at long last the Germans would be tested in Australia's element. Whether or not the defensive terrain advantage would be enough was yet to be seen.
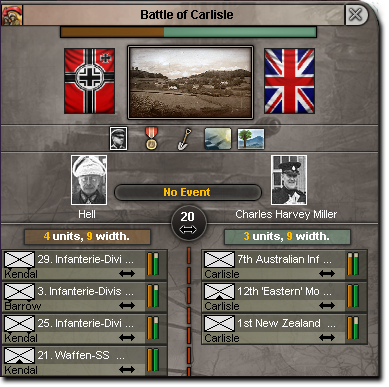
German forces attack the line at Carlisle, hoping to break and surround the Adrian Line from the west.
The defensive lines were soon battered by German attacks as Guderian threw the weight of his forces at Carlisle. The city would not be easy to take, although repeated bombings by the Luftwaffe made life easier for the Wehrmacht on the ground. A stubborn Australian and British defensive line held the city against all attackers. Hitler demanded that the remainder of Britain be taken within the week, but Guderian protested that this was impossible and asked for three more. Hitler compromised and gave him two - whether or not two would be enough to break the Adrian Line was yet to be seen...
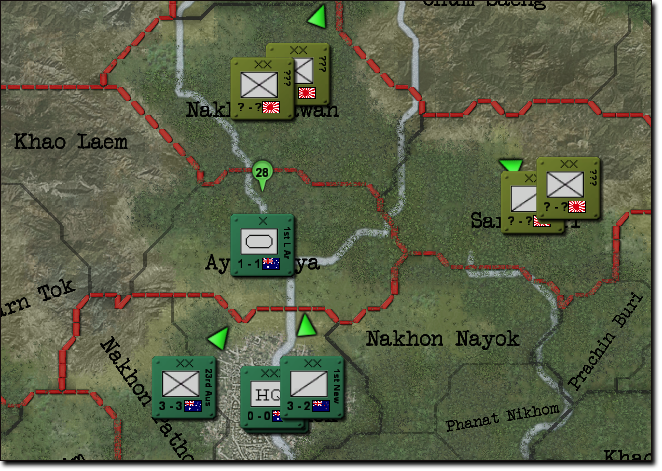
Here in the rough jungle around Ayutthaya, Japanese troops try and fail to break the Australian Tankers from across the river.
The battle in Thailand was far from over. Japanese and Australian soldiers met for the first time in battle as the Australian 1st Armoured Brigade made contact with Japanese infantry storming Ayutthaya in the east. Although the tanks were outnumbered more than 3:1, the encounter soon gave the Allies a critical piece of knowledge: Japan had no effective anti-tank weaponry. Even the Vickers light tanks were able to smash through Japanese strong points, as their upgraded 14mm armour was sufficient to deflect any machine guns or small arms the Japanese had. Only the Japanese mortars and light artillery posed a threat, and they found the fast-moving British tanks hard to hit. The Japanese attack on Ayutthaya was frustrated by numerous counter-thrusts. Australian heavy infantry and a New Zealand cavalry division moved to reinforce the attack and soon Yamashita called it off in frustration. More numbers would be required to break the Australians, who were not as easily trumped as he had hoped.
Here a group of New Zealanders pose for a picture, smiles on their faces. Morale was high in the jungle following the capture of Bangkok.
When they realized the Japanese had actually stopped their attack, ANZAC morale in Thailand skyrocketed. To them, this was proof that the Japanese were no match for the Empire's finest and that Australia would overcome the odds. Leslie Morshead, the man in overall command of the Asian Theatre, was not so easily convinced. He knew that simply holding Bangkok would not win the war, and that to achieve victory here his men needed to retake all of Southeast Asia and push into China itself. If the Chinese could be freed from their Japanese overlords by Australian hands, this war would be easily won.
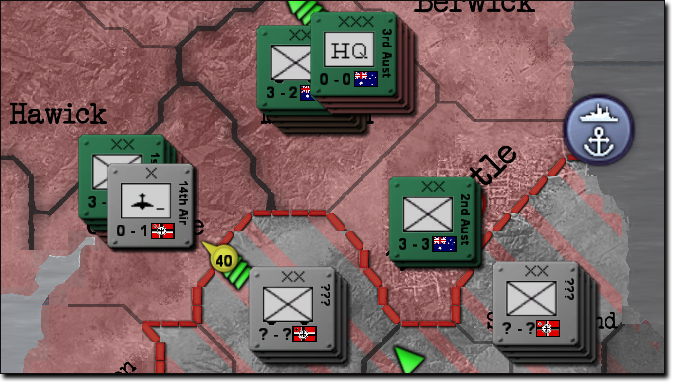
Carlisle was under heavy attack, but the support of naval vessels was helping her hold out from air attack.
At Carlisle, the battle continued to rage. The initial German assault consisted of four divisions, including one of Hitler's elite SS divisions, outfitted in mountain gear. The remaining motorized units found movement more difficult than anticipated in the hilly terrain, especially as resistance fighters, commandos and RAAF units bombed roads, rails and struck at supply depots behind the German lines. No quick victory could be earned here, and even as Stukas struck from the skies, the RAN shelled German positions kilometers inland, weakening Guderian's ability to thrust up the flatter, gentler coastlines of Cumbria. Three days had passed already, and there was no promise of victory yet.
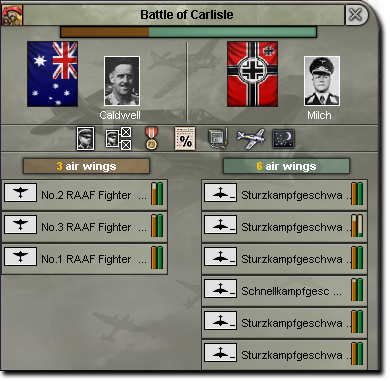
The Luftwaffe's air superiority was momentarily broken in light of numerous strikes by RAAF fighters against bombing runs.
The Luftwaffe, too, suffered from overconfidence. As hundreds of Stukas flew over the skies of Britain, they found sudden, powerful resistance from a resurgent RAAF fighter command. The RAAF had suffered heavy casualties at the hands of the Luftwaffe in the past, but was clearly still a fearsome fighting force. Spitfires and Hurricanes gave the Germans an intense headache, shooting down numerous dive bombers and earning their glorious place in history.
The Adrian Line was now falling under heavy pressure and Carlisle would require reinforcements if she was going to hold out...
By the 10th of March, he Adrian Line was nonetheless struggling under the pressure. Eight divisions were now committed to the assault against Carlisle against four defending British and ANZAC ones. Horace William Strutt believed the time to retreat from England was ripe, but Bingham-White pleaded for a last try to turn it around. Strutt told him that whatever he had in mind, it had better be good...
February 20th-March 10th
Royal Australian Army:
4,490 casualties
3x Vickers MkV Light Tanks lost
Royal Australian Navy:
2 Merchant Ships sunk
1 Escort Ship sunk
Royal Australian Air Force:
7x Supermarine Spitfires fighters lost
20x Hawker Hurricane fighters lost
German Wehrmacht:
2,662 casualties
10x Medium Tanks lost
German Luftwaffe:
107x Junkers Ju87 dive bombers lost
10x Messerschmitt Bf109 fighters lost
German Kriegsmarine:
15 Submarines sunk
2 Transport Ships sunk
KMS Leipzig crippled
1 Merchant Ship sunk
Imperial Japanese Army:
207 casualties
Last edited:
Really nice update! although the news was predominantly grim...I'm very curious to see if you can hold onto the British Isles. I'm wondering...was it your decryption techs that allowed you to see the U-Boats in London? Or the UK's radars? nice little bit of damage you dealt them there....if only Leipzig had been sunk! I'm a big fan of your clean use of graphics to support your story. Very effective.
2,000 years ago the most powerful and advanced army in ancient history was stopped dead in its tracks. Can ANZAC and their allies recreate what the Scots' forefathers did to the Romans?
gripping and epic as ever!
gripping and epic as ever!
I can't give this enough praise it seems. Once again, excellent update. Can't wait to see what tricks Bingham-White might have up his sleeve...
I managed to forget the subtitles for my pictures...whoops! Fixed.
Grim news comes with grim times, I fear! Britain...at this point its theoretically possible to hold the Isles, if and only if the British AI makes the right moves. ANZAC alone is incapable of doing it. As for spotting the Uboats, technically there is no port in London and I thiiink they came from Holland or Northern Germany. I spotted a ? fleet (probably via UK's decryption techs?) moving and I decided to take the risk and send Vanguard on after I was hunting for transports/convoys around the English Channel. Vanguard is equipped with Radars by now and my single engine aircraft are cutting edge, and my destroyers/cruisers have excellent ASW doctrines right now, so it wasn't hard for me to spot them. I was, however, surprised at how quickly I spotted them (within 2 hours of moving into Thames) and how quickly I sunk them all. I decided an ambush as they left the River Mouth where they couldn't dive was the most realistic explanation of what happened.
Both I and the Australian generals were quite deliberate in evoking Roman images with 'Adrian' without specifically saying 'Hadrian'. Only time can tell!
Thank you very much! Bingham-White has his tricks but whether it'll be good enough or not we'll have to see...it may not have been obvious so far but Bingham-White is a 'Relic of the Great War' so despite his high skill, the amount of innovation he can pull out of his hat is naturally somewhat limited. He may not have enough ideas to save Britain...but there's more going on than just Bingham-White and this war is far from over.
-----
Two things I just want to mention:
1) Now that I have free time, I'm planning a new update on Sunday or Monday and then something mid next week (probably Tuesday or Thursday, I'm traveling on Wednesday). I've got the screenshots already taken for the two updates and it'll just need writing. No more waiting two weeks for your Aussie fix!
2) For those who aren't aware, the 2012 AARland Choice AwAARds are continuing into round 2 and I know myself and a lot of authors would love it if you could pop over and consider showing your support in the voting. Last Man and Shilling is of course eligible but there's no reason to vote for me if you don't want to, and there's plenty of other AARs more deserving than I!
Thanks all for the comments, and I'll be working hard to continue delivering this for you!
Really nice update! although the news was predominantly grim...I'm very curious to see if you can hold onto the British Isles. I'm wondering...was it your decryption techs that allowed you to see the U-Boats in London? Or the UK's radars? nice little bit of damage you dealt them there....if only Leipzig had been sunk! I'm a big fan of your clean use of graphics to support your story. Very effective.
Grim news comes with grim times, I fear! Britain...at this point its theoretically possible to hold the Isles, if and only if the British AI makes the right moves. ANZAC alone is incapable of doing it. As for spotting the Uboats, technically there is no port in London and I thiiink they came from Holland or Northern Germany. I spotted a ? fleet (probably via UK's decryption techs?) moving and I decided to take the risk and send Vanguard on after I was hunting for transports/convoys around the English Channel. Vanguard is equipped with Radars by now and my single engine aircraft are cutting edge, and my destroyers/cruisers have excellent ASW doctrines right now, so it wasn't hard for me to spot them. I was, however, surprised at how quickly I spotted them (within 2 hours of moving into Thames) and how quickly I sunk them all. I decided an ambush as they left the River Mouth where they couldn't dive was the most realistic explanation of what happened.
2,000 years ago the most powerful and advanced army in ancient history was stopped dead in its tracks. Can ANZAC and their allies recreate what the Scots' forefathers did to the Romans?
gripping and epic as ever!
Both I and the Australian generals were quite deliberate in evoking Roman images with 'Adrian' without specifically saying 'Hadrian'.
Only time can tell!I can't give this enough praise it seems. Once again, excellent update. Can't wait to see what tricks Bingham-White might have up his sleeve...
Thank you very much! Bingham-White has his tricks but whether it'll be good enough or not we'll have to see...it may not have been obvious so far but Bingham-White is a 'Relic of the Great War' so despite his high skill, the amount of innovation he can pull out of his hat is naturally somewhat limited. He may not have enough ideas to save Britain...but there's more going on than just Bingham-White and this war is far from over.
-----
Two things I just want to mention:
1) Now that I have free time, I'm planning a new update on Sunday or Monday and then something mid next week (probably Tuesday or Thursday, I'm traveling on Wednesday). I've got the screenshots already taken for the two updates and it'll just need writing. No more waiting two weeks for your Aussie fix!
2) For those who aren't aware, the 2012 AARland Choice AwAARds are continuing into round 2 and I know myself and a lot of authors would love it if you could pop over and consider showing your support in the voting. Last Man and Shilling is of course eligible but there's no reason to vote for me if you don't want to, and there's plenty of other AARs more deserving than I!
Thanks all for the comments, and I'll be working hard to continue delivering this for you!
Last edited: