[anchor=i10]
The Dardanelles Campaign[/anchor]
By robou
The Dardanelles Campaign, often referred to as the Gallipoli Campaign, named after principal town in the region, has been called one of the Commonwealth’s worst military disasters, perhaps even more so then the Somme. While the initial idea for the campaign was well thought out, it ended up in failure due to various reasons, and was as much due to Turkish success as it was to Commonwealth failings. I shall be discovering what were these major causes were, and ultimately why the offensive failed.
The plan itself, thought up by Winston Churchill, at the time First Lord of the Admiralty, was good. A swift naval campaign, clearing the narrow straits between Asia and Europe of Turkish forts and minefields, before landing troops in Istanbul and ending the war with the Ottoman Empire. While charging up the narrows, a mere 2 ¼ miles wide at the mouth and less than a mile at the narrowest part and protected by several heavy-gun batteries and mobile howitzer on both sides, was hardly the ideal situation, Britain could easily free up several battleships that were considered too vulnerable to use against the Kaiserliche Marine.
As for a supporting land force, the newly formed Mediterranean Expeditionary Force (MEF) was chosen, consisting of 3 parts. British forces: the Veteran 29th Infantry Division, elements of 2nd Mounted Division of Yeomanry, elements of Royal Naval Division and units of the Royal Marines. Commonwealth Forces: The Australian and New Zealand Army Corps (ANZAC), consisting of the 1st Australian Division as well as the Australian and New Zealand Division. There was also a contingent of Indian troops of the 29th Brigade including 3 Battalions of Ghurkha Rifles. French Forces: Le Force Expéditionnaire Orientale (FEO), consisting of several metropolitan and Senegalese battalions. The choice of force was, certainly, not a factor that helped ensure defeat. The troops were of incredibly high quality, and although the ANZAC troops were inexperienced they would soon show their tenacity in the heat of battle.
Even with this highly professional force at his disposal, Lord Kitchener would make some bad choice of who was to lead them into battle. In charge of the MEF as a whole was General Sir Ian Hamilton, who while being a competent leader, loved by his men, he was 62 by 1915, a spent most of his time away from the battle, very unclear about the already unclear situation on land. At a lower level, his divisional commanders varied. At one end of the scale was Lt. General Sir William Birdwood, commander of the ANZACs, a very competent commander who, unlike many of his counterparts, was willing to act without higher authority and cared about the welfare of his men. Other commanders, such as Sir Aylmer Hunter-Weston, commander of the 29th Infantry, while being charming and brave, had devoid imaginations and unable to learn from their consistent mistakes.
The two principle commanders on the Turkish side, however, were two of the best military minds in the world at the point. The overall commanding officer was General Liman Von Sanders, head of the German military mission to the Ottoman Empire. Well versed in the requirements of modern warfare, Von Sanders did his best to modernize the Ottoman Army, but he was unable to do with to a great extent due to a lack of resources. He deployed the 15th Army well, although he made a few mistakes that he could not have known were bad choices. On the actual peninsular, one Turkish commander, in charge of the 19th Division, would prove himself within a few hours of the British landings. This man was Mustafa Kemal, and he would be one of the most important factors, or at least his decisions were, in deciding the outcome of the campaign.
So, we have looked at the set up of the campaign. We can see that Turkish forces were well-prepared, with Artillery and forts, as well as two good commanders. The British forces were competent enough, but their commanders, albeit Birdwood, were generally incompetent or too far away from the battle to understand exactly what was going one. Now we shall look at the actual campaign.
The Naval attack, supposed to sail through the straits, blasting the Turkish Forts and clearing the minefields, began on February 19th, 1915. Rear-Admiral Sackville Carden sent 12 Capital ships to clear the Turkish forts. Bad weather prevented any accurate fire, and it was not until February 25th that an all out attack on the Forts began. The Turkish and German gunners simply left their positions, finding it useless to fire their obsolete 10in guns at the ships. These guns were destroyed by Marines, but these were forced to withdraw when the Turks came back. However, the Howitzer batteries proved too illusive to be hit by naval fire. While these 6in guns posed no threat to the Battleships, they were very effective against the minesweepers, of which only a few survived after an operation March 13th.
Things went well until March 18th. When the French squadron, serving under British command, was ordered to turn back to allow another wave of British ships to continue the attack, the French ships turned towards the Asiatic shore to move out of the way. However, in line parallel to the shoreline, the Turks (namely the mine expert Lt. Colonel Geehl) had laid a strip of 20 mines. Unaware of this threat, the French Battleship Bouvet ran into one of these mines and sunk in two minutes with almost all her crew. Next, the Battlecruiser HMS Inflexible hit a mine near where the Bouvet had sunk, but stayed afloat limping off to Malta for repairs. Next to hit a mine was HMS Irresistible hit a mine, and attracted the attention of Turkish gunners, who pounded the stranded ship. HMS Ocean went into assist, but was also hit by a mine. Both ships sank, but their crew was saved by brave Destroyer action. With these losses, the naval attack was called off, and troops would need to be landed to secure the forts.
Troops were already nearby, on the Greek island of Lemnos, but a lack of harbour facilities meant the delay of land operations for 6 weeks, in which time Von Sanders better prepared troops and positions for landings.
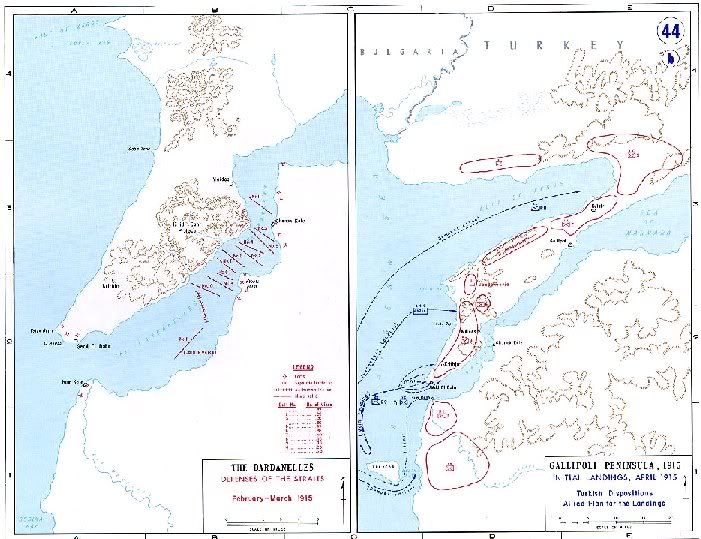
The plan was for multiple landings all along the Gallipoli Peninsular, running from a diversionary raid in the north, through to Gaba Tepe, down to Cape Helles at the mouth of the Narrows. The Anzacs were to land at Gaba Tepe, while the British and French at Cape Helles (after the French had created a diversionary raid on the Asiatic side of the stratis).
The Landings began on 25th April at Gaba Tepe. The Anzacs were promised landing on a wide beach, at least a mile long, with good access to the peninsular. Instead, they met with a beach about ½ mile long and high cliffs just after the small beach. Unknown to the troops, their landing boats had been dragged a mile down the coast by a current, and were landing in the wrong location. This was both a blessing and a curse. During the actual landing, their met with only sporadic rifle fire, as the Turkish had their machineguns and artillery trained on the beach at Gaba Tepe. While the troops got off with few casualties, with Birdwood landing in the first wave, there was mass confusion about the area they were in. However, acting on initiative, Birdwood kept to the offensive, ordering men inland, to see what opposition they could find. Unfortunately for Birdwood’s Anzacs, the terrain in front of them broke the advance up. When Mustafa Kemal attacked with the 19th Division, the Anzacs were too displaced to hold out. Kemal claimed the high ground, around the peak of Chunuk Bair, which would give him the advantage over the Anzacs until the end of the campaign, and this was a major factor in decided the defeat of the Anzac troops. Had they have landed where they would have supposed to; they would have taken many more casualties on the beach, but would have had more success once off the beach. In the situation, the beach where the Anzacs landed, soon renamed Anzac Cove, became a siege ground, each side digging trenches against each other.
Further down the coast, the British were getting a much hotter welcoming from the Turks. At ‘y’ beach, the King’s Own Scottish Borderers met no resistance and the whole flank of the lower peninsular was open to them. Lt. Colonel Matthews of the Royal Marines was able to walk the ½ mile to Kithira, the objective of all the British beaches, and find it unoccupied. However, a dispute between two officers who both believed they were the CO on ‘Y’ meant that no advance was made. By evening, the Turks arrived and controlled the high-ground. Matthews gave his verdict to Hamilton, and the 2,000 men on ‘Y’ were evacuated, and moved to the tip of Helles.
At ‘X’ beach, the next one down the coast, there were only 12 Turkish defenders when the British landed, and the beach was taken easily. The troops here then moved off to secure a land route to ‘W’ beach. At ‘W’ the Lancashire Fusiliers faced two companies of Turkish troops with Machineguns. The Fusiliers braved the fire and secured the beach, though taking severe casualties in the process. It was the time a unit had landed in such an operation under fire, and the Lancs won 6 VCs in the process.
Around the corner of Helles, at Sedd-el-Bahr, the Royal Munsters, the Royal Hampshires and the 1st Royal Dublin fusiliers landed at ‘V’ beach. However, the manner of this landing was odd to say the least. These troops, aboard the Coiler SS River Clyde, would smash the ship into the beach and exit via doors in the sides. Shortly before 6:30, the River Clyde grounded itself on ‘V’ beach, and the first troops departed off it. However, exiting the ships doors 1 by 1, the soldiers were perfect targets for Turkish Machine gunners. After three hours of battle, only 200 men had got out of the ship and onto the beach, and after a second attempt, only another 200 were added to this total. It was not until darkness that the rest of the troops cold leave the armour-plated sides of the SS River Clyde, without suffering a casualty.
Another beach, ‘S’ was assaulted at 7:30, and by 10:00 all the objectives had been secured, but this was mainly due to the fact that the Turkish trenches were visible from the sea. This was most notable at Anzac Cove, where only 1,500 troops could be transported at one time. However, overall, minus the lack of organisation at ‘Y’ beach, the operation had been a success, and by the night of the 25th, 30,000 men were ashore. The problem was that, even with all this manpower, there was little space to use it. This was most apparent at Anzac Cove, where the ferocity of Kemal’s attacks had pushed the Anzacs into a bridgehead 3,500 yards long by 1,200 deep. It was a tight show for the Anzac troops, now digging in around the small perimeter.
While the Anzacs were hemmed in further north, the British had more room to operate, and began to think about taking Kithira, which Colonel Matthews could have easily done on the first day. Instead of an unoccupied position, the British would now face Artillery, Machineguns, and a good portion of the Turkish 9th Infantry Division.
Committed to the first assault on Kithira were the 29th Division, the 1st French Division, and the South Wales Borderers. The attack, although lacking enough artillery support, went reasonably well and by mid-morning the 29th Infantry were on the slopes of Achi Baba, the principle ridge in the region of Kithira. However, they had been so badly mauled by the time they got there that they could not hold the position. Hunter-Weston was adamant to hold the position, and it was not until Hamilton intervened in person that the battle was called off and the British retreated, having suffered 3,000 casualties out of 14,000 men involved.
After this failure Kitchener, who took a personal interest in the campaign, authorised that troops be taken from the Egypt Garrison to send to Gallipoli, although, amazingly, no one informed Hamilton. He eventually found out, and dug in while awaiting the 42nd Infantry Division and the 29th Indian Brigade to arrive. Von Sanders used the time to his advantage. Reorganizing his forces, moving 1 division from the north of the peninsular, one from the Asiatic coast, and receiving two from Istanbul, he saw fit, as well as Enver Pasha in Istanbul did, to launch an assault on the Allied Positions. The assaults, consisting of 18,000 men, failed to breakthrough, but caused many casualties, especially among the French forces, to the Allied forces, that Hamilton had trouble evacuating the wounded.
On the night of May 5th, Hamilton’s reinforcements arrived, and another attack on Kithira was ordered. It took 2 days to advance a mere 600 yards, and the British were still not in control of the high ground. When Hamilton suggested to Hunter-Weston that attacks should take place at night, to reduce casualties, he disagreed, meaning that daylight attacks would still happen, and by May 8th, Hunter-Weston’s daylight attacks had cost the allies a further 6,500 casualties.
More Turkish attacks, wasting over 10,000 men as casualties, at Anzac Cover failed, causing the Anzacs little damage. A virtual stalemate now came across at Anzac cove, although sometimes trenches were only 5 yards between each other.
These failed Turkish attacks, running from the 19th to the 20th of May, made Hunter-Weston, just promoted to Lt. General, decide to press onto the attack, believing the Turkish spirit to be destroyed. On June 4th, The British and French troops were ordered to attack the same positions as the last two times, Achi Baba Ridge and Kithira. The Turks knew exactly where the attack would come, and were ready in fortified positions with plenty of men and artillery. The Turkish spirit was hardly broken, but Hunter-Weston lost 4,000 men before he worked that out. The casualty rate was huge, and for example, the 2nd Hampshire Regiment was left with 100 men and no officers. This insistence by the unimaginative British command of throwing men into attack after useless attack also played a huge in the loss of the campaign.
When Hamilton decided that he was not going to make a breakthrough, the decision came to Kitchener, who had been promised reinforcements by Churchill. This swayed the old man’s mind, and Hamilton was told he was to receive 3 new divisions. However, the congestion problems, Hamilton already having too many men on the Peninsular, meant they would have to be landed away from Helles. Suvla Bay was chosen as the landing location, as this would assist the breakout of Anzac troops by threatening the Turkish rear. However, the situation was hardly favourable. The reinforcements were ‘New Army’ divisions, merely conscripts, and their commander, Sir Fredrick Stopford was much the same as Hunter-Weston, but without the aggressive flair.
The landing, scheduled for August 6th, would be supported by attacks at Anzac and Helles. At Anzac, the 1st Australian Brigade was ordered to make a suicidal charge at the Turkish defences at ‘Lone Pine’. Across a tiny front, 220 yards wide, the Australians made the attack, and only 1,200 of the 2,900 men of the Brigade made it back. The action won 7 VCs. Another suicidal attack by the 3rd Light Horse Brigade ended in slaughter at Russel’s Top, wave after wave of the tiny brigade going over the top. ¾ of the Brigades 600 men fell within 15 minutes of action. The Australians had suffered due to British planning flaws.
The actual landings at Suvla went well, most troops getting ashore quickly. They went, in fact, better then Stopford had foreseen, so he had no orders to advance, not until the late afternoon. These orders would be the undoing of the Suvla operation. With all his troops ashore, Stopford sat on the beach and drunk tea, waiting until noon to start his advance. However, Kemal wasn’t going to be waiting to advance. By noon time when Stopford decided to begin moving, the Turks controlled the high ground over the beach. It was a similar situation to ‘Y’ beach, but this time there were more targets for the Turks.
Stopford’s advance did not actually happen until August 9th, when he found to his discontent, that the Turks controlled all the major hills, and they were not going to give them up easily. On August 12th, the strangest happening of the campaign befell the 1/5th Norfolk’s. While advancing towards Kujuk Anafarta, the Battalion of over 100 men ceased to exist, and Hamilton remarked that “it was a very mysterious thing” for “not one of them ever came back”. The Norfolk’s had disappeared. This event, along with a few other, all but ended the campaign.
Hamilton was replaced by Sir Charles Munro, who immediately demanded that the entire force been evacuated. Hamilton estimated that evacuation would cost another 40,000 men. However, a visit by Kitchener himself, ordered by Prime minister Asquith, showed the general just how desperate the situation was. Munro was ordered to hold on at Helles while Suvla and Anzac Cove were evacuated. Birdwood was put in command of the evacuation. Using clever contraptions, such as an automatic firing rifle, and keeping the Navy shelling the Turks, Birdwood was able to take every man off the peninsular. From December 12th 1915 to January 9th 1916, all the troops were taken off Gallipoli, with the only casualties being 2 men injured at Anzac Cove, and 164 British casualties when Von Sanders ordered another attack on Helles, unaware that the British were all but evacuated. It was hardly the 40,000 men dead that had been estimated. The evacuation was, by far, the most successful operation of the campaign.
So in conclusion, it is easy to see what went wrong at Gallipoli. Incompetent commanders, such as Hunter-Weston and Stopford threw men into huge daylight attacks, of which they changed little over time. Another point to mention here is the flaws Hamilton made of not replacing those men. The lack of sufficient artillery support badly hampered attacks on formidable Turkish positions. British commanders also did not take any initiative, losing chances to take areas in a day that they would then be trying to take for the rest of the campaign. However, some note must be given to the Turkish commanders. Mustafa Kemal always pressed into the attack as soon as he could, ending hopes of major success at Anzac Cove for the British on the first day, as he did at Suvla. Liman Von Sanders, to a lesser extent, must be given credit, as his handling of the Kithira campaign ended out well for the Turks, and his belief in Kemal gave the Turk the support he needed for success.
As for casualties, during the campaign, although this figures are rough, 87,000 Turks, 25,000 British, 10,000 French, 7,300 Australians, 2,400 New Zealanders and 1,700 Indians lost their lives. A high price, on both sides of the line, for a campaign that achieved little.
I leave you with a poem, written in 1916 by a survivor of Gallipoli, Oliver Houge:
‘And all of our trouble wasted
All of it gone for nix
Still... we kept out end up –
And some of the story sticks.
Fifty years on in Sydney
They’ll talk of our first big fight,
And even in little old, blind old England,
Possibly someone might.’
Robou is the author of 'I'm sorry, but you're not the only one...'