

*Pun very much intended.
This will be the final update for the beta AAR, with the game's release coming on April 16. Don't worry: I'm sure I'll probably write an AAR or three for HOD sometime in the future.")
Disclaimer: All the numbers you see in this update are not necessarily the numbers you will see in the final game.
Let's get to it!
The USA calls me into a war against France (over Senegal). I'm thinking at the moment that, hey, this would be a great time to get in some naval combat and show it off! The French disagree and cheat by using their army. I get smacked around pretty hard (it turns out these army things are pretty neat) and the cowardly French navy stays in port. However, while the war is going on, I get an important invention:
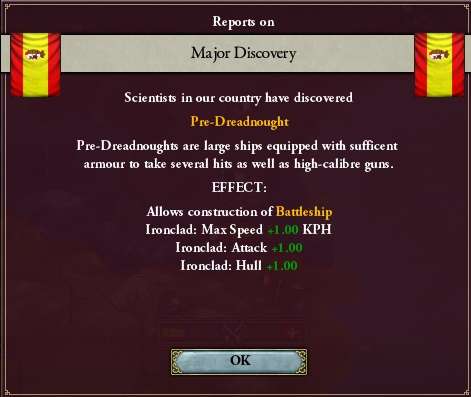
As the careful observer already knows, Battleships are brand new to Heart of Darkness. They serve an important role as your mid-game capital ship of choice for the premier naval powers (and for our purposes, Spain is a premier naval power). Let's take a look at the stats.
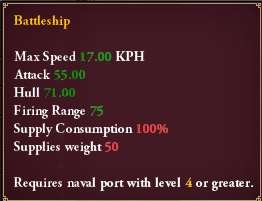
There are three things to focus on. First is firing range, which is also new to HOD. The bigger the number here, the sooner your vessel engages in putting some hurt on the enemy. Battleships outclass anything else available at this point in the game (1883), which means they can shred enemy ships without taking any damage themselves. Second, look at the supply weight. Remember AHD, where you could build 1000 dreadnoughts if you could afford it? Not any more! With a supply weight of 50, the number of battleships you can have is severely limited. (To compare, a Man o' War has a weight of 3.) If I scrapped my entire fleet and built nothing but battleships, guess how big my navy would be? (I'll wait.)
...
6 battleships! I have 324 total weight at this point. While you could build more, you'd suffer pretty severe penalties for doing so. I wouldn't recommend it, to say the least. Are battleships worth it? Oh yes, as you'll see later on.
Now, there's one other cost, which is the third thing we need to talk about it. That "Requires naval port with level 4 or greater." I don't have the tech to build the bases yet, so sadly, I can't build the battleships yet. If you remember from the last update, there's an additional limitation on capital ships like battleships: you can only build them in your home ports. (Those, again, are ports directly connected to your country by land, with some scattered exceptions).
In January of 1884, France adds a war goal: they want New York! Note that the AI is vastly improved: I begged and begged for a white peace but France wouldn't listen. It has to be so infuriating to the USA that I'm getting destroyed in Spain and will probably cost them New York. I unlock Cruisers in July of 1884:
But these are not the ordinary cruisers you know and love!
There are two new stats here as well (note the weight of cruisers: that's pretty formidable!). First, we have Torpedo Attacks. Torpedo Attacks give certain ships (Cruisers and, with an invention, Commerce Raiders) a bonus to hit unscreened big ships. Second, we have Evasion. That means that a cruiser has a 30% chance to avoid being hit by an enemy ship (with other modifiers being included as well). Frigates, Cruisers, and Commerce Raiders are the only vessels with this ability; Frigates and Commerce Raiders have lower evasion values as well. You can get 2.5 Cruisers for the price of a Battleship, in other words. What you choose to spend your money on is entirely up to you!
The USA loses New York in August, which would be a crippling blow in AHD. They'd have to fight France again to get it back. But after a bit of time in HOD...
Notice I have already backed the USA. In a few days, every country on the fence backs the USA as well (nobody likes France), and New York is returned to the USA.

In your face, France! In March of 1886, I get the tech to improve my naval bases. Naval bases in HOD, since they're much more important than in AHD or vanilla, have scaling costs. Upgrading from a level 3 to a level 4 base will cost me over £62,000! Still, I want battleships, so I swallow the cost. I'll end up building three bases. This fires in January of 1890:
With my finances settled and my bases complete, I start one battleship and five cruisers. I'll scrap every wooden ship I own to squeeze out one more battleship. While I try my best to get involved a war against a power with a decent navy (which is harder than you might think), I get the opportunity to back a crisis. I decide to do just that!
This is what it looks like when you propose a solution. In this case, it is Spain proposing that... the Soviet Union release Poland?! You heard me right! The devs and beta testers have worked tirelessly to improve rebel AI and mechanics, and every once in a while, things like this happen, even without player intervention. Now, as the guy in charge, I get to negotiate with the other powers, and here's what they think of me.
This is a good sampling of some of the issues that can affect crisis determinations. Right now, everybody wants to help out the Soviet Union. I need to fix that. Right away, I notice that the British like me most of the eligible Great Powers. (USA and Japan are too far away.) I also remember that, after Great Wars, you can make alliances with more than one GP. I sound out the British, and sure enough, they're interested in an alliance! The British decide to back me a few days later on the strength of our new relationship. France hates me, so I'll never get them to support me. Prussia and Austria don't want an active Poland, who could then stir up crises to get the rest of Poland free. Just for fun, I try to make Prussia an offer.
Note the bonus that the acquire state CB gives to Prussia's interest? Different GPs feel differently about different war goals. You can experiment with each one. Note that the backer of the crisis pays the infamy cost, so think carefully about what you're offering before you offer it. I can see it won't make a difference (I didn't think it would), so I move on. After a while, Austria, Prussia, and France all back the Soviets, and not wanting the French to beat me up again, I offer a white peace. I'm just glad nobody tried to raise a war goal against me!
Some more time passes, and by 1892, I've come up with the perfect way to get some decent naval action. I justify Adding the Netherlands to my sphere. Sure, Austria and the Ottoman Empire are friends to the Dutch, but I have friends of my own: the UK and USA. On June 6, 1893, it's go time! Sure enough, just outside Italy, I get into a naval battle with my Mediterranean squadron.
Every naval battle is divided into the following phases:
1. Seeking target. Your ship looks for an enemy ship to pick on. It will always choose the weakest untargeted ship or, if every ship is targeted, it'll double up on the weakest available target.
2. Approaching. Your ship has picked a victim, and now needs to close with the enemy before firing. The length of this phase is modified by the firing range and your ship's speed.
3. Damage. Here's where you compare your firepower against the enemy's hull and see how much damage is inflicted. (We'll see a better example of this later).
4. Resolution. Either one ship disengages (taking some amount of damage, naturally) or is sunk. Then, the cycle repeats again.
So, even in one naval battle, you don't have one naval battle: you have as many naval battles as you do ships (sometimes less if one fleet is dramatically larger). When all the ships on one side are either sunk or have retreated, the other side wins the battle.
Here's a little more detail on the approach phase:
You start every approach phase at 100. This particular ship, an Austrian Commerce Raider, gets to fire when the range closes to 60. Note the penalty associated with the considerably larger Austrian fleet at this point. The coordination penalty primarily affects the seeking target phase, however.
Here's some damage being dealt!
Three of my ships have all chosen one poor Austrian ship to focus on. The green numbers refer to damage dealt, while red is damage taken; it's a purely abstract number, so is only of proper use for determining how well you're doing relatively. This ship, in any case, won't last long. Thanks to some timely reinforcements, this battle as a whole quickly shifts in my favor, with this result:
Again, note the dynamic battle score! This is a good time to mention that invasion AI has improved a good deal: I actually have the US occupying most of the Netherlands (although I've been blockading the Dutch myself and sinking ships left and right). I get caught in a real fight a few months later. If you click on any ship in the approach phase, you can find who is targeting them:
In this case, two Turkish ships have targeted a cruiser of mine. The Ottomans have Men o' War but I have Battleships. This will not be pretty for them. (Of course, I've been ignoring the ORG techs, so it won't be quite as one sided as it could have been.)
I lose 17 Commerce Raiders, but look at the damage I've inflicted! Yes, it's a "loss", but a couple more losses like this will wipe out the Ottoman navy. I fight one last time against the French, thanks to getting tricked in a Crisis War, and while I do well at sea:
I'll get gutted on land. Maybe I should have read delra's AAR. In terms of conquest, this AAR was pretty challenging, especially for an AHD veteran, but I learned a lot writing it, and I hope you did too! As you can see, HOD has made some very impressive strides for Vicky 2. Thanks for reading, and I'm sure we'll meet again soon in AARland, and elsewhere on the forums!
This will be the final update for the beta AAR, with the game's release coming on April 16. Don't worry: I'm sure I'll probably write an AAR or three for HOD sometime in the future.
Disclaimer: All the numbers you see in this update are not necessarily the numbers you will see in the final game.
Let's get to it!
The USA calls me into a war against France (over Senegal). I'm thinking at the moment that, hey, this would be a great time to get in some naval combat and show it off! The French disagree and cheat by using their army. I get smacked around pretty hard (it turns out these army things are pretty neat) and the cowardly French navy stays in port. However, while the war is going on, I get an important invention:
As the careful observer already knows, Battleships are brand new to Heart of Darkness. They serve an important role as your mid-game capital ship of choice for the premier naval powers (and for our purposes, Spain is a premier naval power). Let's take a look at the stats.
There are three things to focus on. First is firing range, which is also new to HOD. The bigger the number here, the sooner your vessel engages in putting some hurt on the enemy. Battleships outclass anything else available at this point in the game (1883), which means they can shred enemy ships without taking any damage themselves. Second, look at the supply weight. Remember AHD, where you could build 1000 dreadnoughts if you could afford it? Not any more! With a supply weight of 50, the number of battleships you can have is severely limited. (To compare, a Man o' War has a weight of 3.) If I scrapped my entire fleet and built nothing but battleships, guess how big my navy would be? (I'll wait.)
...
6 battleships! I have 324 total weight at this point. While you could build more, you'd suffer pretty severe penalties for doing so. I wouldn't recommend it, to say the least. Are battleships worth it? Oh yes, as you'll see later on.
Now, there's one other cost, which is the third thing we need to talk about it. That "Requires naval port with level 4 or greater." I don't have the tech to build the bases yet, so sadly, I can't build the battleships yet. If you remember from the last update, there's an additional limitation on capital ships like battleships: you can only build them in your home ports. (Those, again, are ports directly connected to your country by land, with some scattered exceptions).
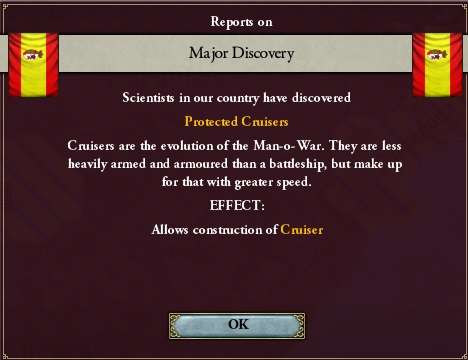
In January of 1884, France adds a war goal: they want New York! Note that the AI is vastly improved: I begged and begged for a white peace but France wouldn't listen. It has to be so infuriating to the USA that I'm getting destroyed in Spain and will probably cost them New York. I unlock Cruisers in July of 1884:
But these are not the ordinary cruisers you know and love!
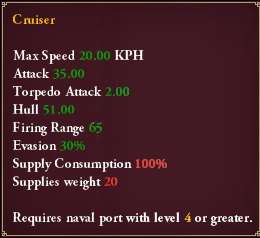
There are two new stats here as well (note the weight of cruisers: that's pretty formidable!). First, we have Torpedo Attacks. Torpedo Attacks give certain ships (Cruisers and, with an invention, Commerce Raiders) a bonus to hit unscreened big ships. Second, we have Evasion. That means that a cruiser has a 30% chance to avoid being hit by an enemy ship (with other modifiers being included as well). Frigates, Cruisers, and Commerce Raiders are the only vessels with this ability; Frigates and Commerce Raiders have lower evasion values as well. You can get 2.5 Cruisers for the price of a Battleship, in other words. What you choose to spend your money on is entirely up to you!
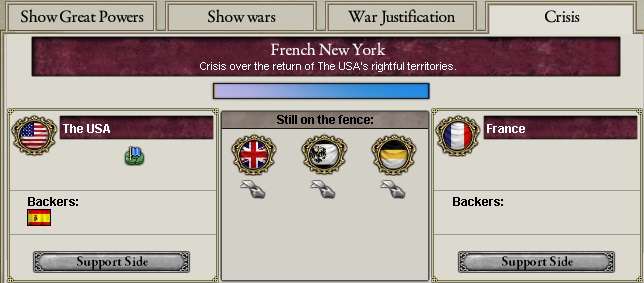
The USA loses New York in August, which would be a crippling blow in AHD. They'd have to fight France again to get it back. But after a bit of time in HOD...
Notice I have already backed the USA. In a few days, every country on the fence backs the USA as well (nobody likes France), and New York is returned to the USA.
In your face, France! In March of 1886, I get the tech to improve my naval bases. Naval bases in HOD, since they're much more important than in AHD or vanilla, have scaling costs. Upgrading from a level 3 to a level 4 base will cost me over £62,000! Still, I want battleships, so I swallow the cost. I'll end up building three bases. This fires in January of 1890:
With my finances settled and my bases complete, I start one battleship and five cruisers. I'll scrap every wooden ship I own to squeeze out one more battleship. While I try my best to get involved a war against a power with a decent navy (which is harder than you might think), I get the opportunity to back a crisis. I decide to do just that!
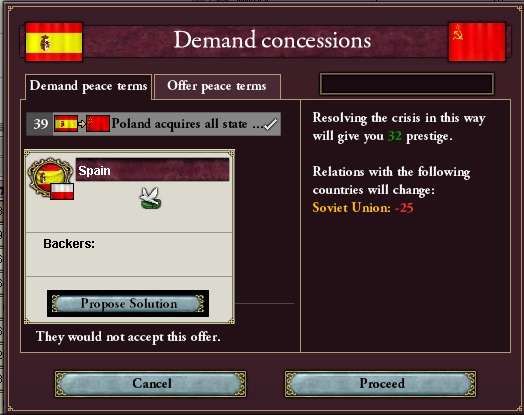
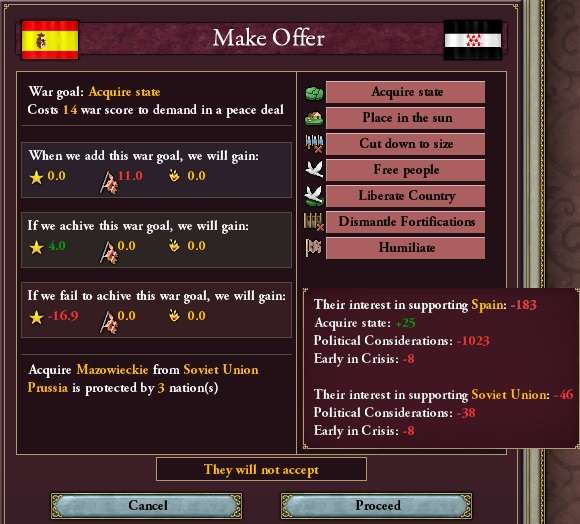
This is what it looks like when you propose a solution. In this case, it is Spain proposing that... the Soviet Union release Poland?! You heard me right! The devs and beta testers have worked tirelessly to improve rebel AI and mechanics, and every once in a while, things like this happen, even without player intervention. Now, as the guy in charge, I get to negotiate with the other powers, and here's what they think of me.
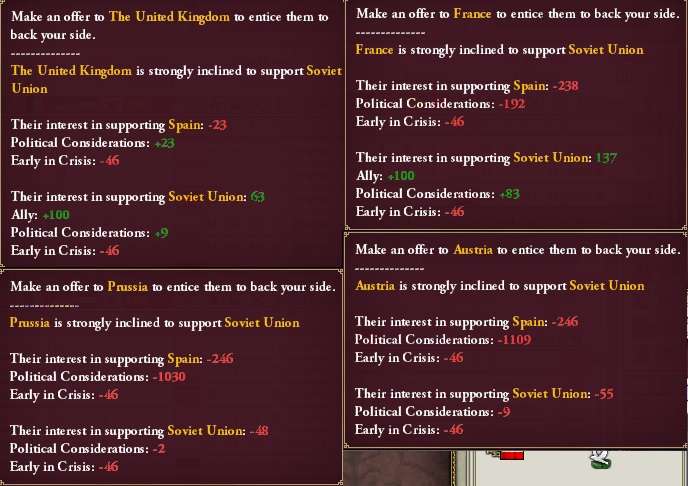
This is a good sampling of some of the issues that can affect crisis determinations. Right now, everybody wants to help out the Soviet Union. I need to fix that. Right away, I notice that the British like me most of the eligible Great Powers. (USA and Japan are too far away.) I also remember that, after Great Wars, you can make alliances with more than one GP. I sound out the British, and sure enough, they're interested in an alliance! The British decide to back me a few days later on the strength of our new relationship. France hates me, so I'll never get them to support me. Prussia and Austria don't want an active Poland, who could then stir up crises to get the rest of Poland free. Just for fun, I try to make Prussia an offer.
Note the bonus that the acquire state CB gives to Prussia's interest? Different GPs feel differently about different war goals. You can experiment with each one. Note that the backer of the crisis pays the infamy cost, so think carefully about what you're offering before you offer it. I can see it won't make a difference (I didn't think it would), so I move on. After a while, Austria, Prussia, and France all back the Soviets, and not wanting the French to beat me up again, I offer a white peace. I'm just glad nobody tried to raise a war goal against me!
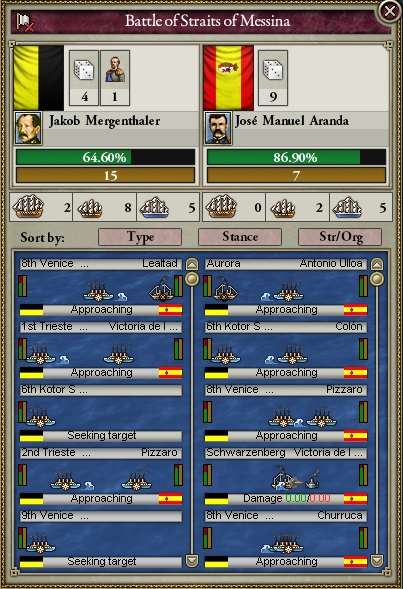
Some more time passes, and by 1892, I've come up with the perfect way to get some decent naval action. I justify Adding the Netherlands to my sphere. Sure, Austria and the Ottoman Empire are friends to the Dutch, but I have friends of my own: the UK and USA. On June 6, 1893, it's go time! Sure enough, just outside Italy, I get into a naval battle with my Mediterranean squadron.
Every naval battle is divided into the following phases:
1. Seeking target. Your ship looks for an enemy ship to pick on. It will always choose the weakest untargeted ship or, if every ship is targeted, it'll double up on the weakest available target.
2. Approaching. Your ship has picked a victim, and now needs to close with the enemy before firing. The length of this phase is modified by the firing range and your ship's speed.
3. Damage. Here's where you compare your firepower against the enemy's hull and see how much damage is inflicted. (We'll see a better example of this later).
4. Resolution. Either one ship disengages (taking some amount of damage, naturally) or is sunk. Then, the cycle repeats again.
So, even in one naval battle, you don't have one naval battle: you have as many naval battles as you do ships (sometimes less if one fleet is dramatically larger). When all the ships on one side are either sunk or have retreated, the other side wins the battle.
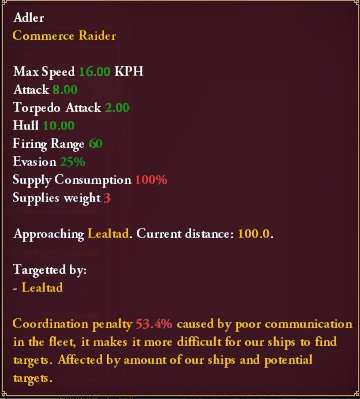
Here's a little more detail on the approach phase:
You start every approach phase at 100. This particular ship, an Austrian Commerce Raider, gets to fire when the range closes to 60. Note the penalty associated with the considerably larger Austrian fleet at this point. The coordination penalty primarily affects the seeking target phase, however.
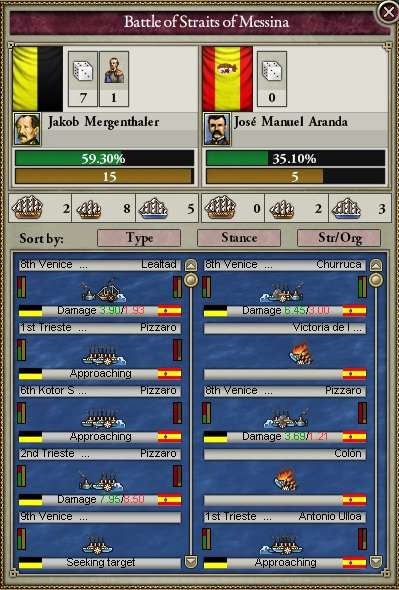
Here's some damage being dealt!
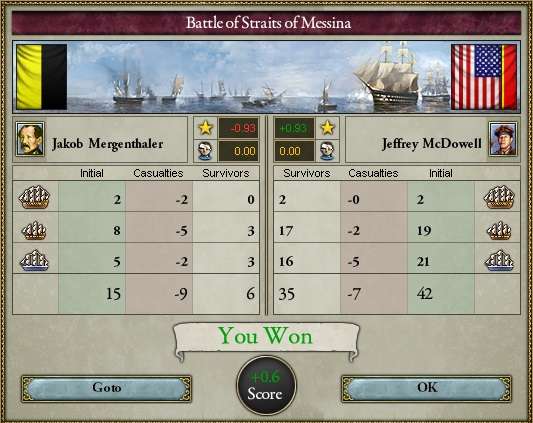
Three of my ships have all chosen one poor Austrian ship to focus on. The green numbers refer to damage dealt, while red is damage taken; it's a purely abstract number, so is only of proper use for determining how well you're doing relatively. This ship, in any case, won't last long. Thanks to some timely reinforcements, this battle as a whole quickly shifts in my favor, with this result:
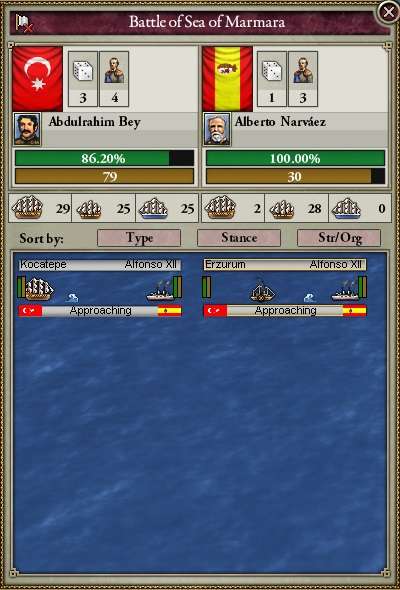
Again, note the dynamic battle score! This is a good time to mention that invasion AI has improved a good deal: I actually have the US occupying most of the Netherlands (although I've been blockading the Dutch myself and sinking ships left and right). I get caught in a real fight a few months later. If you click on any ship in the approach phase, you can find who is targeting them:
In this case, two Turkish ships have targeted a cruiser of mine. The Ottomans have Men o' War but I have Battleships. This will not be pretty for them. (Of course, I've been ignoring the ORG techs, so it won't be quite as one sided as it could have been.)
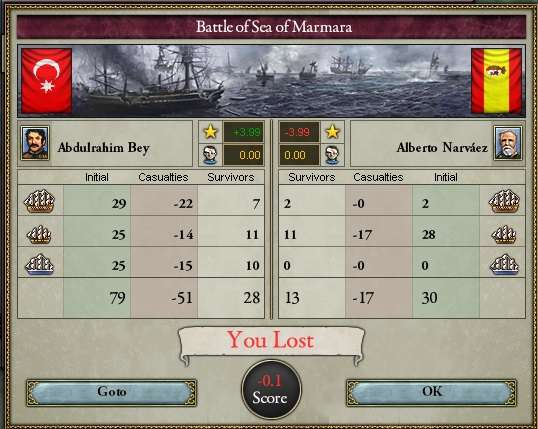
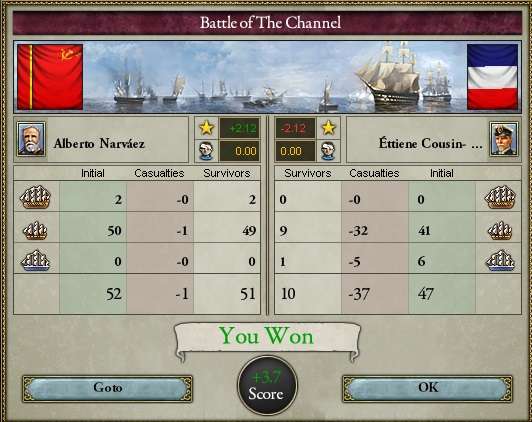
I lose 17 Commerce Raiders, but look at the damage I've inflicted! Yes, it's a "loss", but a couple more losses like this will wipe out the Ottoman navy. I fight one last time against the French, thanks to getting tricked in a Crisis War, and while I do well at sea:
I'll get gutted on land. Maybe I should have read delra's AAR.
In terms of conquest, this AAR was pretty challenging, especially for an AHD veteran, but I learned a lot writing it, and I hope you did too! As you can see, HOD has made some very impressive strides for Vicky 2. Thanks for reading, and I'm sure we'll meet again soon in AARland, and elsewhere on the forums!