The Surrender of the Confederacy
On January 29th 1863, President Jefferson Davis took a last look out over Mobile through the window of his office before picking up his pen and signing the document that lay before him. It had taken just 1 year, 7 months and 17 days for the Union forces to bring the Confederacy to its knees, and now the time had come to admit defeat. The document he had just signed was to be his last act as President of the Confederate States, and it gave instructions for the surrender of all remaining Confederate forces and the dissolution of the Confederate cabinet. Davis sat back in his chair and stared at the opposite wall of his office in despair.
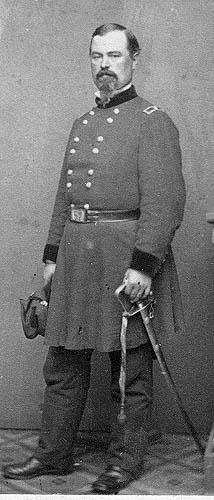
1. Irvin McDowell led the Army of Northeastern Virginia throughout the war. He was a cautious but highly successful commander who, although far from perfect is still remembered as one of the best Generals of the war.
In the East, Richmond had fallen months ago, General Beauregard had wasted the Army of the Potomac and been completely outfought by his Union opponents and Union forces had even begun to advance on North Carolina. Initially, the theatre had been in a stalemate, but this had changed after J.E.B. Stuart led his division through Union lines and raided Washington D.C in a feat of spectacular daring. Unfortunately, Stuart had spent too long in Washington enjoying his success, and the full might of the Army of Northeastern Virginia had been brought down upon him, leaving his division in tatters, forcing him to surrender the city and wasting valuable manpower on a temporary propaganda coup. Furthermore, his short lived success had encouraged Beauregard to launch his ridiculous Pittsburgh campaign. Although he succeeded in taking Pittsburgh, fresh Union forces had been rushed to block any further advance, and after a stalemate that lasted several months, Beauregard had ordered a retreat across the mountains of West Virginia, through bitter winter conditions and under constant attacks by the Union forces under Crittenden. The retreat resulted in the near total destruction of the Confederate forces, and they took no more part in the war. Furthermore, Beauregard had left only Stuart's division and Johnston's Corps (which although powerful, was busy laying siege to Fort Monroe) in Virginia to guard against a possible Union attack. When McDowell did attack, the Army of Northeastern Virginia swiftly pushed aside Stuart's division, took Richmond, Norfolk, Charlottesville and Petersburg and trapped Johnston's Corps against the walls of Fort Monroe. Johnston had held out for many weeks, but eventually had surrendered on January 16th, leaving no significant Confederate force between McDowell and Georgia.

2. John C. Fremont (Left), incompetent and indecisive commander of the Army of the Mississippi. George McClellan (Centre), the first commander of the Army of Kentucky was another incompetent leader. Leonidas Polk (Right), was the primary Confederate commander in the West, and is generally considered the finest Southern General of the war.
In the West, the Confederacy had met with more success, initial Union advances under the incompetent General Fremont (the Army of the Mississipi was renowned for having terrible commanders, H. Berry being the only commander above Division level not guilty of a major error) and the useless General McClellan being stopped at the forts of Island 10, Henry and Donelson. The Confederacy had even begun to mount a counterattack in the latter half of 1862, with Confederate forces taking Cairo and Lexington and mounting raids into Ohio, Illinois, Indiana and Iowa. The Union had returned with a vengeance however, and after McClellan was replaced as commander of the Army of Kentucky by General Buell Confederate efforts in Kentucky met with little success, Union troops matching them at every turn, and even pushing them back from some of their earlier gains. Along the Mississipi, Fremont finally managed to make a coherent effort at an offensive and moved, with a huge riverine flotilla, to recapture Cairo, surrounding the city and the Confederate forces there on January 10th.

3. Stand Watie (Left), a daring Indian raider who fought for the Confederacy and caused huge trouble for the Union. General Edwin Vose Sumner (Right), who led the Union forces in Kansas and Western Missouri. He commanded a vastly inferior force to his opponents and still managed to defeat them.
The far West was a theatre that initially was in the Confederacy's favour. General Sumner had been blocked from making any significant advance by far superior Confederate forces and although he had defeated them repeatedly, he did not have the manpower to hold his gains. Confederate troops from Texas had even advanced on Tuscon and Denver, seizing these towns for the Confederacy, and Stand Watie's Indian forces had run rings around Union troops, tearing up railways, raiding depots and smashing smaller Union forces. This changed however when General Sumner, who had so far led a masterful campaign with entirely insufficient forces finally succeeded in bringing the main Confederate force in the area to battle, smashing it and securing Western Missouri, Kansas and Iowa for the Union.

4. Nathaniel Banks (Left), first served as commander of I Corps in the Army of Northeastern Virginia before leading the Army of Louisiana. Ambrose Burnside (Right), served as a recruiting officer in Baltimore before leading the famous 'Iron Division', which was generally regarded as the finest formation of the war.
In the South, General Banks had landed with his Army of Louisiana and taken New Orleans with barely a fight. Baton Rouge had fallen within weeks and Vicksburg and Jackson had also fallen to Union forces. Although a Confederate counterattack did temporarily succeed in retaking Baton Rouge, Ambrose Burnside's Iron Division accompanied by Rickett's 23rd 'Connecticut' Division drove off the Confederate forces, smashed them and extended Union control to include the West bank of Baton Rouge. Further Confederate counterattacks at Jackson were beaten off by Union forces, thereby securing the lower reaches of the Mississippi under Union control and severely damaging the Confederacies war effort.
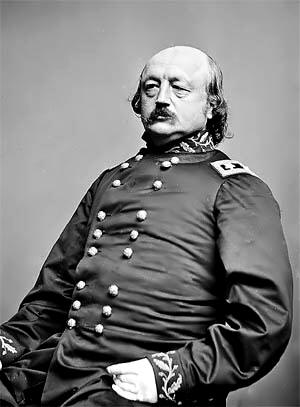
5. General Benjamin 'Stonewall'* Butler served as commander of Fort Monroe throughout the war, and held the crucial fort throughout. He was angered by the decision to appoint Banks rather than himself as commander of the Army of Louisiana, but his leadership was invaluable in the defence of Fort Monroe. *So called because his entire war service consisted of him sitting behind a 'stonewall'.
Fort Pickens and Monroe had stubbornly had held against all resistance with a stubborn determination. Fort Pickens had been under siege for nearly the entirety of the war, and had occupied a large amount of Confederate forces and kept them from being used elsewhere. Fort Monroe not only proved crucial to the control of the Chesapeake, but also occupied the attentions of Johnston's Corps, and played a major role in its destruction by preventing any evacuation or reinforcement.
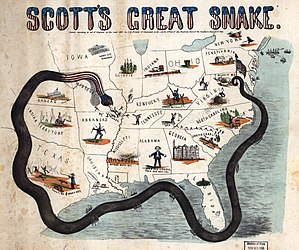
6. Scott's Anaconda plan was initially mocked, but the effect it had on the Confederate economy was massive.
The Union blockade and naval superiority had also aided in the fall of the Confederacy, with Confederate exports falling by nearly 80% from a combination of the blockade and the fall of New Orleans and other key ports. The Confederacy had not a hope of challenging the massive Union navy on the high seas, and when Banks had invaded the Bayou he had done so with no naval interference by Confederate ships. Even on the Mississippi the Confederacy could not match the Union, who outproduced the Confederates 5-1 in Ironclads.

7. Defeat on the battlefield, economic downturn, occupation of key areas and Union morale all played their part in the downfall of the Confederacy.
Perhaps the most frightening thing about the Union victory was the relative ease with which the North had undertaken the war. Unlike the South, the North had no mobilised at all, instead relying purely on volunteers and the purchase of goods to fuel their war effort. Although initially the Union had received modest amounts of volunteers, when McDowell began his Virginia offensive and swept away all before him this steady stream became a flood, with a recruitment drive in December 1862 bringing in more recruits than all previous drives combined. It was this massive surge of recruits that had been the final nail in the coffin for the Southern cause. Although the East was lost, there was still hope of mounting some resistance in that area, and although Cairo was under siege and Kentucky a stalemate there was still hope for more Southern victories. But with the surge in Union recruitment and consequently the formation of a huge number of new divisions, the struggle was hopeless. It was clear that the war, which as of current was going against the Confederacy, could only get worse and that the only option left was to surrender.
Davis awoke from his daydream and realised that some time had passed. The Morning sun was now in the East, and low in the sky, soon night would be upon them. He must move, and now, before it was too late. He rang the bell to summon Johnson and ordered him to find some means of transport to the harbour, and alert the other slaves to pack his bags. If he was quick, there was a chance he and Varina might slip the blockade and be away to Europe. There they could surely find a comfortable living in France or Britain.
On January 29th 1863, President Jefferson Davis took a last look out over Mobile through the window of his office before picking up his pen and signing the document that lay before him. It had taken just 1 year, 7 months and 17 days for the Union forces to bring the Confederacy to its knees, and now the time had come to admit defeat. The document he had just signed was to be his last act as President of the Confederate States, and it gave instructions for the surrender of all remaining Confederate forces and the dissolution of the Confederate cabinet. Davis sat back in his chair and stared at the opposite wall of his office in despair.
1. Irvin McDowell led the Army of Northeastern Virginia throughout the war. He was a cautious but highly successful commander who, although far from perfect is still remembered as one of the best Generals of the war.
In the East, Richmond had fallen months ago, General Beauregard had wasted the Army of the Potomac and been completely outfought by his Union opponents and Union forces had even begun to advance on North Carolina. Initially, the theatre had been in a stalemate, but this had changed after J.E.B. Stuart led his division through Union lines and raided Washington D.C in a feat of spectacular daring. Unfortunately, Stuart had spent too long in Washington enjoying his success, and the full might of the Army of Northeastern Virginia had been brought down upon him, leaving his division in tatters, forcing him to surrender the city and wasting valuable manpower on a temporary propaganda coup. Furthermore, his short lived success had encouraged Beauregard to launch his ridiculous Pittsburgh campaign. Although he succeeded in taking Pittsburgh, fresh Union forces had been rushed to block any further advance, and after a stalemate that lasted several months, Beauregard had ordered a retreat across the mountains of West Virginia, through bitter winter conditions and under constant attacks by the Union forces under Crittenden. The retreat resulted in the near total destruction of the Confederate forces, and they took no more part in the war. Furthermore, Beauregard had left only Stuart's division and Johnston's Corps (which although powerful, was busy laying siege to Fort Monroe) in Virginia to guard against a possible Union attack. When McDowell did attack, the Army of Northeastern Virginia swiftly pushed aside Stuart's division, took Richmond, Norfolk, Charlottesville and Petersburg and trapped Johnston's Corps against the walls of Fort Monroe. Johnston had held out for many weeks, but eventually had surrendered on January 16th, leaving no significant Confederate force between McDowell and Georgia.
2. John C. Fremont (Left), incompetent and indecisive commander of the Army of the Mississippi. George McClellan (Centre), the first commander of the Army of Kentucky was another incompetent leader. Leonidas Polk (Right), was the primary Confederate commander in the West, and is generally considered the finest Southern General of the war.
In the West, the Confederacy had met with more success, initial Union advances under the incompetent General Fremont (the Army of the Mississipi was renowned for having terrible commanders, H. Berry being the only commander above Division level not guilty of a major error) and the useless General McClellan being stopped at the forts of Island 10, Henry and Donelson. The Confederacy had even begun to mount a counterattack in the latter half of 1862, with Confederate forces taking Cairo and Lexington and mounting raids into Ohio, Illinois, Indiana and Iowa. The Union had returned with a vengeance however, and after McClellan was replaced as commander of the Army of Kentucky by General Buell Confederate efforts in Kentucky met with little success, Union troops matching them at every turn, and even pushing them back from some of their earlier gains. Along the Mississipi, Fremont finally managed to make a coherent effort at an offensive and moved, with a huge riverine flotilla, to recapture Cairo, surrounding the city and the Confederate forces there on January 10th.
3. Stand Watie (Left), a daring Indian raider who fought for the Confederacy and caused huge trouble for the Union. General Edwin Vose Sumner (Right), who led the Union forces in Kansas and Western Missouri. He commanded a vastly inferior force to his opponents and still managed to defeat them.
The far West was a theatre that initially was in the Confederacy's favour. General Sumner had been blocked from making any significant advance by far superior Confederate forces and although he had defeated them repeatedly, he did not have the manpower to hold his gains. Confederate troops from Texas had even advanced on Tuscon and Denver, seizing these towns for the Confederacy, and Stand Watie's Indian forces had run rings around Union troops, tearing up railways, raiding depots and smashing smaller Union forces. This changed however when General Sumner, who had so far led a masterful campaign with entirely insufficient forces finally succeeded in bringing the main Confederate force in the area to battle, smashing it and securing Western Missouri, Kansas and Iowa for the Union.
4. Nathaniel Banks (Left), first served as commander of I Corps in the Army of Northeastern Virginia before leading the Army of Louisiana. Ambrose Burnside (Right), served as a recruiting officer in Baltimore before leading the famous 'Iron Division', which was generally regarded as the finest formation of the war.
In the South, General Banks had landed with his Army of Louisiana and taken New Orleans with barely a fight. Baton Rouge had fallen within weeks and Vicksburg and Jackson had also fallen to Union forces. Although a Confederate counterattack did temporarily succeed in retaking Baton Rouge, Ambrose Burnside's Iron Division accompanied by Rickett's 23rd 'Connecticut' Division drove off the Confederate forces, smashed them and extended Union control to include the West bank of Baton Rouge. Further Confederate counterattacks at Jackson were beaten off by Union forces, thereby securing the lower reaches of the Mississippi under Union control and severely damaging the Confederacies war effort.
5. General Benjamin 'Stonewall'* Butler served as commander of Fort Monroe throughout the war, and held the crucial fort throughout. He was angered by the decision to appoint Banks rather than himself as commander of the Army of Louisiana, but his leadership was invaluable in the defence of Fort Monroe. *So called because his entire war service consisted of him sitting behind a 'stonewall'.
Fort Pickens and Monroe had stubbornly had held against all resistance with a stubborn determination. Fort Pickens had been under siege for nearly the entirety of the war, and had occupied a large amount of Confederate forces and kept them from being used elsewhere. Fort Monroe not only proved crucial to the control of the Chesapeake, but also occupied the attentions of Johnston's Corps, and played a major role in its destruction by preventing any evacuation or reinforcement.
6. Scott's Anaconda plan was initially mocked, but the effect it had on the Confederate economy was massive.
The Union blockade and naval superiority had also aided in the fall of the Confederacy, with Confederate exports falling by nearly 80% from a combination of the blockade and the fall of New Orleans and other key ports. The Confederacy had not a hope of challenging the massive Union navy on the high seas, and when Banks had invaded the Bayou he had done so with no naval interference by Confederate ships. Even on the Mississippi the Confederacy could not match the Union, who outproduced the Confederates 5-1 in Ironclads.
7. Defeat on the battlefield, economic downturn, occupation of key areas and Union morale all played their part in the downfall of the Confederacy.
Perhaps the most frightening thing about the Union victory was the relative ease with which the North had undertaken the war. Unlike the South, the North had no mobilised at all, instead relying purely on volunteers and the purchase of goods to fuel their war effort. Although initially the Union had received modest amounts of volunteers, when McDowell began his Virginia offensive and swept away all before him this steady stream became a flood, with a recruitment drive in December 1862 bringing in more recruits than all previous drives combined. It was this massive surge of recruits that had been the final nail in the coffin for the Southern cause. Although the East was lost, there was still hope of mounting some resistance in that area, and although Cairo was under siege and Kentucky a stalemate there was still hope for more Southern victories. But with the surge in Union recruitment and consequently the formation of a huge number of new divisions, the struggle was hopeless. It was clear that the war, which as of current was going against the Confederacy, could only get worse and that the only option left was to surrender.
Davis awoke from his daydream and realised that some time had passed. The Morning sun was now in the East, and low in the sky, soon night would be upon them. He must move, and now, before it was too late. He rang the bell to summon Johnson and ordered him to find some means of transport to the harbour, and alert the other slaves to pack his bags. If he was quick, there was a chance he and Varina might slip the blockade and be away to Europe. There they could surely find a comfortable living in France or Britain.
OOC: This is a true AAR in that it is totally after the action. I only decided to write it after I had won the war, and this will be the only update of the AAR. This was my first time playing AACW and it's certainly been interesting. I've learned some very important lessons, namely:
1. The Confederacy likes to try and take Pittsburgh via Grafton, WV. Therefore it might be prudent to fortify both Grafton and Pittsburgh more thoroughly in a future game.
2. Raiders are hell. Eventually I figured out a slapdash solution of divisions of cavalry and horse artillery which have the punch to take out the raiders but can still manoeuvre well enough, but I still had problems with them.
3. Island 10 is a tough nut. the Army of the Mississippi was hung up on it for the best part of 1862 till I finally gave up and retreated to St. Louis. I think part of the problem was Polk deciding to camp an entire division within the walls, but a larger riverine force than I had initially would also have helped.
4. New Orleans and the lower Mississipi is, in general, lightly held. I should have sent another Corps with Banks and some more garrison units so I could really start a blitzkrieg there. It wasn't necessary this game, but it would have helped.
5. Washington wont hold well with the initial garrison. I would probably go back and build a fort straight away and reinforce it, rather than suffering its fall again, even if I can quickly retake it.
6. The West needs more reinforcement. My production of troops was focused mainly in the East, which meant that whilst I had a huge superiority there (particularly after the AI threw away first Jackson's Corps, then Stuart's Division then the bulk of their Eastern army on pointless ventures) it did mean I was lacking in the West. The Army of the Mississippi was about the size of a single Eastern Corps.
7. Initially I ignored the navy, then I overcompensated horrendously by building Ironclads and Blockade squadrons like they were growing on trees that grew on bigger trees that grew on bigger trees. I then wasted a large part of the riverine units pounding forts for little gain.
")