• We have updated our Community Code of Conduct. Please read through the new rules for the forum that are an integral part of Paradox Interactive’s User Agreement.

SaberHRE

Captain
64 Badges
Aug 7, 2004
305
0
  • Stellaris: Digital Anniversary Edition
  • Europa Universalis IV: Common Sense
  • Crusader Kings II: Horse Lords
  • Europa Universalis IV: Cossacks
  • Crusader Kings II: Conclave
  • Europa Universalis IV: Mare Nostrum
  • Stellaris
  • Stellaris: Galaxy Edition
  • Stellaris: Galaxy Edition
  • Stellaris: Galaxy Edition
  • Hearts of Iron IV: Cadet
  • Hearts of Iron IV: Colonel
  • Crusader Kings II: Reapers Due
  • Europa Universalis IV: El Dorado
  • Stellaris: Leviathans Story Pack
  • Hearts of Iron IV: Together for Victory
  • Stellaris - Path to Destruction bundle
  • Europa Universalis IV: Mandate of Heaven
  • Knights of Honor
  • Europa Universalis IV: Third Rome
  • Hearts of Iron IV: Death or Dishonor
  • Stellaris: Synthetic Dawn
  • Europa Universalis IV: Cradle of Civilization
  • Crusader Kings II: Jade Dragon
  • Stellaris: Humanoids Species Pack
  • Stellaris: Nemesis
  • Europa Universalis IV: Wealth of Nations
  • Crusader Kings II: Legacy of Rome
  • Crusader Kings II: The Old Gods
  • Crusader Kings II: The Republic
  • Crusader Kings II: Sons of Abraham
  • Crusader Kings II: Sword of Islam
  • Deus Vult
  • Europa Universalis III
  • Europa Universalis III: Chronicles
  • Divine Wind
  • Europa Universalis IV
  • Europa Universalis IV: Art of War
  • Europa Universalis IV: Conquest of Paradise
  • Crusader Kings II
  • Europa Universalis IV: Call to arms event
  • Hearts of Iron III
  • Heir to the Throne
  • Europa Universalis IV: Res Publica
  • Victoria: Revolutions
  • Europa Universalis: Rome
  • Victoria 2
  • Victoria 2: A House Divided
  • Victoria 2: Heart of Darkness
  • Rome: Vae Victis
Although this could go to the SolAARium, I thought a seperate thread should be created for help concerning graphics.

So ask questions such as:
-How does one make a nicely looking map of their current.

-What graphics tools do AAR authors usually use.

-What tips could you give a newbie AAR author on imagery in AARs.
 
Saber said:
-How does one make a nicely looking map of their current
See below for a quick tutorial that I drew up for the AARlander on making maps with Inkscape. Unfortunately anon left before it could be 'published'

What graphics tools do AAR authors usually use
For maps I use Inkscape and GIMP for everything else. Both programmes are open source and thus free

What tips could you give a newbie AAR author on imagery in AARs.
Spend time on them. Presentation is important so take the time to a) find good images, and b) polish them up. I like using frames on my images, as discussed here
 
Making Maps: An Inkscape Tutorial​

There are plenty of ways to make maps and certainly I am no expert on this feature of AARs. Anyone can put together a decent effort with MS Paint and both Photoshop and the GIMP are common mapmaking tools. Its just a personal preference but I like to use 
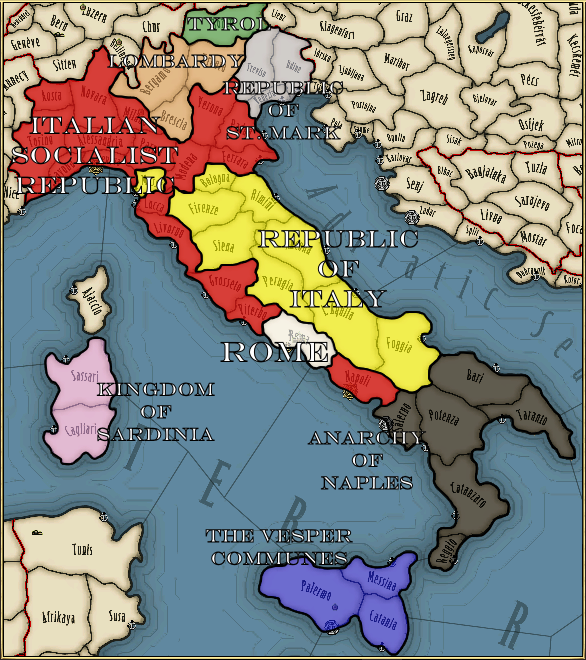
Inkscape for creating my AAR maps. This is a graphics program that uses vector graphics and so is somewhat different to most bitmap based tools. It also happens to be free to download and use. Here I've compiled some old posts on the subject into a tutorial that should contain everything you need to know about making maps using Inkscape. By the time I've finished explaining the basics you should be able to produce a map like that below:

March_Italy1878.png

One I made earlier: Italy in turmoil

Step One: The Preliminaries

Obviously enough the first step in using Inkscape is to download and install the program. The download can be found on this page while installing is straightforward enough. The latest version of Inkscape is 0.45 and, as I mentioned above, it is an open-source project and thus free. Once you have the tool installed there is the small matter of picking your base map. Ideally you want a blank/white screenshot that you can colour in yourself. Thrashing Mad has put together a package of such maps (see here) but for this particular example the standard Victoria diplomatic map will do fine

For the rest of this tutorial you can set up layers in Inkscape to help manage the different objects that you'll be placing on the map (eg, Borders, Text, Arrows, etc) but that's not strictly necessary. If you've never used such graphics programs before then don't bother using layers on your first effort

Step Two: National Borders

Now its time to start adding to our blank map. The primary purpose of most maps is representing nations, and so that should be our first order of business. In Inkscape we do this not by filling in an area (as in Paint or GIMP) but by drawing an outline of the object. In this case an object will be the group of provinces that make up the nation

1) We trace the borders of the nation using the Pencil tool. Pick a point on the border and drag the mouse around the contours of the nation until you reach the start point again. Ending the line at the start completes the object. This is the most time consuming element of the whole process as it involves manually drawing the outline of the nation onto the map. Thankfully you don't have to be too concerned about accuracy (see below) but the more time you spend on this step, the better your map will look

2) Our outline of the nation is complete but its not very distinct. This is a good chance to introduce the very important Fill and Stroke window. Select your outline and use the CTRL-SHIFT-F shortcut to bring up this window. The "Stroke" tab refers to the actual line that you've drawn, while the "Fill" tab governs what's inside of this outline. These options allow you to set the colour and transparency, amongst others, of your object but for now we'll just go to the "Stroke Style" tab and increase the thickness of our nation's outline. Increasing the "Width" of the line to three or five will make it easier to see and manipulate on the map

3) Now that the outline of our nation/object is more visible on the map, we can make use of one of Inkscape's greatest features. If you are anything like me then the odds are that the trace you made during Step One does not exactly match up with the province borders on the screenshot. Now is the time to fix these little mistakes. Select the Node Editor tool (F2) and click on your object. A series of white squares appear along the outline - these are the nodes on the line and they govern the shape of the object. In Paint or GIMP you draw a line and that's that, but with Inkscape you can draw a line and then twist it around or otherwise modify it. This is because the line is represented by two or more "nodes", which are really just points that you can meddle with. A square would have four nodes (one for each corner) whereas a triangle only has three. Complex shapes (such as the borders of the Papal States) might have dozens or hundreds

Try manipulating a node by dragging it out of position and watch how the line changes. We're doing the same thing in this step by dragging errant nodes so that they now lie on desired border path. It takes some practice to get used to but you can also add or delete nodes and make use of their "handles" to further perfect your shape.

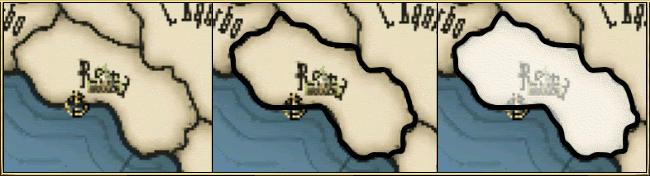
4) Now that you're fairly happy with the outline of your shape, you can start to add colour and other effects using the Stoke and Fill window mentioned above. Adjust or add colour to both the outline (stroke) and the inside (fill) of your shape using the sliders. You can also set the transparency of both and add more effects using the same sliders

FillTutorial.gif

Rome (L-R): Blank; Borders drawn; With a white (slightly transparent) fill

Step Three: Text and Finishing

By now you should have a completed nation object like that in the above Roman example. Repeat the above steps for other nations and you're in business with the vast majority of the work done. Aside from miscellaneous polishing up (tweaking borders and colours for example) all that's really left to do is add text. This is very straightforward when using the Text tool (F8). Just add your text to the map and you can then drag and manipulate it at will. Fonts and font sizes can be adjusted using the CTRL-SHIFT-T shortcut. Text, like other objects, can also be modified using the Fill and Stroke window. I've recently begun experimenting with making my text stand out by using different colours for my fill and stoke - in the top example the fill is white while the stroke is black

Step Four: Exporting Bitmap and Finishing

With the nations labelled you can now export the file for use in other programs. Inkscape saves files in the .svg format which is incompatible with most, or all, other graphics programs and image uploading sites. Go to File>Export Bitmap in order to save your map in another format. Here you can save a copy of the image in whatever format (usually .jpg, .bmp, .png, or .gif) and folder you wish. Most internet hosting sites will accept any of the above formats. I like to add borders to my AAR images so I'd then open the map (in its non-svg format) in GIMP and do this and any other finishing effects

Conclusion

There you have a quick tutorial on making maps with Inkscape. I am not a map expert and nor do I pretend that this is the best way to make maps. However I do enjoy messing around with Inkscape and I like the maps it produces. It is definitely a program that rewards experimentation, although the above steps do not use any advanced features, and I'd encourage anyone with an interest in making good quality AAR maps to try it out and simply mess around with the tools for a while. As always, feel free to address any questions to me and I'll do what I can to help
 
Last edited:
Wow! Thanks ComradeOn and asd. I was actually looking for a tutorial of this sort.
 
I use Photoshop but am not terribly skilled in it, so I can't give a lot of pointers. Until recently, I use thrashing_mad's blank Eu3 province map, but now have shifted to using the global Victoria province map, which was made by yours truly last year. I can find a link if you want it.

What I do is fill in the provinces controlled by a certain nation. I then remove the borders between provinces controlled by the same nation, while leaving borders between nations intact. When that is finished (usually takes a while), I copy it into a new document, and apply some sort of filter to it (the last one I did was the Rough Pastels filter. I then save as PNG and upload to Photobucket.
 
Ah, I've actually been thinking of putting up a tutorial for the maps that I use. :) Basically, they are based on a slightly edited blank map for CK -- I've only done them in CK this far -- and then the provinces controlled by one nation are filled in. The internal borders betweeen the provinces are removed, and each realm is given a colour of their own. After that, it's imported in Gimp and "multiplied" with a custom parchment-structure.

Examples of maps, made with my own blank map and Gimp:
map_outremer-after.png


mapf_outremer.png


I am willing to post a more thorough tutorial if it is of interest. :)
 
Snugglie said:
Ah, I've actually been thinking of putting up a tutorial for the maps that I use. :) Basically, they are based on a slightly edited blank map for CK -- I've only done them in CK this far -- and then the provinces controlled by one nation are filled in. The internal borders betweeen the provinces are removed, and each realm is given a colour of their own. After that, it's imported in Gimp and "multiplied" with a custom parchment-structure.

I am willing to post a more thorough tutorial if it is of interest. :)

What custom parchment background do you use?
 
rcduggan said:
What custom parchment background do you use?
Well... one that I found somewhere on the internet, logically. :D But allright, I'll try to put a tutorial together sometime during the day, keep a look-out for it. :)
 
Snugglie said:
Well... one that I found somewhere on the internet, logically. :D But allright, I'll try to put a tutorial together sometime during the day, keep a look-out for it. :)

Many thanks!
 
Snugglie said:
Well... one that I found somewhere on the internet, logically. :D But allright, I'll try to put a tutorial together sometime during the day, keep a look-out for it. :)
How does the tutorial? It's been a few days.
 
rcduggan said:
How does the tutorial? It's been a few days.
Er, yeah... :D

Sorry, been a little busy, and my computer's not been super-friendly with me. Not to mention that a friend had the ill taste to lend me his copies of Vicky+Ricky, and I've been shooting a few peeks at that generally incomprehensive game.

Okay, so those are the bad excuses, I will try to fix something soon. But I was thinking about talking to canonized tomorrow about writing an article on it in the AARlander -- it all depends on whether or not you can have two articles in the same issue -- instead of here, so that it might reach a little wider audience. :) But you will get your tutorial, you've got my word on that.
 
Here I am again, and I actually managed to fix a tutorial for my maps, published in the new AARlander, right here. If any of you've got any questions on it or -- even better -- suggestions for improvement, feel welcome to voice them.
 
That reminds me ! Snugglie wrote a tutorial as well for how to use GIMP and all this to make maps in the latest AARlander:

Here's the link .

coverjuly.jpg
 
Sematary reminded me of an old post in which I quickly step through drawing arrows on maps with Inkscape. It can be found here

Subterranean said:
Another method of getting initial coloured CK maps would be to use this program to generate them from the map files themselves. You can see an example resized screenshot here showing the initial 1066 scenario start.
Very nice. Does this work for other Paradox games as well? Either way, drawing maps in Inkscape for CK is always a pain due to the sheer number of borders/nations that have to be represented
 
Subterranean said:
Another method of getting initial coloured CK maps would be to use this program to generate them from the map files themselves. You can see an example resized screenshot here showing the initial 1066 scenario start.
Ah, nice one! That might be useful. :)