• We have updated our Community Code of Conduct. Please read through the new rules for the forum that are an integral part of Paradox Interactive’s User Agreement.
good questions. let me just leap your frog :).

ROFL
Thanks for the answers.

Regarding questions 3 and 4..... I have to disagree with your thoughts when playing as Germany. But this is a tutorial for all nations so yes, it will vary depending on the situation. Someday if you write a "Take3 for Experienced but not Expert Players" I would like to discuss this more.


6) the only option here, is to sacrifice as much as you can. there's a lot of 1938 tech around, but less 1939 tech. we will gradually move points over from one thing to the next. worst case scenario, transfer all LS to officer training for a few weeks. it really doesn't take long to build it back up to 100+ %. and we have the Sitzkrieg, where we will be doing our upgrades, giving us about 6 months to get back on top.

Ahhhh I wondered when or if you were going to start upgrading. I look foward to your next update.

EDIT: I really enjoyed Chapter 17.

zz
 
Last edited:
somebody asked for my yearly balance sheets, so here they are:

start 1/1/'36:
energy: 27.562
metal: 13.479
rare: 46.659
oil: 13.234
supplies: 7.814
fuel: 5.611
money: 40
IC: 201 total
MP: 808

1/1/'37:
energy: 50.677
metal: 54.747
rare: 58.046
oil: 8.041
supplies: 23.399
fuel: 16.265
money: 2.076
IC total: 201
MP: 951

1/1/'38:
energy: 85.417
metal: 90.359
rare: 69.704
oil: 10.504
supplies: 32.323
fuel: 21.220
money: 4.706
IC total: 228
MP: 1.447

1/1/'39:
energy: 99.999
metal: 99.999
rare: 79.774
oil: 13.364
supplies: 42.683
fuel: 29.039
money: 7.312
IC total: 250
MP: 1.688
 
Chapter 20: Naval Power.

First off, let me start my admitting that I’m far from being a naval expert. So if any of our resident specialists see a glaring mistake on my part, let me know.

With that little editorial out of the way, let’s talk ships and shells, shall we ?

shipstats.png

We’ll start with ship stats. As with planes, most of their stats are self-explanatory, but a few warrant closer examination.

From left to right, these stats are:

Organisation: works the same way as other units’ org.
Convoy attack: how effective they are at hitting enemy merchant shipping. Notice that Battleships, battlecruisers and submarines have the highest stats here.
Surface attack: the number of shots fired at surface ships during a round. Kings here, obviously, are battleships, battlecruisers and heavy cruisers (capital ships). Take a look at carriers. In and by themselves, they have no attack value at all (let’s face it, they are just huge bathtubs carrying planes).
Sub attack: best ships to attack subs are destroyers and carriers (CAGs).
Air attack: the number of shots fired per round at attacking planes. This is where cruisers shine.
Shore bombardment: as explained, having a ship in an adjacent sea zone when fighting over an coastal province gives you a combat bonus. Battlecruisers and battleships are really the only ones worth mentioning.
Surface defense: how many shots a ship can avoid during a combat round. Note the low defense on battleships and the high defense on destroyers. This is mostly a function of their speed (think X-wing fighter versus Death Star).
Air defense: again, cruisers are the best to provide cover from enemy aircrafts, along with carriers.
The next three are the detection values: higher stats here make it tougher to surprise the ship during first contact. Destroyers have the best detection values in the game.
Visibility: low visibility makes it easier to sneak up on the enemy. Trying to surprise someone with a submarine is one thing, doing the same with a battleship is just plain silly.
Transport capacity: a transport ship can carry a weight of 40.
Mission max range: how far out to sea you can send them (in kilometers; 1 mile=1.6 km). Beyond this range would require you to rebase the ship to another naval base. Notice how battlecruisers and heavy cruisers have the same range.
Firing Range: somewhat confusingly shown. Carriers have a firing range of 100 km (this is the combat range of the CAG, actually), battleships 32 km, battlecruisers 30, heavy cruisers 24, light cruisers 18, destroyers 14, subs 15 and transports 10 km. (more on this stat later).
Speed: how fast the ship moves. Of primal importance during naval combat, as we will see later on. Subs are extremely slow and, as such, not suitable for combat. Again notice the synergy between the 3 types of cruisers, but the speed demon here is the destroyer.
Hull: this stat has 2 functions in-game. Firstly, it determines how much damage it can take. Secondly, it determines how many ships you can cram into one squadron before you get penalties (again, more on this in the combat section)
Positioning: due to our evenly distributed research of naval doctrines, all our ships have a 5% positioning bonus (except escort carriers and transports). This stat determines how well placed the ship is to hit its target. Low positioning will mean less hits and an increased chance of Friendly Fire. (yeah, that’s right; with bad positioning you could end up sinking your own screens!)
The rest of their stats you know.

What does this mean, in practice?

Carriers are priceless. By far the most powerful ship in the game and the most versatile as well, due to the CAGs’ extreme firing range.

Battleships are brute force. Pure and simple. Big guns, heavy armour but too slow and too hulking to survive on their own.

Battlecruisers were supposed to be able to outshoot anything they could catch and outrun anything that could outshoot them. While this didn’t turn out as hoped, battlecruisers ARE fast, and when coupled with other cruiser types, this means all ships would be able to bring their guns to bear. Compare this to a squadron consisting of battleships (firing range 32 km) and destroyers (firing range 14 km). The battleships would be firing allready while the destroyers would still be trying to close in.
In fact, in HOI2 there was an exploit called the Cruizerg fleet; massed cruisers all combining to fire at once, overpowering the battleship’s defenses.
Escort carriers seve only one function, really. As the name suggests, they are meant to escort transports and convoys. Period. If you’re looking to go the carrier route, it is best to focus on pure carriers mostly.

Heavy cruisers are labeled as capital ships in the game, while in reality they were used mostly in a screen function (again, more details later). They lack the stamina to go up against other capital ships, but they can add some much-needed aerial defense if you’re going up against an enemy with carriers and land-based bombers and they can serve as damage soaks for your battleships.

Light cruisers are sturdy screening vessels with bigger range, but they lack the anti-sub ability, detection values and speed of destroyers.

Destroyers are fast, cheap to build and maintain, with excellent detection and anti-sub values, but they are not build for pitched battle.

Submarines have two functions: convoy raiding and stealthy recon.

Transports are…well…transports. (duh)

So how do you go about assembling a fleet?

km1939.png

The actual game mechanics are the following:
Speed: whenever possible, you should always strive to avoid putting capital ships together with disparate speed. This is mostly due to how combat works.

In the case of our Kriegsmarine, Bismarck is slowing the rest of the fleet down as shown when you hover the mouse over the fleet's speed in the upper right corner.

Hull. The hull values of all the ships in the squadron are added together. If the total is bigger than 10, you get positioning penalties in combat (they get in each other’s way). This penalty is 4% per point over 10 hull. So in theory, a total hull value of 10 or less would be ideal.
In practice, however, things look a bit different. A naval commander’s skill provides 10% positioning bonus per skill point. Raeder and Donitz, for instance, have skill 4 and 5 respectively, and provide 40% and 50% bonus, enabling you to offset the penalty to a large degree. In the case of the Kriegsmarine, we have a total hull of 18.42 (not shown; I calculated it adding together each ship’s hull value) and give us a 29% penalty. If we give Raeder command, his 40% bonus more than outweighs the penalty. A reasonable hull rate per ship squadron would be somewhere between 10 and 15. In other words, we’re going to have to trim it down a little.

Capital vs. Screen ratio. You need to have at least 1 screening ship per capital ship or suffer a combat penalty.
Screens are Light cruisers and destroyers and primarily exist to protect the capital ships.
Capitals are heavy cruisers, battlecruisers, battleships, escort carriers and carriers.

In the case of our kriegsmarine, we have 6 capitals and 8 screens.

Remember that we are still building a battleship, a carrier, a light cruiser and a destoyer. I would seperate the battlecruisers, along with 2 heavy cruiser, giving us 4 capital ships. So we need at least 4 screens to go with it. Add the destroyer and three of the level-3 light cruisers.

squadrons.png

I renamed the second squadron “Reserve Flotte”.
Once the battleship Tirpitz is finished, it will be added to the kriegsmarine. We could add the carrier as well and still have a capital/screen ratio of 1:1. Or we could base it in its own for now and reassign light cruisers to accompany it.

Note how you can combine ships with a specific task in question. In this case, our main fleet is slower than our reserve fleet, but it will have both battleships in its ranks. The reserve fleet has the best spotting chance (due to the destroyer) and anti-air ability (due to the cruisers). While less powerful per ship, the reserve fleet’s ships can (almost) all fire at an enemy at once.

Little history lesson here: the UK was afraid of Germany combining its cruisers in this fashion. That’s why they came up with a naval agreement limiting Germany’s shipbuilding capacity.

I once experimented with Germany’s real-life 1934 “cruizerg” building program, and found that it works, at least early on in the war, but the ships got banged up due to a lack of “stamina” and had to spend weeks in drydock after each encounter.

For those of you interested in experimenting on your own, I refer you to this awesome threat:
http://forum.paradoxplaza.com/forum...aval-Plans-for-the-World-s-Naval-Powers/page1

Concerning carriers, most people, including myself, keep them seperate from other capital ship types for a simple reason: any warship in combat will try to close on the enemy in order to fire its guns. A Carrier, however, will try to stay at the extreme range of 100 km, far outside the firing range of any other ship type. When you combine them with other capitals, they will be “sucked in” closer, where their lack of armament will only serve to hinder them.

The most common type of fleet would be:

Surface Action Group (SAG): a squadron composed of battleships or battlecruisers with screens (mostly light cruisers) , intended primarily for naval combat.

Carrier Task Force (CTF): as the name suggests, the only capitals here will be carriers, accompanied by destroyers or light cruisers. When accompanied by destroyers, it is an excellent weapon against enemy submarines: the destroyers will find the wolfpack and the CAGs will sink them. And this type of fleet is fast enough to outrun anything else they might run into. (also known as an ASW-squadron)
When accompanied by Light Cruisers, it is usually intended for pitched battle, as the cruisers can take more of a beating than destroyers.

Invasion fleet: a number of troop transports, along with a couple of screens for protection and maybe a carrier or an escort carrier, for use in amphibious invasion.

Coastal patrols: mostly older screens and a heavy cruiser or two for routine patrole duty outside the frontlines.

Submarines: as we’ve seen, their main asset is stealth to sink enemy shipping or to explore enemy coastlines for potential invasion sites.


But what happens when two fleets collide?

First of all, unlike ground forces, naval squadrons cannot see into the adjacent sea zone. They can only see to the edge of their current sea zone. (due to the ranges involved; sea zones are much larger than ground provinces).
So your ships enter a sea zone where an enemy squadron is present. What happens?
First, the game rolls dice to see whether they spot each other (like the doctrine tech spotting). If one side doesn’t notice the other one, they start out farther from their ideal positioning. If one of the clashing fleets consists of submarines, those have a 50% chance to surprise the enemy, gaining 300% attack bonus for the first 3 hours of the engagement. (naval bombers, by the way, have 25% chance to surprise the enemy and gaining 75% attacking bonus.)
When neither notices the other fleet, both sail on in happy ignorance.
When they see each other, what then? Merry greetings and well wishes?
Well…not really.

wash1y.png

I took the save from an earlier game and send out the 1. Flotte. Notice the lack of org on the Graf Zeppelin. For demonstration purposes, I send them to the coast of England right after the Graf Zeppelin was commisioned. No sane person would ever do that in actual gameplay, of course.
Here they run into a Home Fleet squadron consisting of a carrier (HMS Furious), an aging battleship (HMS Nelson), a heavy cruiser and 4 destroyer flotillas. (in-game DDs actually consist of about 5 to 10 destroyers). It is under the command of commander bruce-Frase, a level-4 blockade runner, who can command 6 ships. As he is commanding 7, they are at a disadvantage against Raeder, a superior tactician of equal skill but less experience.
What’s more, they meet up at night, when anything can happen.
The UK fleet starts out with a basic positioning of 97%, while the German fleet starts out with 90%.
This percentage is then modified for each ship seperately to give actual positioning.
All ships will attempt to reach firing distance, except the two carriers who both stay at extreme range and let their CAGs do the talking for them.

wash2.png

Graf Zeppelin is at 55 km more than far enough to launch its planes. The attack and defense values are then calculated and shots fired.


Bismarck is at 16 km distance from HMS Effingham and fires a salvo, while my destroyers are lagging behind at 64km, well outside their firing range. (notice how Bismarck’s forward guns are shown firing?)
The British ships are still trying to close in on the Germans and have not fired a single shot, relying only on HMS Furious’ CAGs. (none of them is shown with blazing guns).
After shots have been fired, damage is calculated if a hit was scored.
Bismarck has a sea attack rating of 23. This is multiplied by it’s current strength (still undamaged) of 100% and divided by Effingham’s Hull Rating of about 1.3 or so (educated guess here) for a total of 17.7 damage (rounded up).
What’s that? A lot of damage? Yeah, naval combat is hell! What’s more, there’s base 10% chance of scoring a critical hit, multilpying damage by 10 (!!) (the equivalent of a lucky shot in the enemy’s ammo hold).
Oh, and when an enemy fleet completely sinks, it takes its commanding officer with it, contrary to air- and ground units).
When looking at an unpauzed naval engagement, you will see ships trying to steer away (they will move towards their edge of the combat card).
You can choose to disengage by clicking the little icon in the upper left coner or let nature run its course. After all ships have been driven off, the result will be displayed. The loser is always the one who is “driven off the edge of the combat card”, as it were, regardless of actual sinking. (sometimes you will get a loss when you sank 3 battleships or something, or a win while the only ship remaining is a lone destroyer).
It can be over in the blink of an eye, as this one was (I didn’t even get a chance to take a second screenshot), or it can last for days (think Midway and Mariana Turkey Shoot).
The defeated side will retreat into the next, random sea zone, hoping to reach a friendly port for repairs.
(I once had a US Task Force in the Western Channel and a UK SAG in the Eastern channel play tennis with one of my fleets. They got defeated and ran into the other squadron, who defeated them in turn and send them back where they came from…into the waiting hands of the CTF!)
Naval Combat is fast, furious, exciting and unpredictable and should never be entered into lightly. So unless your chosen strategy is to whittle down the RN’s presence, keep them in port under the watchful eye of an interceptor wing. You never know who is going to come for a friendly visit.

And that leaves me with only thing to add. Naval Commanders.

You have:
-commanders: able to command up to 6 ships.
-rear admirals: able to command up to 12 ships.
-vice admirals: can command up to 18 ships.
-admirals: can command up to 30 ships (by which time any hull value will have long since become a thing of the past).
Note that if two squadrons find themselves in the same fight, the total number of ships counts towards stacking/positioning and command limit!!
As stated before, each skill point they possess, provides a 10% positioning bonus.

Traits:
Blockade Runner: reduces the time needed to disengage from a fight, thereby improving the odds that the fleet will survive. Best suited for transport fleets.
Sea Wolf: improves convoy raiding by 20%. (mostly used for submarines)
Spotter: increases the chance of finding an enemy fleet by 10%. Best suited for anti-sub duty and for blockading enemy straights.
Superior Tactician: increases the range by which ships can engage by 10%. Obviously to be used for your combat squadrons.
And of course there’s the omni-present Old Guard, who reduces experience gain by 50%.

In our tutorial, I am going to give admiral Raeder command of Kriegsmarine, while Donitz can be promoted to rear admiral to command the reserve fleet. (I am loathe to send a skill-5 leader to almost certain death onboard a submarine).
Weserflotte: Carls, a high-level Blockade Runner, is perfect for the job.
Baltische Flotte: Saalwachter can set for command here.
The submarines will be commanded by sea wolves. Start by assigning the least-skilled one command of I. Unterseebootflotte (I believe Claesen, a skill-1 commander), and work your way up the ladder, thereby ensuring that the best and most modern subs are commanded by the best commanders.


I guess that’s it for today.

Have fun reading TheBromgrev’s thread on real-world fleets and see you next time when we wallow in the very last months of peace in the entire game.
 
Thanks for posting the balance sheets. My Jan39 is close to yours except for rares, should have traded for more.

zz

each game is different. sometimes, they act hard to get for no apparent reason. as long as you have about 76.000 by the time the balloon goes up, you will be fine.
 
Misterbean,


I have to say that this is really great stuff. I can't wait until the battle begins :p
 
Misterbean,


I have to say that this is really great stuff. I can't wait until the battle begins :p

me neither, to be honest.

God, I missed writing while I was away!
 
+1

Sorry, +1 pertaining to Davy's post
"I have to say that this is really great stuff. I can't wait until the battle begins "

But if you want to explain license-built units for SSmith, that would be cool
 
Last edited:
okay. suppose I'm playing Italy in stead of Germany. my armour tech sucks and I don't have the LS to keep it up-to-date. So I ask my faction member Germany for a license. A list appears with all the things they are willing to license out (and no, unfortunately, you can't get a license to build Japanese carriers). If I'm lucky, panzers are part of that list. I select them and a slider can be used to set a price, after which the german panzers will appear in my Italian production queu, where they will be treated as everything else. Very handy for playing minor faction members, like Belgium, who had a sizable number of airmen in the RAF.
 
ok, Max. all our bomber wings should be in groups of 3, while the interceptors go in groups of 4. With 4 interceptors, I have the same stacking penalty as the RAF's bombers, which usually attack in groups of 3, while maintaining superior fighting power.
What happens in a dogfight between, say, Spitfires and Messerschmidts, is the same as ground combat. each plane randomly targets an enemy plane. having four of them means the damage is spread around more.
Right now, on 1/1/'39, I have 5 fighter groups of 4 and 1 fighter group of 3 (VI. Fliegerkorps).
Stuka 1 has its 3 bombers, while stuka 2 only consists of 2 bombers.
Luftflotte IV only has 1 tactical bomber, while the other 3 are complete.

you may have missed a spot somewhere. Do you still have a save from early 1938? I have annual saves on file, so I could look into it where you went wrong, if you want.

As for the nitty gritty, I will get more into detail when the war starts, but basically, it's very easy. wait until you see the AI start bombing someplace. usually, it gets fixated on just 2 or 3 provinces at a time. so once you know where they've hit you, that is where they will return next time. set one of your interceptors on an "air superiority" mission (maintain a constant presence in the air) over that one single province, and you should get them every single time. (Dortmund and Leipzig are favorite targets, but sometimes it will zoom in on Köln or Bitburg, for instance).
if you have radar, you could opt for "air intercept" instead (keeping the fighters on the ground until an enemy is spotted) to save on fuel.

Just so everyone understands...It is not the type of aircraft that has the different stacking penalty. It is the MISSION of Air Superiority/Air Interception that allows the extra wing. So if you use Interceptors for ground assault you will have a higher penalty
 
Just so everyone understands...It is not the type of aircraft that has the different stacking penalty. It is the MISSION of Air Superiority/Air Interception that allows the extra wing. So if you use Interceptors for ground assault you will have a higher penalty
A very important distinction. Thanks for that clarification.
 
wrong!

hoi325u.png

try it.
three bombers have a 30% stacking penalty.
3 interceptors have 20% stacking penalty.
besides, it's not very useful getting interceptors fro ground attack given their abismal ground attack abilities
 
Well that answers that. TY misterbean.
 
wrong!

hoi325u.png

try it.
three bombers have a 30% stacking penalty.
3 interceptors have 20% stacking penalty.
besides, it's not very useful getting interceptors fro ground attack given their abismal ground attack abilities

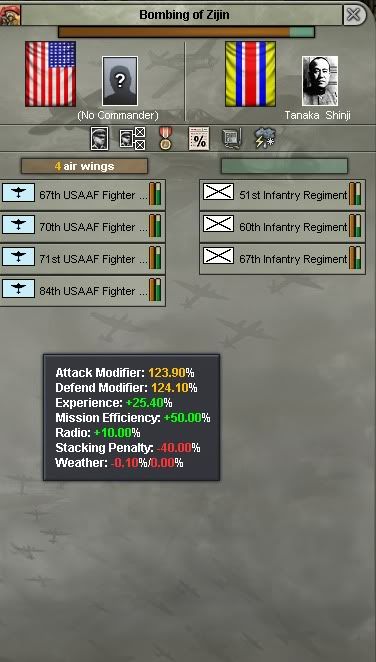
I looked at the picture above and you just showed that using planes for air intercept/air superiorty does get 1 free wing without a stacking penalty. Here is a screenshot from one of my games.

Proof.jpg


Now this is a fight where 4 Interceptors are ground attacking a stack of Japanese Infantry. Notice that the 4 wings get a 40% stacking penalty. Now I know I don't usually use fighters to do ground attacks, but if you have already air superiority in the area, why not do a little straffing, will probably do little but every little bit counts in my eyes. I think this shows it IS the mission that determines the stacking penalty.
 
Wait, are you using MR Fighters or Interceptors for your strafing? Is that possibly the difference?
 
The difference is the mission. If I do any mission other than Interception or Air Superiority with a group of planes every wing counts for the stacking penalty. If I am doing Air superiority/Interception I get 1 wing free of stacking penalties. Now I will be honest I have not tested CAGs to see what the differences in stacking penalty because it is suppose to be 1/4 that of other plane types. I am saying you can do ground attack missions or other missions with FTRs and INTs and if you are not dogfighting you have the same stacking penalty as TACs or STRs or NAVs for an example.
 
Last edited: