

When is it to my advantage to hire mercenaries instead of relying on my own troops? It’s a simple enough question. Let’s see if we can we can figure it out. This is a lengthy, mathematical investigation. If math isn’t your thing, then either skip to the conclusions or stop right here.
Problem Description
Let’s constrain the problem with some assumptions:
Quantifying Combat Strength
Combat mechanics are rather complicated, but I’m going to make a rough approximation of a soldier’s value depending on his class. Let’s sum the total Attack and Defense values of each class of soldier in all three phases of combat. I’m going to call this quantity “Power.” Yes, this is not a perfect way to score combat value, but it’s far better than nothing. Examining defines.lua, we extract the following data:
Unit - Power/Morale/Maintenance
Light Infantry – 17/3/1
Heavy Infantry – 19.5/5/2
Archers – 19/1/1/
Pikemen – 22.4/6/2
Light Cavalry – 31/4/2
Heavy Cavalry – 40/10/4
Evaluating the Swiss Band under these metrics yields a Power of 30.8 ((600*19.5+300*19+22.4*600)/1000 = 30.84) and a Morale value of 6.9 ((600*5+300*1+600*6)/1000 = 6.9). So what improvements would I need to make to castle(s) to get the same Power and Morale? Let’s examine.
The 1 Castle Demesne
If I am a lowly count with but one castle, I have a lot of improving to do. If I want to get my levies to a Power of 30.8 and Morale of 6.9, then I need to build ALL of these buildings:
Militia Barracks 1, 2, and 3
Barracks 1, 2, 3, 4, 5, 6
Stable 1, 2, and 3
Training Grounds 1 and 2
Castle Walls 1 and 2
Keep 1 and 2
This nets me an army of 228 light infantry, 528 heavy infantry, 264 archers, 156 pikemen, 204 light cavalry, and a paltry 6 knights. With morale boosts from the Training Grounds, this gives me a force of 29.25 Power and 67.5 Morale…it’s close but not perfect. There are other building combinations that yield similarly potent forces, but this is one of the more cost effective ones that yields a close Power:Morale ratio.
Hurray, I’ve built all those buildings and can muster my own force to rival the Swiss Band. What did it cost me to do this? Would you believe 3510 gold?! Ok, ok, but the maintenance on my demesne is lower, right? Yes, it is only 1.91 gold per month instead of 6.75. So how long would I have to field both armies before it was economically advantageous to gone the demesne route? It turns out to be roughly 64 years.
Mercenaries: 75 + 6.75*12*64 = 5259 gold
Demesne: 3510 + 1.91*12*64 = 4977 gold
This assumes that your levy maintenance remains fixed…it doesn’t decrease in size as the army takes losses. This is a bit optimistic; your actual mileage will vary. But even still, you will have to field your levy a LONG time before you recoup your investment.
More than One Castle
If I have multiple castles instead of 1, does the demesne route become more compelling? Well, yes it does. In order to get an equivalently potent army, you don’t need as many buildings. If you have 2 castles, you’ll need to spend 1610 gold upgrading each one (I’ll spare you the building list). For 3, it’s 790 gold. 4 is 320G, 5 is 220G, 6 is 100G, and you don’t need any upgrades if you have 7 or more castles. Again, these numbers can vary depending on your build strategy. In order to get a Power:Morale ratio close to the Swiss Band, my 3 castle strategy involves building Keeps, which aren’t really that cost effective. Hence the precipitous dropoff in cost between 3 and 4 castles.
Regardless of which building route you take, we can begin to uncover a pattern of initial cost and cost over time. This is the chart that I came up with.
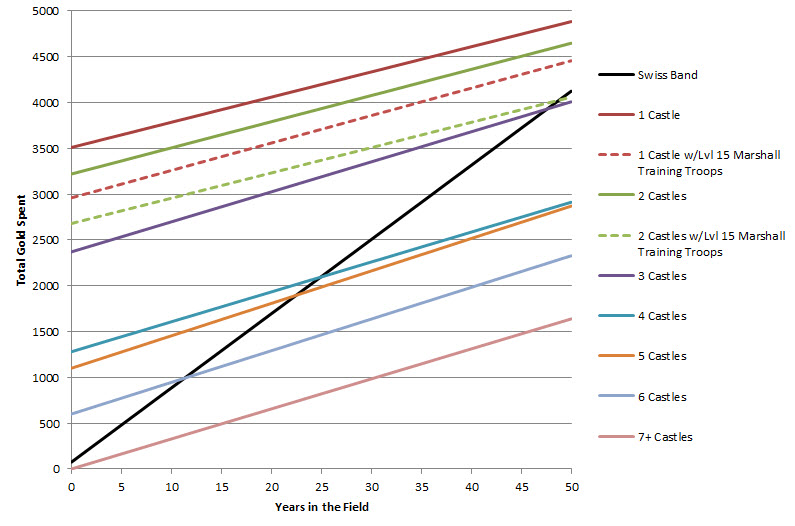
As you can see, there’s a critical point beyond which the demesne investment becomes worthwhile.
Conclusions
Based on all the data, this is what I’ve decided.
1) Never upgrade a castle until you have at least 4 of them. Always rely on mercenaries before then. They’re going to get you to 4 castles in a far more cost effective manner.
2) Once you get to 4+ castles, you can begin to contemplate investing in your demesne for the long haul. But even then, it’s going to take a quarter century of warfare before you begin to break even.
3) The smartest thing to do is to quickly max out your demesne holding limit with mercenaries.
Future Investigation
I haven’t thought about it as thoroughly, but it would be interesting to compare mercenaries versus building upgrades once you max your demesne out. My suspicion is that you’ll find a similar situation: improving the demesne is only advantageous over decades of warfare. It would also be interesting to evaluate temples and cities, though I suspect that they won’t help the situation.
Problem Description
Let’s constrain the problem with some assumptions:
- I want to hire the Swiss Band or raise an equivalently potent army from my demesne.
- I am sitting on a wad of cash such that money is no object. My only concern is maximizing the effectiveness of the gold I spend.
- Since I am in no rush to field this army, build times to improve my demesne are not a concern.
- I don’t care about my vassals’ levies. They are notoriously fickle about sending troops and get upset when I field them for too long.
- My demesne only consists of castles that have no upgrades.
- I’m not going to leverage any culture-specific buildings.
Quantifying Combat Strength
Combat mechanics are rather complicated, but I’m going to make a rough approximation of a soldier’s value depending on his class. Let’s sum the total Attack and Defense values of each class of soldier in all three phases of combat. I’m going to call this quantity “Power.” Yes, this is not a perfect way to score combat value, but it’s far better than nothing. Examining defines.lua, we extract the following data:
Unit - Power/Morale/Maintenance
Light Infantry – 17/3/1
Heavy Infantry – 19.5/5/2
Archers – 19/1/1/
Pikemen – 22.4/6/2
Light Cavalry – 31/4/2
Heavy Cavalry – 40/10/4
Evaluating the Swiss Band under these metrics yields a Power of 30.8 ((600*19.5+300*19+22.4*600)/1000 = 30.84) and a Morale value of 6.9 ((600*5+300*1+600*6)/1000 = 6.9). So what improvements would I need to make to castle(s) to get the same Power and Morale? Let’s examine.
The 1 Castle Demesne
If I am a lowly count with but one castle, I have a lot of improving to do. If I want to get my levies to a Power of 30.8 and Morale of 6.9, then I need to build ALL of these buildings:
Militia Barracks 1, 2, and 3
Barracks 1, 2, 3, 4, 5, 6
Stable 1, 2, and 3
Training Grounds 1 and 2
Castle Walls 1 and 2
Keep 1 and 2
This nets me an army of 228 light infantry, 528 heavy infantry, 264 archers, 156 pikemen, 204 light cavalry, and a paltry 6 knights. With morale boosts from the Training Grounds, this gives me a force of 29.25 Power and 67.5 Morale…it’s close but not perfect. There are other building combinations that yield similarly potent forces, but this is one of the more cost effective ones that yields a close Power:Morale ratio.
Hurray, I’ve built all those buildings and can muster my own force to rival the Swiss Band. What did it cost me to do this? Would you believe 3510 gold?! Ok, ok, but the maintenance on my demesne is lower, right? Yes, it is only 1.91 gold per month instead of 6.75. So how long would I have to field both armies before it was economically advantageous to gone the demesne route? It turns out to be roughly 64 years.
Mercenaries: 75 + 6.75*12*64 = 5259 gold
Demesne: 3510 + 1.91*12*64 = 4977 gold
This assumes that your levy maintenance remains fixed…it doesn’t decrease in size as the army takes losses. This is a bit optimistic; your actual mileage will vary. But even still, you will have to field your levy a LONG time before you recoup your investment.
More than One Castle
If I have multiple castles instead of 1, does the demesne route become more compelling? Well, yes it does. In order to get an equivalently potent army, you don’t need as many buildings. If you have 2 castles, you’ll need to spend 1610 gold upgrading each one (I’ll spare you the building list). For 3, it’s 790 gold. 4 is 320G, 5 is 220G, 6 is 100G, and you don’t need any upgrades if you have 7 or more castles. Again, these numbers can vary depending on your build strategy. In order to get a Power:Morale ratio close to the Swiss Band, my 3 castle strategy involves building Keeps, which aren’t really that cost effective. Hence the precipitous dropoff in cost between 3 and 4 castles.
Regardless of which building route you take, we can begin to uncover a pattern of initial cost and cost over time. This is the chart that I came up with.
As you can see, there’s a critical point beyond which the demesne investment becomes worthwhile.
Conclusions
Based on all the data, this is what I’ve decided.
1) Never upgrade a castle until you have at least 4 of them. Always rely on mercenaries before then. They’re going to get you to 4 castles in a far more cost effective manner.
2) Once you get to 4+ castles, you can begin to contemplate investing in your demesne for the long haul. But even then, it’s going to take a quarter century of warfare before you begin to break even.
3) The smartest thing to do is to quickly max out your demesne holding limit with mercenaries.
Future Investigation
I haven’t thought about it as thoroughly, but it would be interesting to compare mercenaries versus building upgrades once you max your demesne out. My suspicion is that you’ll find a similar situation: improving the demesne is only advantageous over decades of warfare. It would also be interesting to evaluate temples and cities, though I suspect that they won’t help the situation.
Last edited:
") .
.