I'm baaaack.
TKFS: Well, not too worried, but I'm glad you understand.")
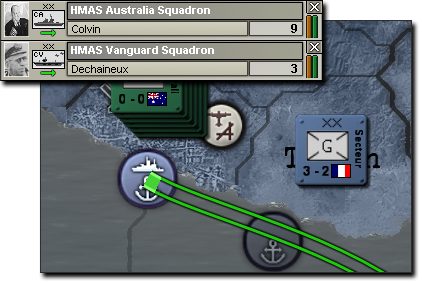
H.Appleby: Clearly I have to find more attractive Australian men in uniform! I do hope to go on the offensive in Asia, I'd like to be the one to put the pressure on Japan, but I may also have to let them get close and lure them into the range of my naval bombers yet. I haven't decided the exact strategy for fighting Japan but I know I will have to pick one soon as it won't be that much longer before they go after Britain.

Chapter 2.3 - The Blitzkrieg
The remainder of March had been a quiet month, as the war remained comfortably silent across the Franco-German front. German radio traffic was, however, steadily increasing and British Intelligence was convinced that a western offensive was coming - and soon. Despite the formal declaration of war against Norway, the Germans had been unable to properly coordinate an assault through Sweden and British troops had begun to reinforce the Nordic country, making an offensive on it an unwelcome distraction from Hitler's Spring plans. On April 1st, the news came, but it wasn't entirely what Allied Command had expected.

The Germans had launched an invasion of the neighbouring Dutch, a move which blindsided the majority of Allied Commanders. Both French and British had expected the hammerfall to take place in Belgium, where a concerted German thrust would bypass the strongest Maginot fortifications at Lorraine. British Expeditionary forces were unprepared for this action and slow to react. With the Australian Army redeployed into Southern France, there was little she could do to salvage France's tenuous position.

A major push was being conducted into the Southern Netherlands, but most of Germany's vast armies were still held in reserve.
The declaration of war on the Netherlands was completely unprovoked, Germany's third of its kind. The Reich had shown its willingness to do anything to achieve victory, and the Wehrmacht was a force to be reckoned with. British forces would try to save the Netherlands, but with little more than peacetime reserves and some Dutch equipment dating as far back as the late 1800s, there was not much to be done. Within days, the Dutch government would flee the country and operational command of all remaining Dutch forces would be transferred to the British.

The unprovoked attack was the last straw for many countries, and protests in neutral countries across the world were held as people spoke out against the dictator's conquering spree. Few countries would listen. One country that did take steps, however, was the United States of America. The Industrial Giant was slowly awakening from her decades-long stupor and shaking off the rust of the Great Depression. Although much of her equipment was outdated, she still maintained the world's second largest navy and one of her most modern air forces. With her vast industrial potential, it was hoped by most nations that the United States would join the war as she had before, bringing her great manpower and unmatched ability to produce war material against the Reich.

Although joining in this Second Great War had been proposed, most of the Congress had agreed that it was a European affair and they were not prepared to get involved. It was believed by most politicians that France and Britain could handle the upstart German dictator on their own as they had more men, tanks and guns as well as a superior defensive position. Germany would be fighting an uphill battle to get anywhere and America would not need to intervene. However, after a great deal of debate, it was finally agreed that America would institute a small-scale draft to replenish the US Army and begin recruiting officers and NCOs in preparation for a larger buildup. There was a growing fear not of Germany but of Japanese Imperialism, especially since the young Empire had crushed the Chinese Republic and made repeated threats towards the Allies. It was agreed that if the Empire of Japan turned her aggression onto the Europeans, the United States might have to intervene in the name of preserving her trade links and Western Democracy.

Much of the Dutch Army had been overrun and surrendered against the superior speed and firepower of the Germans. Britain's zone of control extended over most of the western country, but the time and costs of redeploying troops to the country had restricted her options. It seemed likely that the German Panzers would reach the coastline before any significant number of British boots had been put on the ground. The Battle of the Netherlands was declared lost and the Dutch were abandoned to Hitler's growing Reich. Although France pleaded with Belgium to cast aside her neutrality and join the Allied War effort, giving them one last chance to save the Netherlands before it was completely gone, the neutral Republic was terrified of the Reich and unwilling to violate its neutrality in some kind of vain hope that Hitler could be convinced that peace was better than war. The failure of the British to save the Dutch was an embarrassment, and at last, ashamed, Prime Minister Neville Chamberlain resigned from his post and withdrew from the public face.

The British Government was in chaos, and they needed a figurehead for the country and quickly. After much argument and debate, it was finally agreed to bring in an old hawk in the form of the Lord of the Admiralty, Winston Churchill. He was a veteran politician. It was hoped that Churchill had what it took to meet the Germans and bring the British people the decisive victory they were looking for.

Winston Churchill shortly after his appointment as Prime Minister on April 3rd, 1940.
Although Winston Churchill had long been criticized by the government and he was received coldly by the House of Parliament and the War Cabinet, he had a strong affinity for the military and his post had done a great deal for Allied morale. He had served in the military from 1894 to 1899, as well as some involvement in the First World War. He had been a key member of the development of the first armoured fighting vehicle, the Matilda tank. His appointment also did a great deal to calm fears overseas. Churchill proposed a strong, decisive action against Hitler and spoke with ample conviction and willingness to shed blood that his predecessor had lacked. Australian Command was delighted to see his appointment, and his excellent relations with United States President Roosevelt was seen as yet another positive.

The American People were unhappy with the draft and they were making it clear en masse.
The United States, however, was suffering from troubles of its own. The decision to mobilize the military and declare a draft without any provoked war had been an unpopular one in a country that was still largely isolationist. Mobs of striking workers, draft dodgers and angry citizens rioted in a number of cities across the Continental United States, forcing state governors to call in the National Guard to restore order. Roosevelt in an address to the Union called for order, but no one was listening. His popularity with the voters was slipping, and few people believed that he had a realistic chance of re-election despite his great success in restoring the US Economy to health.

Four days after the appointment of Winston Churchill, the German Blitz began in earnest with a declaration of war on Belgium. The Belgians immediately bleated to the Allies for help. Although some French commanders callously suggested abandoning the Belgians and simply maintaining the planned defensive line along the border, it was agreed that Belgium had the superior defensive positions for holding off the Blitz.

Although the Belgian Army had been mobilized and was already itching for a fight, it was outnumbered and outgunned. They needed to hold out for reinforcements.
The entire North Allied Army Group began to move, seeking to secure the valuable defensive positions along Belgium's river networks and the forests and hills of the Ardennes. The Germans were already rapidly advancing into Belgian territory and although the Belgians were more prepared for war than the Dutch, it was immediately clear that they would be little match for the Wehrmacht alone. The Luftwaffe ran constant bombing over Belgian positions as Hitler's army applied a merciless amount of pressure across the entire front line.

French troops pass through a Belgian town on their march to the River Scheldt, where Allied Command had planned a long, sturdy line of defensive formations.
Although the French were frustrated at the Belgians for not joining sooner, they could not allow Hitler to advance. Divisions were assigned to take up defensive positions along the River Scheldt and to hold the all-important Ardennes at any cost, even diverting extra war material from the Maginot Line in order to ensure that Bastogne would be secure. It would not be long before Hitler's army met with fierce resistance from the French Army.

Luxembourg offered little resistance to the advancing German armour.
It seemed to Allied Command Australian warnings about the mobility of German tanks and the skills of their crew were to be heeded after all. German armoured units effortlessly crushed Luxembourgische defenses and began to thrust into the Ardennes, defying all pre-war expectations that they would not face a great deal of armour in the heavily forested region. French commanders were insistent that their own Chars would be useless in the rough terrain and British tanks were designed more for infantry support than anti-tank work. Without a clear, easy answer to the Ardennes, they simply tried to pack the area with more infantry and bog down the enemy armour with ambushes.

Luxembourg did not last long, the Grand Duchy was absorbed into the Greater German Reich and declared part of Hitler's new Germanic union. To many, it seemed that the tiny state might never be seen again, and a valuable source of raw iron and steel manufacturing had returned to the Germans' waiting arms. This would go a long way to alleviating her concerns of supplying the war industry.

It was clear that the German Army was no opponent to be underestimated, and with the Italians and Japanese on the verge of joining the war, Australia's current production rates were insufficient. The people of Australia were rallied under the inspired speeches of Prime Minister Curtin and Governor-General Alexander Lord Gowrie. They needed to be ready to prosecute this new Great War until the very end.

Inspired by the Great War actions of Austria-Hungary, Germany and the United States, Australia instituted a system of War Bonds on April 10th, calling for the Australian people to help pay for the war in exchange for future favours and repayments. It was hoped that this fundraising would enable the Australian Military to engage on two fronts simultaneously, and help her to build up an increasingly powerful base of military and industry.

The loss of Antwerpen was a painful blow to Allied war plans and a hole in the planned defensive line along the Rive Scheldt.
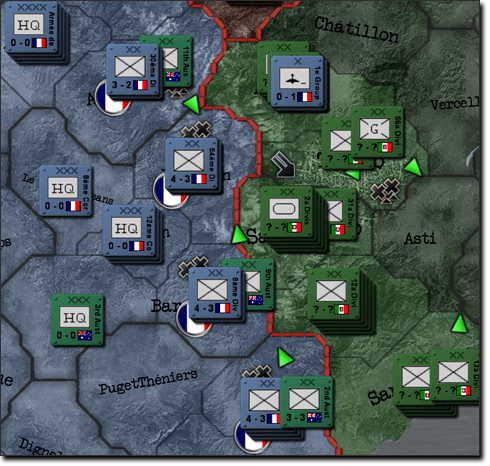
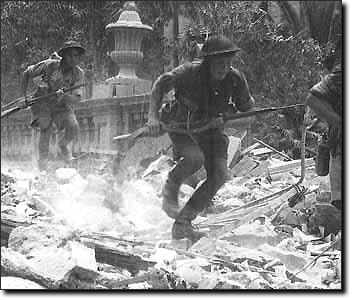
The Belgian Front was struggling under the weight of German thrusts. The fall of Antwerpen in spite of British landings had proven a painful blow to Allied war efforts, and threatened the safety of the entire line. General John Vereker, overall commander of the British Expeditionary Force, suggested pulling the Australian reserves from Southern France to assault the city. It was believed that with the aid of the Corps of Royal Engineers and the 7th Armoured Brigade, they could breach the German defensive lines and retake the city, pushing Jerry back over the river. The French disapproved of this plan, as a growing Italian buildup on the border had made them nervous of retaliatory strikes. In the end, it was decided by Field Marshall Edmund Ironside, his superior, that the Australians should be saved for Italy. Regular British divisions were thrown into the attack on Antwerpen; inexperienced conscripts who had not been adequately trained, the scenes at Antwerpen were a disaster for the British. 3,284 men were lost and a further 7,909 wounded attempting to take the city over the course of the first three days, but almost no ground had been gained. On the 16th of April, General Vereker called off the attack and began to search for alternate ways to take the city. The Germans had held the line.

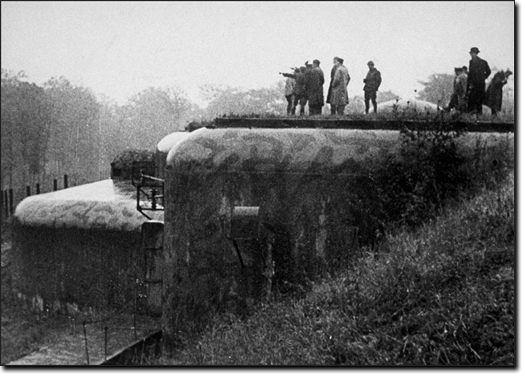
A German boat carries a squad across during an offensive near Fort Eben-Emael.
The Germans were finding great success. Buoyed by their momentum and eager to achieve victory, they thrust into Belgium, using spearheads of medium armour and motorized infantry to quickly gain ground where an offensive was successful. On the 19th of April, twelve days after the German declaration of war on Belgium, the strongpoint of Fort Eben-Emael had been completely encircled by German forces. Despite multiple attempts by French and Belgian infantry to pierce the encirclement, they lacked the heavy weapons to effectively shift the German Panzers. The Fort held out for another five days against multiple assaults, but at last on the 25th of April, the few surviving stragglers surrendered. Belgium's strongest fortification had failed to save her from the German onslaught.

The vaunted fort at Eben-Emael had fallen, although it had bought the Allies valuable time. German progress in the Ardennes was worrying.
Although the line had stabilized by the end of April, fighting was still intense and brutal. The mobility and speed of German tanks had given them a distinct edge in the heavily forested Ardennes region, and the British and French lacked a suitable tank to counter it. Their light armour was too weak to put up a fair fight against the Pz.Kpfw IV and their heavy armour was too immobile and unreliable to be of any real use in the Ardennes - the Char had attempted to engage German armour but regularly broke down or became outflanked by their lighter opponents. They needed a solution and fast, as the Germans were gaining ground in the forests despite allocation of extra anti-tank weaponry and artillery to the region. Only time would tell if it would come in time.
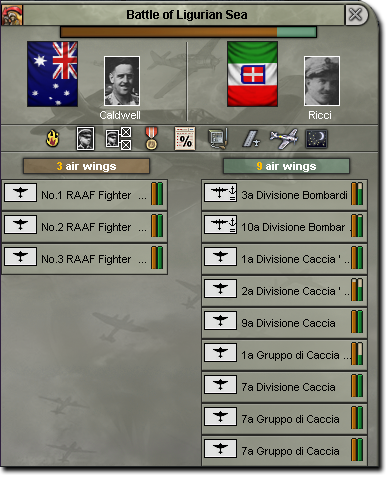
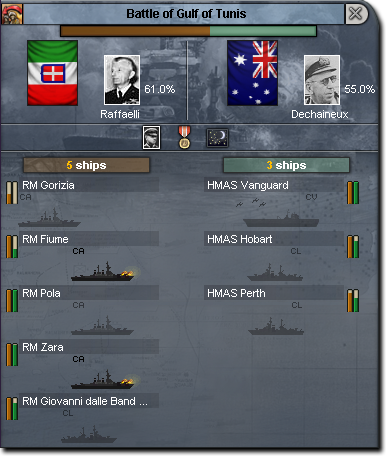
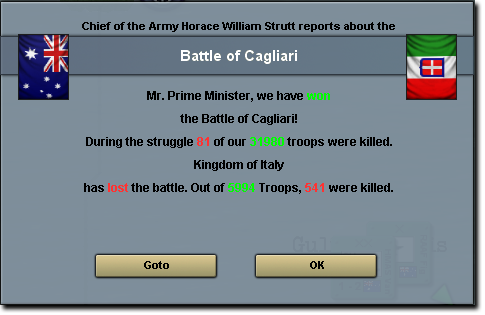
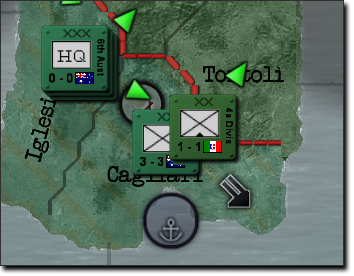
Then the news broke - on April 28th, the Kingdom of Italy declared war on the French Republic and United Kingdom of Great Britain.
TKFS: Well, not too worried, but I'm glad you understand.
H.Appleby: Clearly I have to find more attractive Australian men in uniform! I do hope to go on the offensive in Asia, I'd like to be the one to put the pressure on Japan, but I may also have to let them get close and lure them into the range of my naval bombers yet. I haven't decided the exact strategy for fighting Japan but I know I will have to pick one soon as it won't be that much longer before they go after Britain.
Chapter 2.3 - The Blitzkrieg
The remainder of March had been a quiet month, as the war remained comfortably silent across the Franco-German front. German radio traffic was, however, steadily increasing and British Intelligence was convinced that a western offensive was coming - and soon. Despite the formal declaration of war against Norway, the Germans had been unable to properly coordinate an assault through Sweden and British troops had begun to reinforce the Nordic country, making an offensive on it an unwelcome distraction from Hitler's Spring plans. On April 1st, the news came, but it wasn't entirely what Allied Command had expected.
The Germans had launched an invasion of the neighbouring Dutch, a move which blindsided the majority of Allied Commanders. Both French and British had expected the hammerfall to take place in Belgium, where a concerted German thrust would bypass the strongest Maginot fortifications at Lorraine. British Expeditionary forces were unprepared for this action and slow to react. With the Australian Army redeployed into Southern France, there was little she could do to salvage France's tenuous position.
A major push was being conducted into the Southern Netherlands, but most of Germany's vast armies were still held in reserve.
The declaration of war on the Netherlands was completely unprovoked, Germany's third of its kind. The Reich had shown its willingness to do anything to achieve victory, and the Wehrmacht was a force to be reckoned with. British forces would try to save the Netherlands, but with little more than peacetime reserves and some Dutch equipment dating as far back as the late 1800s, there was not much to be done. Within days, the Dutch government would flee the country and operational command of all remaining Dutch forces would be transferred to the British.
The unprovoked attack was the last straw for many countries, and protests in neutral countries across the world were held as people spoke out against the dictator's conquering spree. Few countries would listen. One country that did take steps, however, was the United States of America. The Industrial Giant was slowly awakening from her decades-long stupor and shaking off the rust of the Great Depression. Although much of her equipment was outdated, she still maintained the world's second largest navy and one of her most modern air forces. With her vast industrial potential, it was hoped by most nations that the United States would join the war as she had before, bringing her great manpower and unmatched ability to produce war material against the Reich.
Although joining in this Second Great War had been proposed, most of the Congress had agreed that it was a European affair and they were not prepared to get involved. It was believed by most politicians that France and Britain could handle the upstart German dictator on their own as they had more men, tanks and guns as well as a superior defensive position. Germany would be fighting an uphill battle to get anywhere and America would not need to intervene. However, after a great deal of debate, it was finally agreed that America would institute a small-scale draft to replenish the US Army and begin recruiting officers and NCOs in preparation for a larger buildup. There was a growing fear not of Germany but of Japanese Imperialism, especially since the young Empire had crushed the Chinese Republic and made repeated threats towards the Allies. It was agreed that if the Empire of Japan turned her aggression onto the Europeans, the United States might have to intervene in the name of preserving her trade links and Western Democracy.
Much of the Dutch Army had been overrun and surrendered against the superior speed and firepower of the Germans. Britain's zone of control extended over most of the western country, but the time and costs of redeploying troops to the country had restricted her options. It seemed likely that the German Panzers would reach the coastline before any significant number of British boots had been put on the ground. The Battle of the Netherlands was declared lost and the Dutch were abandoned to Hitler's growing Reich. Although France pleaded with Belgium to cast aside her neutrality and join the Allied War effort, giving them one last chance to save the Netherlands before it was completely gone, the neutral Republic was terrified of the Reich and unwilling to violate its neutrality in some kind of vain hope that Hitler could be convinced that peace was better than war. The failure of the British to save the Dutch was an embarrassment, and at last, ashamed, Prime Minister Neville Chamberlain resigned from his post and withdrew from the public face.
The British Government was in chaos, and they needed a figurehead for the country and quickly. After much argument and debate, it was finally agreed to bring in an old hawk in the form of the Lord of the Admiralty, Winston Churchill. He was a veteran politician. It was hoped that Churchill had what it took to meet the Germans and bring the British people the decisive victory they were looking for.
Winston Churchill shortly after his appointment as Prime Minister on April 3rd, 1940.
Although Winston Churchill had long been criticized by the government and he was received coldly by the House of Parliament and the War Cabinet, he had a strong affinity for the military and his post had done a great deal for Allied morale. He had served in the military from 1894 to 1899, as well as some involvement in the First World War. He had been a key member of the development of the first armoured fighting vehicle, the Matilda tank. His appointment also did a great deal to calm fears overseas. Churchill proposed a strong, decisive action against Hitler and spoke with ample conviction and willingness to shed blood that his predecessor had lacked. Australian Command was delighted to see his appointment, and his excellent relations with United States President Roosevelt was seen as yet another positive.
The American People were unhappy with the draft and they were making it clear en masse.
The United States, however, was suffering from troubles of its own. The decision to mobilize the military and declare a draft without any provoked war had been an unpopular one in a country that was still largely isolationist. Mobs of striking workers, draft dodgers and angry citizens rioted in a number of cities across the Continental United States, forcing state governors to call in the National Guard to restore order. Roosevelt in an address to the Union called for order, but no one was listening. His popularity with the voters was slipping, and few people believed that he had a realistic chance of re-election despite his great success in restoring the US Economy to health.
Four days after the appointment of Winston Churchill, the German Blitz began in earnest with a declaration of war on Belgium. The Belgians immediately bleated to the Allies for help. Although some French commanders callously suggested abandoning the Belgians and simply maintaining the planned defensive line along the border, it was agreed that Belgium had the superior defensive positions for holding off the Blitz.
Although the Belgian Army had been mobilized and was already itching for a fight, it was outnumbered and outgunned. They needed to hold out for reinforcements.
The entire North Allied Army Group began to move, seeking to secure the valuable defensive positions along Belgium's river networks and the forests and hills of the Ardennes. The Germans were already rapidly advancing into Belgian territory and although the Belgians were more prepared for war than the Dutch, it was immediately clear that they would be little match for the Wehrmacht alone. The Luftwaffe ran constant bombing over Belgian positions as Hitler's army applied a merciless amount of pressure across the entire front line.
French troops pass through a Belgian town on their march to the River Scheldt, where Allied Command had planned a long, sturdy line of defensive formations.
Although the French were frustrated at the Belgians for not joining sooner, they could not allow Hitler to advance. Divisions were assigned to take up defensive positions along the River Scheldt and to hold the all-important Ardennes at any cost, even diverting extra war material from the Maginot Line in order to ensure that Bastogne would be secure. It would not be long before Hitler's army met with fierce resistance from the French Army.
Luxembourg offered little resistance to the advancing German armour.
It seemed to Allied Command Australian warnings about the mobility of German tanks and the skills of their crew were to be heeded after all. German armoured units effortlessly crushed Luxembourgische defenses and began to thrust into the Ardennes, defying all pre-war expectations that they would not face a great deal of armour in the heavily forested region. French commanders were insistent that their own Chars would be useless in the rough terrain and British tanks were designed more for infantry support than anti-tank work. Without a clear, easy answer to the Ardennes, they simply tried to pack the area with more infantry and bog down the enemy armour with ambushes.
Luxembourg did not last long, the Grand Duchy was absorbed into the Greater German Reich and declared part of Hitler's new Germanic union. To many, it seemed that the tiny state might never be seen again, and a valuable source of raw iron and steel manufacturing had returned to the Germans' waiting arms. This would go a long way to alleviating her concerns of supplying the war industry.
It was clear that the German Army was no opponent to be underestimated, and with the Italians and Japanese on the verge of joining the war, Australia's current production rates were insufficient. The people of Australia were rallied under the inspired speeches of Prime Minister Curtin and Governor-General Alexander Lord Gowrie. They needed to be ready to prosecute this new Great War until the very end.
Inspired by the Great War actions of Austria-Hungary, Germany and the United States, Australia instituted a system of War Bonds on April 10th, calling for the Australian people to help pay for the war in exchange for future favours and repayments. It was hoped that this fundraising would enable the Australian Military to engage on two fronts simultaneously, and help her to build up an increasingly powerful base of military and industry.
The loss of Antwerpen was a painful blow to Allied war plans and a hole in the planned defensive line along the Rive Scheldt.
The Belgian Front was struggling under the weight of German thrusts. The fall of Antwerpen in spite of British landings had proven a painful blow to Allied war efforts, and threatened the safety of the entire line. General John Vereker, overall commander of the British Expeditionary Force, suggested pulling the Australian reserves from Southern France to assault the city. It was believed that with the aid of the Corps of Royal Engineers and the 7th Armoured Brigade, they could breach the German defensive lines and retake the city, pushing Jerry back over the river. The French disapproved of this plan, as a growing Italian buildup on the border had made them nervous of retaliatory strikes. In the end, it was decided by Field Marshall Edmund Ironside, his superior, that the Australians should be saved for Italy. Regular British divisions were thrown into the attack on Antwerpen; inexperienced conscripts who had not been adequately trained, the scenes at Antwerpen were a disaster for the British. 3,284 men were lost and a further 7,909 wounded attempting to take the city over the course of the first three days, but almost no ground had been gained. On the 16th of April, General Vereker called off the attack and began to search for alternate ways to take the city. The Germans had held the line.
A German boat carries a squad across during an offensive near Fort Eben-Emael.
The Germans were finding great success. Buoyed by their momentum and eager to achieve victory, they thrust into Belgium, using spearheads of medium armour and motorized infantry to quickly gain ground where an offensive was successful. On the 19th of April, twelve days after the German declaration of war on Belgium, the strongpoint of Fort Eben-Emael had been completely encircled by German forces. Despite multiple attempts by French and Belgian infantry to pierce the encirclement, they lacked the heavy weapons to effectively shift the German Panzers. The Fort held out for another five days against multiple assaults, but at last on the 25th of April, the few surviving stragglers surrendered. Belgium's strongest fortification had failed to save her from the German onslaught.
The vaunted fort at Eben-Emael had fallen, although it had bought the Allies valuable time. German progress in the Ardennes was worrying.
Although the line had stabilized by the end of April, fighting was still intense and brutal. The mobility and speed of German tanks had given them a distinct edge in the heavily forested Ardennes region, and the British and French lacked a suitable tank to counter it. Their light armour was too weak to put up a fair fight against the Pz.Kpfw IV and their heavy armour was too immobile and unreliable to be of any real use in the Ardennes - the Char had attempted to engage German armour but regularly broke down or became outflanked by their lighter opponents. They needed a solution and fast, as the Germans were gaining ground in the forests despite allocation of extra anti-tank weaponry and artillery to the region. Only time would tell if it would come in time.
Then the news broke - on April 28th, the Kingdom of Italy declared war on the French Republic and United Kingdom of Great Britain.
Mar 1940-Apr 1940
No Australian Engagements
No Australian Engagements
Last edited: