Marseille retaken
Recap: After the Italian victory in Ethiopia in May 1936, the large build-up of British forces on the Ethiopian-Sudanese Border unnerved the Italians. Marshal Balbo pitched a “grand plan” for a war against the Allies to Mussolini. It was accepted and a multi-front war began between Italy and the Allies on the 11th May 1936.
On the 2nd July 1936, Spain erupted into civil war. The Italian Fascist’s and the German Nazi’s both supported the Nationalist side.
Europe
Recap: At the start of the war the Italian I and IV armies had easily pushed over the unprepared French forces along Little Maginot Line (in the Alps) and expanded into the Provence and Rhone regions. The front became static with the arrival of two French armour divisions and the French forces then counterattacked and retook Marseille. With reinforcements from the II and VIII armies, the Italians have now retaken the imitative along the front.
On the 20th May, the Italians were also able to capture Malta from the British and later Corsica from the French, securing the central Mediterranean. A series of naval battles took place between Italian and French fleets in the central Mediterranean during mid-June. French naval power was seriously damaged including the loss of the carrier Bearn and the battleship Provence.
Alpine Front
28th July: The French 71st Division which retreated at Aix-en-Provence on the 21st was still in the process of extracting itself from that battle. The French infantrymen were moving to the south where a sole French Division guarded Marseille. The division guarding Marseille only comprised of a brigade of motorised troops and a brigade of cavalry. The city was vulnerable. Seizing the opportunity, General Pintor ordered the Italian IV Army and elements of the II and VIII to launch an overwhelming attack on the lone French division now guarding Marseille.
The French 71st march south to Marseille.
Outnumbered and hard pressed from both the north and the east, the guard division also had to contend with the demoralising impact of streams of fleeing men from the French 71st Divisions troops entering the city. The French guards were able to hold out while the men of the 71st retreated to the Vieux-Port (the old port).
Weak French forces allow the battle for Marseille to be won by the Italians.
In the north, following the Italian victories at Ruffieux and St-Claude on the 24th and 26th, forces of the Italian I Army had now advanced into these provinces without further resistance. In fact, a large gap in the French front had appeared at the northern end.
29th July: The 2nd ‘Tridentina’ Division at Ruffieux now pressed onwards, this time to the southwest against the French at Bourgoin-Jallieu. These troops were in the midst of an assault on Grenoble. The orders of the ‘Tridentina’ division was to halt the French counterattack against Grenoble
30th July: Despite an attack on the ‘Tridentina’ Division by French forces at Bourg-en-Bresse, the stratagem worked, the attack on Grenoble was called off. Likewise the advance of the ‘Tridentina’ Division against Bourgoin-Jallieu was halted so that they could defend themselves against the new attack.
Guzzoni’s successfully defeats the French attack on Grenoble.
The Rhone-Alpine front had recently expanded westwards in both the north and the south, leaving the French armour and an infantry division surrounded on three sides at Luc-en-Diois . Intelligence indicated that both divisions were in the process of withdrawing westwards to the Rhone River. General Pintor pushed for an immediate all-out assault on the position, similar to what he had implemented at the battle of Aix-en-Provence. His proposal was discussed with both General Guzzoni and Marshal Badoglio. Badoglio preferred a more defensive approach because of the presence of French armour but Guzzoni supported his fellow general. The plan was implemented after Badoglio relented to the wishes of his two subordinates.
General Pintor’s assault on Luc-en-Diois
The assault on Luc-en-Diois involved combined forces of the I (4 divisions), the IV, II and VIII Armies (one division each). The French Divisions were already in the process of withdrawing to the west and gave up the fight easily.
31st July: With the fall of Marseille being only a matter of time, the fresh 2nd Naval Squadron attempted to swoop in and take out more French ships when they fled from the port city. Unfortunately heavy mists allowed the battered French naval vessels to slip away. The city was soon occupied by four Italian Divisions. A uninformed French Infantry Division which had been advancing on the city made contact with the ‘Brennero’ Division but soon broke contact with the sizeable Italian occupation force.
Marseille falls
1st August: With the ‘Tridentina’ Division pinned down at Ruffieux by French forces, General Guzzoni now ordered a counterattack against the attackers. The Italian 4th “Cuneense” mountain division attacked west against the French forces in Bourg-en-Bresse. The effect was insant, the French division had no option but to call off the attack and concentrate on defending itself at Bourg-en-Bresse.
Italian troops would soon be at the Rhone.
Mediterranean
29th July: Before the fall of Marseille, Major General Arlabosee had got his troops onto French transport ships docked at Vieux-Port (the old port).
French transports loading up the 71st Infantry Division at Marseille
Instead of heading south to French Algeria, the transports and its accompanying escorts headed south east towards Corsica. Someone in the French command had got the idea that they would be able to land the 71st at Ajaccio and reclaim Corsica for the French. Guarding Ajaccio for the Italians was a single garrison brigade, the 53rd, which had dug in nicely around the port in the event of a seaborne invasion.
Italian intelligence was quick to relay the information of the French fleet’s movements and its goal of amphibious invasion. Naval and air assets were quickly scrambled. Out of the port at Viterbo shot the 1st Naval Squadron under the command of Vice Admiral Ghe. She comprised of:
The composition of the Italian 1st Squadron
The Regina Aeronautica scrambled all available air support in the area, a mixture of light bombers, naval bombers and fighters for support.
The 2nd Battle of the Bonifacio Straits begins along with the amphibious invasion of Corsica
The battle opened up at 10am on the 29th in rough weather. The French fleet under Abrial was led by the battleship Paris with support from two cruisers and three flotilla s of screens. A flotilla of French submarines was also scouting around the area. The French had numerical superiority but the Italians had the bigger guns and mass air support. In the opening volleys, the Italian ships were able to sink a French transport and a destroyer while Italian bombers also damaged a few French destroyers and sunk a few transports.
As the battle dragged on into the later part of the afternoon it swung into the favour of the Regina Marina with the arrival of reinforcements. The Italian 3rd Naval squadron joined the battle with 5 light cruisers and a flotilla of destroyers. More French transports and destroyers were either sunk or damaged.
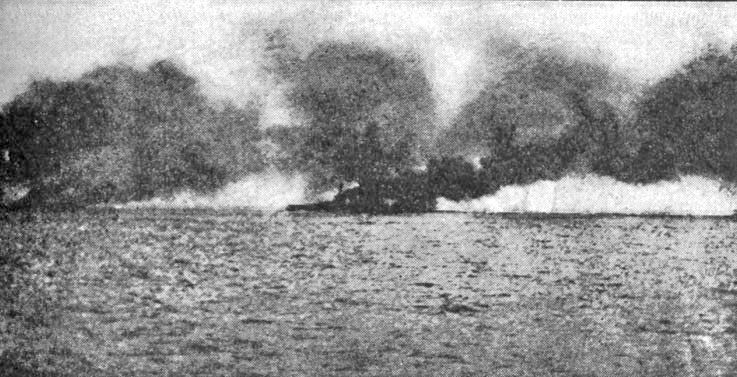
The 2nd battle of the Bonifacio Straits
As darkness closed in the French screens were in disarray after another bombing run by the Italian air squadrons. Several more transport ships were sunk and the infnatry of the French 71st were forced into the water in rough seas. Many were lost.
30th July: The battle continued throughout the night. A few French landing boats made it ashore near Ajaccio but they were easily dealt with by the 53rd Garrison Brigade.
Foreground: French cruiser Foch on fire and sinking; Far left: Unidentified French destroyer also on fire an sinking.
Mid-morning on the 30th the Foch and the Tourville were both sinking after taking hard hits from the Italian cruisers. By early afternoon the battle was officially over. It was a disaster for France, the heavy cruisers Foch and Tourville both going down along with a flotilla of destroyers and a flotilla of transports. In addition, all 9,000 men of the 71st Infantry Division were either lost at sea or captured along the coasts of Corsica.
The 2nd battle of the Bonifacio Straits is won.
The RM Fiume claimed the Foch and the RM Armando Diaz the Tourville
ASI
Recap: In North Africa, the Italian IX Army has captured Tunis and were now heading west to Algiers. The X Army and the VI Army advanced east, first taking Cairo and then besieging the British in Alexandria. After a tough battle the British 7th Infantry Division and the Middle East Command were forced to surrender. The Italians were then forced on the defensive along the line of the Suez against a determined British and Iraqi attack. The line was breached in its entirety and the British were able to initially push on before their attack faulted.
Nile Delta
29th July: South of Cairo, the 2nd ‘Emanuele Filiberto’ Division continued to nip at the heels of the British 48th ‘South Midlands’ Division as it advanced south. The 27th ‘Sila’ Division which had successfully driven the 3rd Iraqi Division out of the high ground in Zagazig continued its advance to the Suez.
At the far northern end of the canal a fresh British Division had succeeded in pushing elements of the 7th Cirene Division out of Port Said.
TOP: 2nd ‘Emanuele Filiberto’ Division pursues the British 48th ‘South Midlands’ Division; BOTTOM: The British 18th Infantry defeat elements of the7th Cirene Division who were holding Port Said. The remainder of the 7th ‘Cirene’ Division was still locked in battle with the 2nd Iraqi Division at Isma’iliya.
1st August: The blackshirts of the 7th ‘Cirene’ Division were taking heavy casualties at Isma’iliya and were forced to give up the attack. The mighty 27th ‘Sila’ Division continued its push to the Suez, driving the 3rd Iraqi Division all the way to its easterly bank.
Battles of Isma’iliya and El Suweis
Soldiers of the 27th ‘Sila’ Division in action.
In that rugged and arid lands to the south, the 2nd ‘Emanuele Filiberto’ Division was able to trap the British 48th ‘South Midlands’ Division in a number of steep sided defiles after it satellite brigade, the 4th ‘Santi Maurizio’, unexpectedly appeared at the front of the British division. The entire division, almost 9,000 men were all captured.
Bersaglieri of the 2nd ‘Emanuele Filiberto’ Division examine Thompson submachine guns captured from the British 48th ‘South Midlands’ Division.
With supply problems hampering the Italian Divisions, the 27th ‘Sila’ and the 2nd ‘Emanuele Filiberto’ Division were now the only combat ready divisions left.
AOI
Recap: In East Africa, the strong French 1st Army in Djibouti initially made good advances on the Eritrean capital of Asmara but they were eventually surrounded and annihilated by Italian forces. The Italians were also able to capture key British strategic locations in the Somaliland, northern Sudan and British East Africa, effectively trapping the British 3rd Army in the Sudan east of Ethiopia. In the south, a relief effort attempted by the British 4th Infantry Division just north of Lake Victoria failed and the Italians have finally closed the pincer and trapped the British against the impenetrable water waste called The Sudd.
Arabia Felix
Recap: On the 11th July, the Italian colonial troops successfully landed and secured the undefended British port of Aden. Yemeni forces (allies of Britain) immediately attacked the Italians but could not hold out when Italian reinforcements arrived. Yemen was overrun but the fighting units of their army escaped across the border into the British Aden Protectorate. This victory yielded full control of the Gate of Tears to the Italians, a significant strategic advantage.
Yemeni loyalist forces now have the Somali Dubats holding Aden very hard pressed.
28th July: In an effort to relieve the besieged Somali Dubats at Aden, the 1st Est Bassacmapi division attacked the positions of the Royal Yemeni Army at Ataq in the Aden Protectorate. The relief effort was too late, the colonial troops guarding Aden were forced to retreat by the Yemeni cavalry.
The Eritreans of the 1st Est Bassacampi Division attempt to relieve the Dubats but they are to late.
29th July: Very unsatisfied with the result, Marshal Grazinai had de Stefanis’s ever victorious 30th ‘Sabauda’ Division shipped into the Port of Aden. The tough veterans of the Abyssinian War and of the defeat of the French 1st Army easily held Aden against the Yemeni cavalry forces.
The famous 30th ‘Sabauda’ are called in to secure Aden from the Yemeni loyalist forces still fighting on.


") ):
):