

The rocks are good for camping. But that side of the map is inferior to the other side. The ruins are the best (including the towers). If you hold several of the ruined houses, all the enemies that move in between will be exposed to archers from at least one of the houses at all timesm, while the archers in there can easily take protection, and even retreat in an awkward manner. The towers are good for ambushing from.
[NOP] Noble Order of the Platypus - Reign of Grand Master Wetew 04/2010 - 08/2011
- Thread starter Wetew
- Start date
-
We have updated our Community Code of Conduct. Please read through the new rules for the forum that are an integral part of Paradox Interactive’s User Agreement.
You are using an out of date browser. It may not display this or other websites correctly.
You should upgrade or use an alternative browser.
You should upgrade or use an alternative browser.
What is wrong with the red cross to the left of the shot ? I've several times been able to use it as an archer (one of the times i manage to be good at not standing still) : it is a high ground over the batlefield, it's not the obvious path to go up to the village, you can run and circle behind the said-village, or circle to the wood/rocks to the right (when looking at the ruins).
What have i missed ?
What have i missed ?
Yeah, I'll do a overview where I point out the good and bad positions. The village for me is a bad position compared to other places.The rocks are good for camping. But that side of the map is inferior to the other side. The ruins are the best (including the towers). If you hold several of the ruined houses, all the enemies that move in between will be exposed to archers from at least one of the houses at all timesm, while the archers in there can easily take protection, and even retreat in an awkward manner. The towers are good for ambushing from.
You are really exposed to good enemy archers and there isn't really room for an infantry to protect you as he can't hide anywhere except behind his shield (and thus can't protect you well enough). I don't say that it's a bad position, just that it's bad compared to the other positions. But if we have to camp then we need to spread out and some poos bastard will have to take that position to the left.What is wrong with the red cross to the left of the shot ? I've several times been able to use it as an archer (one of the times i manage to be good at not standing still) : it is a high ground over the batlefield, it's not the obvious path to go up to the village, you can run and circle behind the said-village, or circle to the wood/rocks to the right (when looking at the ruins).
What have i missed ?
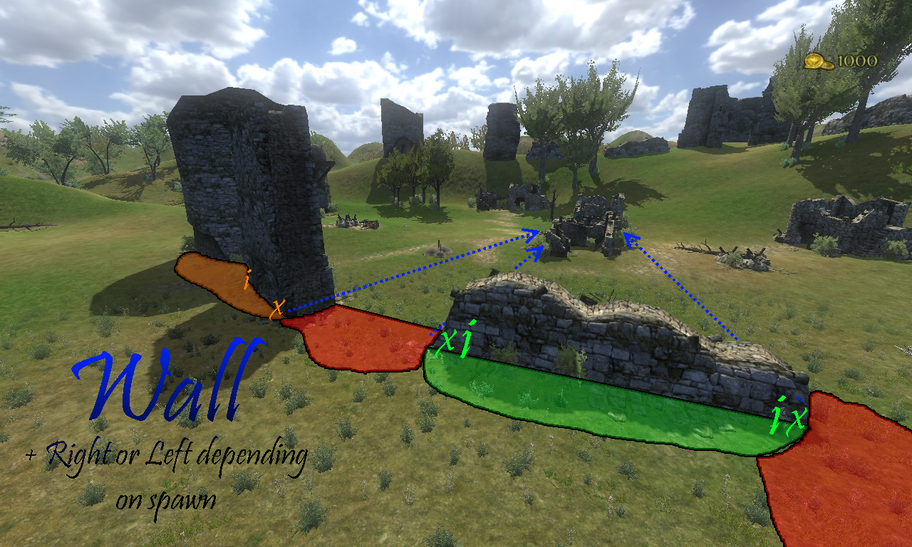
I'm not done with the maps, but this is what I think would be a good map (please tell me if you want more directions). The arrow points out where archers (X) should focus on shooting, the green/orange/red areas are for infantry (I) to defend their archers in. And of course, the archway (to the left) is an excellent position, but if the battle leader shouts out "WALL TO THE LEFT" then people standing in the archway really doesn't do much good there. However if you compare them both so is the archway ten times better than this wall
interesting maps")
Indeed
I'l continue with my pesky questions :
- what about the archer position in the archway ? is too exposed ?
- if there are two archers behind the wall, can one infantry to protect both be enough if we communicat through TS ?
- until now, we've been chosing our troop category according to our own liking... should we try to specialise ourselves ? and form up pairs (one infantry and one archer) during our trainings ? (just a possibly stupid thought)
how did the training go after my leave?
I keep shooting, often hitting... but keeping low kill scores :wacko: but it was really nice. I think my aiming skills when i have time and my bow speed in the other cases are improving.
As infantry, i'm starting to last longer in fights, even hitting my opponent... even if i still end up getting killed
EDIT: Oh, and Wetew helped me solve my mike issue, so last session sound issues shouldn't happen again.
The archer position in the archway is excellent, but not if the team leader wants you to focus on this wall. I'm almost done with the archway and you'll will see how a normal tactic is there.
I'l continue with my pesky questions :
- what about the archer position in the archway ? is too exposed ?
- if there are two archers behind the wall, can one infantry to protect both be enough if we communicat through TS ?
- until now, we've been chosing our troop category according to our own liking... should we try to specialise ourselves ? and form up pairs (one infantry and one archer) during our trainings ? (just a possibly stupid thought)
Yeah, on infantry could be enough. As long as the archers spread out and shoots into the melee...
Not sure, it's good to be good at many things, but focusing on two types is good.
The Archway! This is the primary spot to get to for teams starting at The Village. The number of players are 8, divided into two groups. Group one (1) consists of the Team Leader (TL), and five other members. It's best if the TL isn't an archer/crossbowman, as they are pretty vulnerable on this map. The team should consist of three archers/crossbowmen and three infantries. Group two (2) consist of two members, one archer/crossbowman and the other an infantry. They are at a more vulnerable position and their primary objective is to flank the enemy.
With this map it's likely that the other team rushes to the Middle Ruins, thus getting ac excellent spot to defend. But if they decide to attack The Archway then it's more likely that they will spread out their forces, then that they will go together. There's six different approach for the enemy, making it hard to defend all fronts.
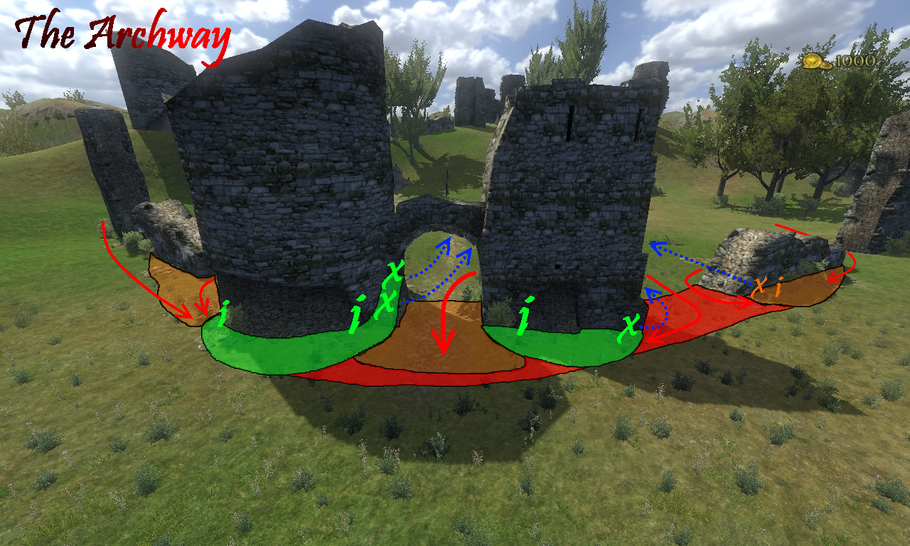
This is the objective for members of group one (1):
This is the objective for members of group two (2):
Other information:
Attacking from all directions isn't possible for the enemy. They will only attack from two or three direction, and communication is the key to know where they are attacking.
If the enemy charges with Cavalry then it's impostant to stay close to the wall, and let the archers/crossbowmen shoot their horses.
This map could also be played with one or two Cavalry. Their objective would be to scout, and not attack untill our own infantry is engaged in melees with the enemy. An archer will not be able to both shoot into a melee and attacking a horse, thus would an successful attack draw the attention away from the melee and give us and advantage there.
With this map it's likely that the other team rushes to the Middle Ruins, thus getting ac excellent spot to defend. But if they decide to attack The Archway then it's more likely that they will spread out their forces, then that they will go together. There's six different approach for the enemy, making it hard to defend all fronts.
This is the objective for members of group one (1):
- Infantry to the left: Will be stationed to defend and warn if the enemy approaches from that side. He will not counterattack but instead retreat into the green zone if attacked.
- Archers/Crossbowmen in the middle: They will try to shoot enemies either attacking or snipering from the Middle Ruins. This is a vulnerable position and these members need to aim and shoot quickly. Most of the time it's better to shoot fast and then hide thus preventing the enemy from trying a rush. Snipering from this position is hard as the enemy is better protected. These archers/crossbowmen will also function as a help to infantry in group one (1). They will shoot into a melee! Thus they need to be good at aiming!
- Infantry in the middle: Their objective is to guard the archers/crossbowmen. Their position may change depending on what the enemy does, and they are to move between the green zones in the middle. It should be decided who of them that will help the left infantry if the enemy attacks from that flank. The other one will then take a defensive stance to guard the middle archers/crossbowmen.
- Archer/Crossbowman to the left: This is a somewhat vulnerable position. His obective is to shoot against the Middle Ruin. If the enemy charges between The Archway and the Right Wall then he's to retreat behind a helping infantry.
This is the objective for members of group two (2):
- Infantry to the right: This position isn't one that is to be held at all cost. If attacked he and his archer will retreat back to The Archway. If The Archway is attacked he is to counterattack the enemy in the rear.
- Archer/Crossbowman to the right: His objective is to shoot against the Middle Ruins. If attacked he's to retreat to The Archway. If The Archway is attack he's to take a better position and attack the enemy in its rear. This is one of the more important roles on this map. Flanking the enemy succesfully will win the round.
Other information:
Attacking from all directions isn't possible for the enemy. They will only attack from two or three direction, and communication is the key to know where they are attacking.
If the enemy charges with Cavalry then it's impostant to stay close to the wall, and let the archers/crossbowmen shoot their horses.
This map could also be played with one or two Cavalry. Their objective would be to scout, and not attack untill our own infantry is engaged in melees with the enemy. An archer will not be able to both shoot into a melee and attacking a horse, thus would an successful attack draw the attention away from the melee and give us and advantage there.
Last edited:
Not sure, it's good to be good at many things, but focusing on two types is good.
Understood.
As you might have guessed, i gave up horses, i suck too much.
I still have issues in melee without shield, but i guess i'll have to train more.
Understood.
As you might have guessed, i gave up horses, i suck too much.
I still have issues in melee without shield, but i guess i'll have to train more.
I've started to give up on being archer (unless I know I will be facing newbies or will be well-protected from mellees, like in sieges), but I am still confident when being a crossbowman. With archer factions I now try going for infantry or cavalry instead, but I avoid playing Vaegirs.
I have just learned something new with ranged weapons, that I would like to share with you all....
When shooting at people blocking with their shield, your arrow/bolt will always go through the shield, but they do not go far enough, as you should know by now. If you closely look where the arms are situated on the shield when blocking, you can hit the arm by shooting at that part of the shield, and it does cause some damage, although it is not a one-hit-kill. If you can, you should still try to hit the head or feet if they are exposed by poor blocking (blocking too high or low). But do try to hit the arms holding the shield if someone is blocking well.
Last edited:
Nice spotting, thanks
Wasn't my spotting. Some random player taught me.

Oh no ! not a two-hander !... hmmm, right, he's on our side
As usual now, i'm coming this evening for my friday training session. I'll try ton increase my skills as archer/crossbowman, possibly also try to learn how to fight with a single-hand weapon and no shield.
As usual now, i'm coming this evening for my friday training session. I'll try ton increase my skills as archer/crossbowman, possibly also try to learn how to fight with a single-hand weapon and no shield.
Went training today, learned that i am most skilled with two handed axes
Oh no ! not a two-hander !... hmmm, right, he's on our side
As usual now, i'm coming this evening for my friday training session. I'll try ton increase my skills as archer/crossbowman, possibly also try to learn how to fight with a single-hand weapon and no shield.
Hehe, are we allowed to like two-handers even if they are on our team?
I might come and train tonight Gigau, I was supposed to be on a birthday party but I'm feeling sick so I'm not sure if I'll go.
We need to raise some more dollars for the server before next payment. How much and when can be seen in the first page of this thread.
Anyone playing right now?
Anyone playing right now?
how much do we need?
also I tried to play today with sami....but im too ill....the flu is killin my head...
also I tried to play today with sami....but im too ill....the flu is killin my head...
We need to raise some more dollars for the server before next payment. How much and when can be seen in the first page of this thread.
Anyone playing right now?
I said i'd give about 5 euros per month... hadn't given for march and april. didn't my donation :
Account Credit Balance: $80.62
EDIT : couldn't play today, was out for the day with friends.